If you ask me, making conversation heart candies at home is way more fun than buying them at the store.
These sweet little candies bring back memories of grade school Valentine’s Day parties, but homemade ones let you write whatever messages you want. The basic recipe uses powdered sugar, corn syrup, and natural flavoring to create a soft, moldable dough.
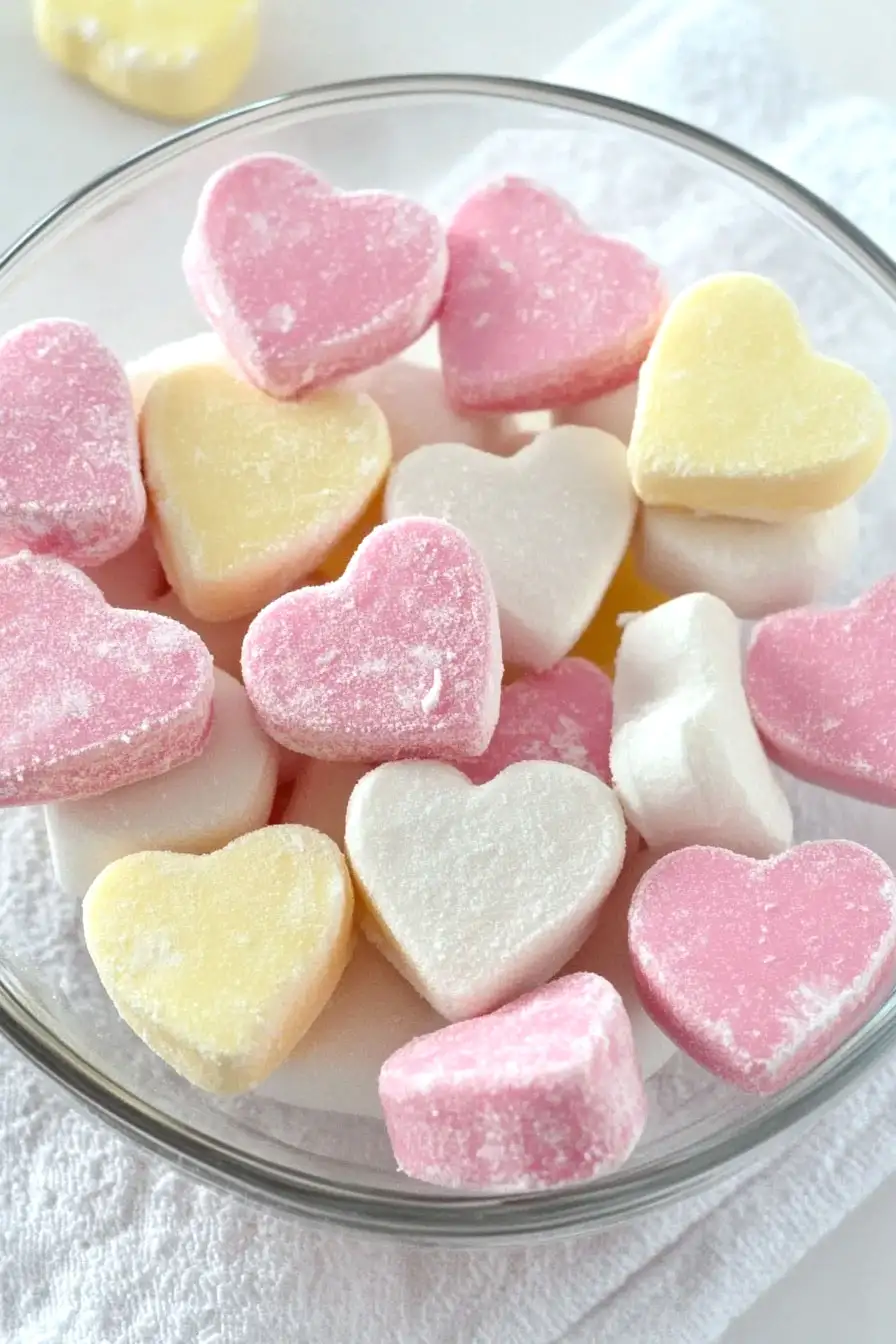
They’re rolled out just like sugar cookies, but instead of baking, they’re left to dry until they reach that classic chalky-yet-sweet texture we all know. You can keep it traditional with pink and white, or mix up different colors to match any holiday.
It’s a fun weekend project that kids love helping with, perfect for making memories (and sweet treats) together.

Why You’ll Love These Conversation Hearts
- Homemade version of a classic – Making your own conversation hearts lets you create custom messages and colors, perfect for adding a personal touch to Valentine’s Day treats.
- Natural ingredients – Unlike store-bought versions, you control exactly what goes into these candies – using natural food coloring and flavors means no artificial ingredients.
- Fun activity – This is a great project to do with kids or friends – everyone can help create their own colors, messages, and flavor combinations.
- Make-ahead friendly – These candies can be made well in advance of Valentine’s Day, making them perfect for gifting or party planning.
- Customizable flavors – You can use any flavor extracts you like – from classic vanilla to fun combinations like cherry or orange – making each batch uniquely yours.
What Kind of Dextrose Should I Use?
For making conversation hearts, you’ll want to use pure powdered dextrose, which is sometimes labeled as glucose powder or corn sugar in stores. While it might be tempting to substitute regular granulated sugar, dextrose is essential here because it creates the specific texture and mouthfeel that makes these candies authentic. You can find food-grade dextrose at specialty baking stores or online retailers, but make sure it’s labeled as fine powder rather than crystals. If your dextrose feels grainy, you can run it through a food processor to make it finer, which will help it blend more smoothly with the other ingredients.

Options for Substitutions
Making these sweet conversation hearts at home allows for some ingredient flexibility, though a few items are must-haves:
- Dextrose: This is a key ingredient that’s hard to substitute since it creates the right texture. Regular sugar won’t work the same way, so try to source dextrose (also called glucose powder) for best results.
- Arrowroot starch: You can swap this with cornstarch in equal amounts. Potato starch also works well as a 1:1 replacement.
- Gelatin: For a vegetarian version, use agar agar powder, but use only half the amount since it’s stronger than gelatin. Keep in mind the texture might be slightly different.
- Natural food coloring: Regular food coloring works fine here. You can also try natural alternatives like beet powder for pink, matcha for green, or turmeric for yellow – just add small amounts at a time.
- Food coloring pens: If you can’t find food coloring pens, you can mix food coloring with a tiny bit of vodka to create a paint, then use a small brush to write messages.
- Simple syrup: The recipe’s simple syrup uses dextrose, but if you’re running low, you can skip it – it just helps with shine and texture but isn’t crucial to the recipe’s success.
Watch Out for These Mistakes While Making
The trickiest part of making conversation hearts is getting the right consistency – too much moisture will make your candy paste sticky and impossible to roll, while too little will leave it crumbly and difficult to work with. To achieve the perfect texture, add water gradually, just a few drops at a time, until the mixture forms a play-dough-like consistency that’s easy to handle. Another common mistake is rushing the drying process – these candies need at least 24 hours to dry completely at room temperature, and trying to speed this up in the oven can result in melted or misshapen hearts. When adding flavor extracts and food coloring, start with small amounts and adjust to taste – it’s much easier to add more than to fix an overpowering flavor or too-bright color. For the best results, work with small batches of dough at a time while keeping the rest covered with plastic wrap to prevent it from drying out too quickly.
What to Serve With Conversation Heart Candies?
These sweet little candies make perfect additions to any Valentine’s Day spread or dessert table! I like to serve them alongside other holiday treats like chocolate-covered strawberries, sugar cookies, or pink-frosted cupcakes for a festive display. Since conversation hearts are pretty sweet on their own, pair them with some unsweetened hot chocolate or coffee to balance out the flavors. You can also use them as cute decorations on top of vanilla ice cream sundaes or arrange them around the edge of a chocolate cake for an extra special touch.
Storage Instructions
Keep Fresh: These homemade conversation hearts need to be kept in an airtight container at room temperature. Place pieces of parchment paper between layers to prevent them from sticking together. When stored properly, they’ll stay good for up to 3 weeks – plenty of time to share the love!
Protect: Keep these sweet treats away from moisture and humidity, as they can get sticky or start to dissolve. A cool, dry pantry or cupboard is the perfect spot. Avoid storing them in the refrigerator, as the moisture can make them lose their shape and texture.
Gift: Planning to give these as gifts? Pack them in small cellophane bags or decorative tins lined with parchment paper. They’ll stay fresh for about 2 weeks when packaged this way, making them perfect for Valentine’s Day treats or party favors.
| Preparation Time | 30-45 minutes |
| Cooking Time | 10-15 minutes |
| Total Time | 24-25 hours |
| Level of Difficulty | Medium |
Estimated Nutrition
Estimated nutrition for the whole recipe (without optional ingredients):
- Calories: 1600-1800
- Protein: 0-5 g
- Fat: 0-2 g
- Carbohydrates: 400-420 g
Ingredients
- 1 tsp simple syrup
- 3 tsp arrowroot starch
- Flavor extracts (like McCormick pure vanilla extract)
- Food coloring pens (for writing messages)
- Heart-shaped fondant or cookie cutter (smaller sizes work best for candy)
- 5 tbsp water
- Natural food coloring (such as Watkins pure food colors)
- 1 tsp gelatin
- 1 lb dextrose (powdered if possible for smoother texture)
Step 1: Powder the Dextrose
Start by making sure the dextrose is finely powdered.
Mix the arrowroot starch and dextrose together and grind them in a Vitamix, other high-powered blender, or coffee grinder until you achieve a fine powder.
This ensures your candies have a smooth texture.
Step 2: Prepare the Simple Syrup
Create a simple syrup by combining 2 tablespoons of regular dextrose with 1 tablespoon of water in a saucepan.
Heat the mixture gently until the dextrose has completely dissolved and transformed into a thickened syrup.
This will act as a binder in your candy.
Step 3: Dissolve the Gelatin
In a separate saucepan, combine the gelatin with ¼ cup plus 1 tablespoon of water and 1 teaspoon of the simple syrup you prepared earlier.
Heat the mixture until the gelatin is fully dissolved, ensuring it blends into the candy dough smoothly.
Step 4: Form the Dough
In a stand mixer, combine 1 pound of the finely powdered dextrose with the gelatin liquid.
Mix on medium speed until a dough begins to form.
The dough should be pliable and well-mixed, serving as the base for your candies.
Step 5: Color and Flavor the Dough
Divide the dough into sections, depending on how many different colors and flavors you want.
To each section, add your desired food coloring and flavor extracts.
Mix each section until the color and flavor are evenly distributed throughout the dough.
Step 6: Shape the Candy
Dust a clean working surface with some of the finely powdered dextrose to prevent sticking.
Roll out each section of dough to a thickness of about 1/8 to 1/4 inch.
Use heart-shaped fondant cutters (or any shape of your choice) to cut out the candies from the dough.
Step 7: Dry the Candies
Carefully place the cut-out candy shapes onto a parchment-lined cookie sheet.
Ensure they are spaced out to allow for proper drying.
Let the candies dry undisturbed for at least 24 hours to achieve the perfect texture.
Once dry, your candies are ready to enjoy or store for later!
