If you ask me, crispy chicken tenders are always a crowd favorite.
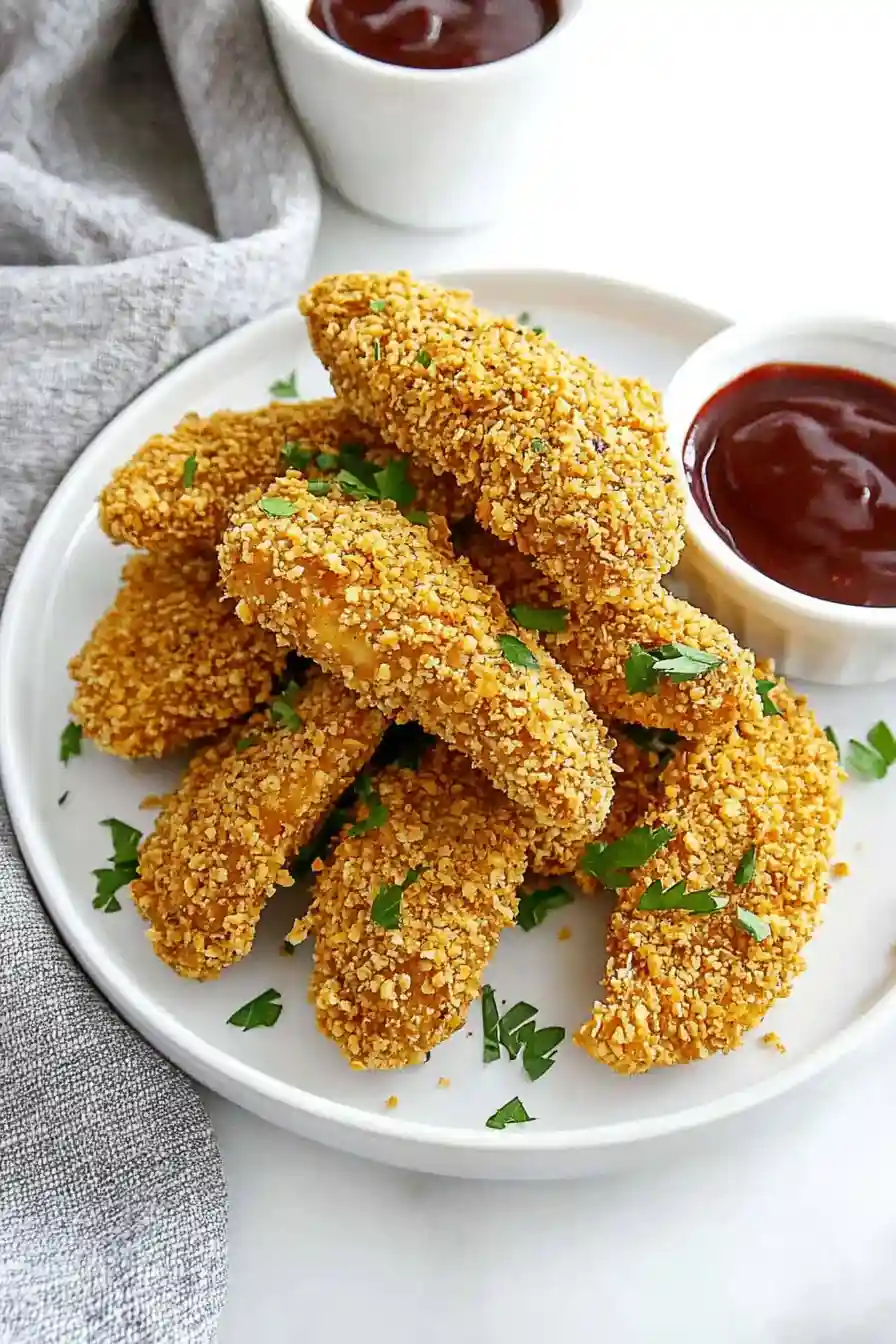
These homestyle tenders use crushed corn flakes for an extra crunchy coating that both kids and adults love. The cereal gives them that golden-brown color and satisfying crunch you’d expect from your favorite restaurant.
They’re coated in a simple blend of seasonings and baked until perfectly crisp, making them a bit lighter than the deep-fried version. The corn flake coating sticks beautifully to the chicken, creating that classic crackly exterior we all crave.
It’s a no-fuss dinner that brings the comfort of childhood favorites to your table, perfect for busy weeknight meals.
Why You’ll Love These Chicken Tenders
- Extra crunchy coating – The crushed corn flakes create an incredibly crispy exterior that stays crunchy, making these way better than regular breadcrumb-coated tenders.
- Kid-friendly meal – These homemade tenders are a guaranteed hit with children, and you’ll feel good knowing exactly what goes into them – no mystery ingredients here!
- Simple ingredients – You probably have most of these basic ingredients in your pantry already, and corn flakes are an affordable alternative to traditional breadcrumbs.
- Healthier option – These tenders are baked instead of fried, making them a lighter choice than restaurant versions while still maintaining that satisfying crunch.
What Kind of Corn Flakes Should I Use?
Regular, plain corn flakes are your best bet for this recipe – you don’t need anything fancy or sugar-coated. Store brands work just as well as name brands like Kellogg’s, so feel free to save a few bucks there. When crushing your corn flakes, you’ll want them fine enough to coat the chicken but not so powdery that you lose the signature crunch – aim for pieces about the size of panko breadcrumbs. A good trick is to put them in a zip-top bag and crush them with a rolling pin, checking the texture as you go. If you’re planning ahead, you can even buy pre-crushed corn flake crumbs, though they tend to be a bit more expensive than crushing your own.

Options for Substitutions
This crunchy chicken recipe is pretty adaptable – here are some easy swaps you can try:
- Chicken tenders: No tenders? No worries! You can use chicken breasts cut into strips, or even chicken thighs cut into tender-sized pieces. Just keep the pieces similar in size for even cooking.
- Corn flakes: While corn flakes give the best crunch, you can substitute with panko breadcrumbs, crushed Rice Krispies, or even crushed potato chips. Each will give you a different but equally tasty coating.
- Eggs and milk: For a dairy-free version, you can use non-dairy milk like almond or soy milk. You can also replace the egg mixture with buttermilk or mayo thinned with a bit of water.
- Seasonings: Feel free to mix up the seasonings based on what you have. Italian seasoning, ranch seasoning mix, or cajun spice blend all work great. Just keep the total amount of seasonings similar.
- Cooking spray: While spray oil helps get an even coating, you can brush with regular oil instead. Just make sure all the breaded chicken pieces get a light coating of oil for proper browning.
Watch Out for These Mistakes While Cooking
The biggest challenge when making corn flake chicken tenders is ending up with a coating that falls off during cooking – to prevent this, make sure to pat your chicken completely dry with paper towels before starting the breading process.
Another common mistake is not crushing the corn flakes finely enough, which can lead to uneven coating and burning – pulse them in a food processor or place them in a zip-top bag and crush with a rolling pin until they’re fine but not powdery.
The temperature of your oven is crucial – setting it too high will burn the corn flake coating before the chicken is fully cooked, so stick to 375°F and arrange the tenders on a wire rack set over a baking sheet to ensure even cooking and a crispy bottom.
For the crunchiest results, avoid stacking or overlapping the tenders while baking, and resist the urge to flip them more than once during cooking – too much handling can cause the coating to fall off.

What to Serve With Corn Flake Chicken Tenders?
These crunchy chicken tenders are perfect for dipping, so I always start with a few sauce options like honey mustard, ranch, or BBQ sauce on the side. For sides, you can’t go wrong with classic french fries or sweet potato fries, but I often serve them with a crisp coleslaw to add some freshness to the meal. If you’re looking to add some green to your plate, a simple garden salad or steamed broccoli works great, and the kids never complain when there’s mac and cheese involved. These tenders are also really good sliced up and served on top of a caesar salad for a more grown-up twist.
Storage Instructions
Keep Fresh: These crunchy chicken tenders stay good in an airtight container in the fridge for up to 3 days. I like to place a paper towel in the container to help absorb any excess moisture and keep that corn flake coating nice and crispy.
Freeze: Want to meal prep? These tenders freeze really well! Let them cool completely, then place them on a baking sheet and freeze until solid (about 1-2 hours). Transfer to a freezer bag and they’ll keep for up to 3 months. This method prevents them from sticking together.
Warm Up: To get that crispy coating back, pop the tenders in the oven at 375°F for about 10-15 minutes if refrigerated, or 20-25 minutes if frozen. The air fryer works great too – just heat them at 375°F for 5-7 minutes, flipping halfway through. Avoid using the microwave as it can make the coating soggy.
| Preparation Time | 15-20 minutes |
| Cooking Time | 25-40 minutes |
| Total Time | 40-60 minutes |
| Level of Difficulty | Easy |
Estimated Nutrition
Estimated nutrition for the whole recipe (without optional ingredients):
- Calories: 1500-1700
- Protein: 150-160 g
- Fat: 70-90 g
- Carbohydrates: 130-150 g
Ingredients
For the chicken:
- 3 lb chicken tenders (patt dry for crispier coating)
For the egg wash:
- 2 large eggs (beaten lightly with a fork)
- 1/4 cup milk
For the coating:
- 1 tsp paprika
- 1 tsp salt
- 4 cups corn flakes (finely crushed, I use Kellogg’s brand)
- 1 tsp garlic seasoning
- 1 tsp onion seasoning
- 1/2 tsp black pepper
For cooking:
- cooking oil spray (I use Pam Original)
Step 1: Prepare the Baking Setup
Preheat your oven to 400°F.
Line a rimmed sheet pan with parchment paper and place a wire rack on top of the pan.
Spray the rack with nonstick cooking spray to prevent the chicken from sticking.
Step 2: Coat the Chicken Tenders
In a large bowl, whisk together the eggs and milk until well combined.
Submerge the chicken tenders in the mixture, ensuring they’re coated thoroughly.
In a separate large zip-top bag, add the crushed corn flakes, along with onion powder, garlic powder, paprika, salt, and pepper.
Shake the bag well to mix all the ingredients.
Step 3: Bread the Chicken
Remove a piece of chicken from the egg mixture, allowing any excess to drip off.
Place it into the bag of seasoned corn flakes and shake to coat the chicken evenly.
If needed, use your hand to pat the coating onto the chicken for better adhesion.
Repeat this process with all chicken tenders.
Step 4: Bake in the Oven
Place the coated chicken tenders on the prepared wire rack.
Lightly spray the tops of the tenders with cooking spray.
Bake them in the oven for 15-25 minutes, depending on the size of your pieces, until the internal temperature reaches 160°F.
Once done, let the chicken rest for about 5 minutes.
During this resting time, the chicken will continue to cook and reach the ideal temperature of 165°F.
Step 5: Air Fryer Option
If you’re using an air fryer, preheat it to 400°F and lightly grease the bottom of the basket or shelf with nonstick cooking spray.
Place the chicken tenders in a single layer in the air fryer basket.
Spray the tops of the chicken with cooking spray.
Air fry for 10-15 minutes, flipping the chicken halfway through to ensure even cooking.
Make sure the internal temperature has reached 160°F before serving.
Step 6: Serve
Once the chicken tenders are done, either from the oven or air fryer, they’re ready to serve.
Enjoy them hot with your favorite dipping sauce or a side dish.
Bon appétit!
