Making a Japanese cheesecake at home might seem like a daunting task, especially if you’ve seen those perfectly smooth, jiggly versions all over social media. Between precise measurements, water baths, and the fear of dreaded cracks, traditional recipes can feel overwhelming when you’re just trying to satisfy a dessert craving.
That’s where this rice cooker Japanese cheesecake comes in: it’s a fuss-free approach that gives you that same light, fluffy texture without all the usual stress. Plus, it uses a kitchen appliance you probably already have sitting on your counter.
Why You’ll Love This Rice Cooker Cheesecake
- No oven needed – If you have a rice cooker, you can make this amazing cheesecake without ever turning on your oven – perfect for hot summer days or small kitchens.
- Light and fluffy texture – Unlike dense traditional cheesecakes, this Japanese-style version is airy and soft, making it feel less heavy after a meal.
- Simple ingredients – You only need basic pantry staples and cream cheese to make this dessert – no special or hard-to-find items required.
- Foolproof method – The rice cooker does all the work for you, taking the guesswork out of baking temperatures and water baths that traditional cheesecakes need.
What Kind of Cream Cheese Should I Use?
For Japanese cheesecake, regular block-style cream cheese (like Philadelphia) is your best bet. Make sure to get the full-fat version rather than reduced-fat cream cheese, as this will give you the right texture and prevent your cheesecake from becoming grainy. The most important thing is to let your cream cheese come to room temperature before using it – this usually takes about an hour on the counter. Cold cream cheese will leave lumps in your batter, while properly softened cream cheese will blend smoothly with the other ingredients. If you’re in a hurry, you can cut the cream cheese into smaller cubes to help it soften faster.

Options for Substitutions
While Japanese cheesecake requires some specific ingredients for the right texture, here are some substitutions you can try:
- Cream cheese: This is a must-have ingredient that shouldn’t be substituted, as it’s the foundation of the cheesecake. Just make sure it’s at room temperature for smooth mixing.
- Cake flour: If you don’t have cake flour, you can make your own by mixing all-purpose flour with cornstarch. For every 1 cup of all-purpose flour, remove 2 tablespoons and replace with 2 tablespoons cornstarch. Sift together several times.
- Skim milk: Any type of milk works here – whole milk, low-fat, or even plant-based options like soy milk. Just note that using whole milk will make a richer cake, while plant-based milk might result in a slightly different texture.
- Lemon juice: You can swap this with lime juice, or if you’re out of citrus, try 2 tablespoons of orange juice or 1½ tablespoons of white vinegar.
- White sugar: Regular granulated sugar works best here, but you can use caster sugar if you have it. Avoid brown sugar or liquid sweeteners as they’ll change the texture too much.
Watch Out for These Mistakes While Baking
The biggest challenge when making rice cooker cheesecake is getting the temperature right – since rice cookers vary in heating power, you’ll need to run multiple cooking cycles (usually 2-3 times) until the center is fully set, pressing “cook” again each time the rice cooker switches to “warm” mode.
Room temperature ingredients are crucial for success – cold cream cheese will leave lumps in your batter, so make sure to let your cream cheese and eggs sit out for at least 30 minutes before starting, and whisk thoroughly until completely smooth.
When separating your eggs, even a tiny bit of yolk in your whites can prevent them from whipping properly, so separate them carefully and make sure your bowl and beaters are completely grease-free before whipping the whites to soft peaks.
To prevent your cheesecake from deflating too much as it cools, avoid opening the rice cooker lid during cooking, and once done, let it cool gradually in the pot for 15-20 minutes before removing – sudden temperature changes can cause dramatic sinking.
What to Serve With Japanese Cheesecake?
This light and fluffy cheesecake is perfect with a cup of hot green tea or coffee, which helps balance its subtle sweetness. Since Japanese cheesecake is less rich than traditional cheesecake, it pairs really nicely with fresh berries or a simple fruit compote on the side. I like to serve mine with a small scoop of matcha ice cream or a drizzle of caramel sauce when I’m feeling fancy. You can also add a dollop of whipped cream and a mint leaf for a simple but pretty presentation.
Storage Instructions
Keep Cool: This rice cooker cheesecake needs to be kept in the refrigerator in an airtight container. It’ll stay fresh and yummy for up to 4 days. I like to place it on a plate and cover it with plastic wrap or pop it in a cake container to keep it from absorbing other food smells.
Freeze: You can freeze individual slices wrapped in plastic wrap and aluminum foil for up to 2 months. Just make sure to label them with the date! When you’re craving a slice, move it to the fridge the night before you want to eat it.
Serve: For the best taste and texture, let your cheesecake sit at room temperature for about 15-20 minutes before serving. This helps soften it up just enough to bring out all those lovely flavors. If you’ve frozen it, thaw it overnight in the fridge, then follow the same room temperature rule.
| Preparation Time | 20-30 minutes |
| Cooking Time | 40-50 minutes |
| Total Time | 60-80 minutes |
| Level of Difficulty | Medium |
Estimated Nutrition
Estimated nutrition for the whole recipe (without optional ingredients):
- Calories: 600-700
- Protein: 15-20 g
- Fat: 40-50 g
- Carbohydrates: 50-60 g
Ingredients
For the cake:
- 2 eggs, separated
- 2 tbsp lemon juice (freshly squeezed for best flavor)
- 5 tbsp cake flour
- 6 3/4 fl oz milk
- 6 1/2 tbsp white sugar
- 8 oz cream cheese (softened to room temperature for easier mixing)
For the topping:
- powdered sugar (for dusting before serving)
Step 1: Prepare and Soften the Cream Cheese
In a large glass mixing bowl, add the cream cheese.
Ensure the cream cheese is very soft to avoid lumps.
You can gently heat it in the microwave at 10-second intervals (cover the top of the bowl with a paper towel to prevent splatter) until it is smooth and whiskable, resembling frosting in texture.
Step 2: Mix in the Wet Ingredients
Once the cream cheese is smooth, add the egg yolks to the bowl and whisk until the batter is smooth.
Next, incorporate the sugar and whisk again until well combined and smooth.
Finally, add the lemon juice and mix until the batter is perfectly smooth.
Step 3: Add and Sift the Dry Ingredients
Sift the cake flour into the batter.
This step is crucial to avoid clumps.
If you don’t have a sifter, use a sieve and gently tap it to sift the flour into the batter.
Once sifted, whisk until the batter is smooth.
Step 4: Incorporate the Milk
Add the milk to the batter and gently whisk until everything is smoothly combined, ensuring no lumps remain.
Step 5: Whip and Fold the Egg Whites
In a separate clean bowl, whip the egg whites on high speed using a stand mixer until stiff peaks form.
Gradually fold the egg whites into the batter in three batches.
Be gentle to retain the airiness of the whipped whites; some small lumps and streaks of egg whites are okay.
Step 6: Cook the Cake in a Rice Cooker
Thoroughly grease the interior of your rice cooker pot (a 5 1/2 cup rice cooker is ideal).
Pour the batter into the pot.
If your rice cooker has a “cake” function, use that option; if not, select the white rice setting, and you may need to run a second cycle.
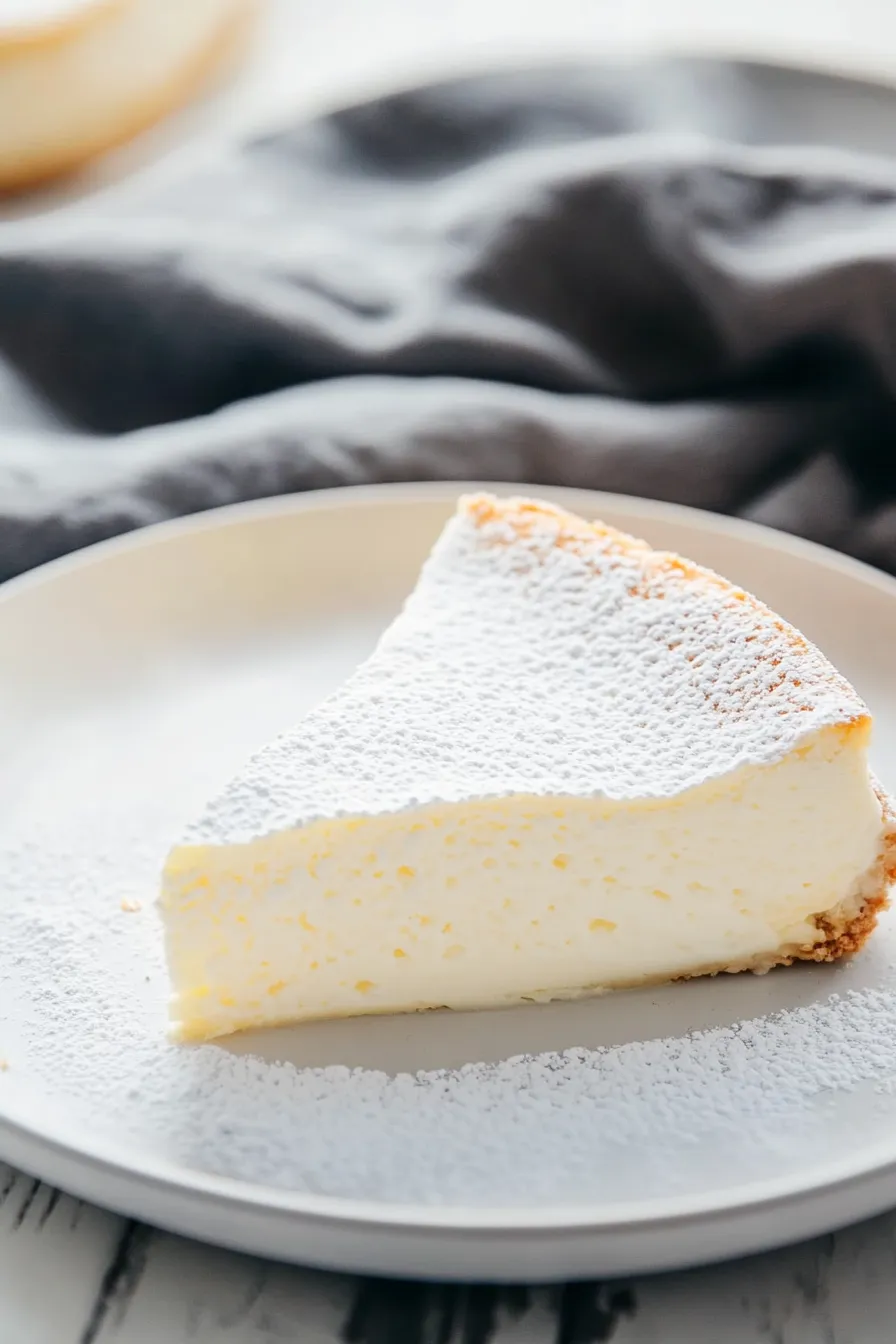
Cook the cake for about 40 minutes, checking towards the end for doneness: the cake should pull away from the pot’s sides, have an even color on the surface, and bounce back when touched.
Step 7: Cool and Set the Cake
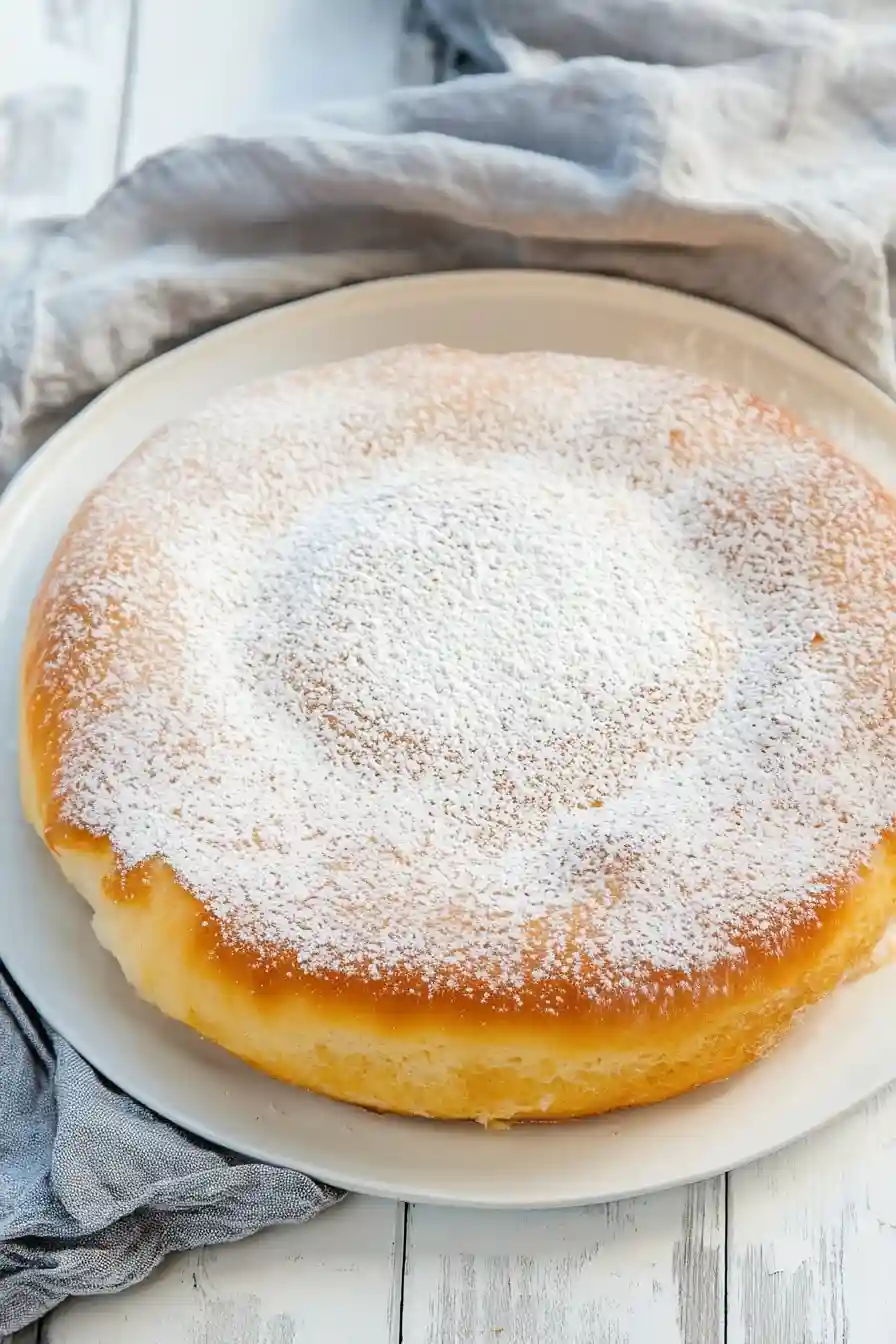
Once cooked, place a plate over the rice cooker pot and carefully invert it to transfer the cake onto the plate.
Refrigerate the cake for at least one hour to set, enhancing the cheese flavor and sweetness.
Dust with powdered sugar before serving to finish.
Store any uneaten cake in the fridge to keep it fresh.
