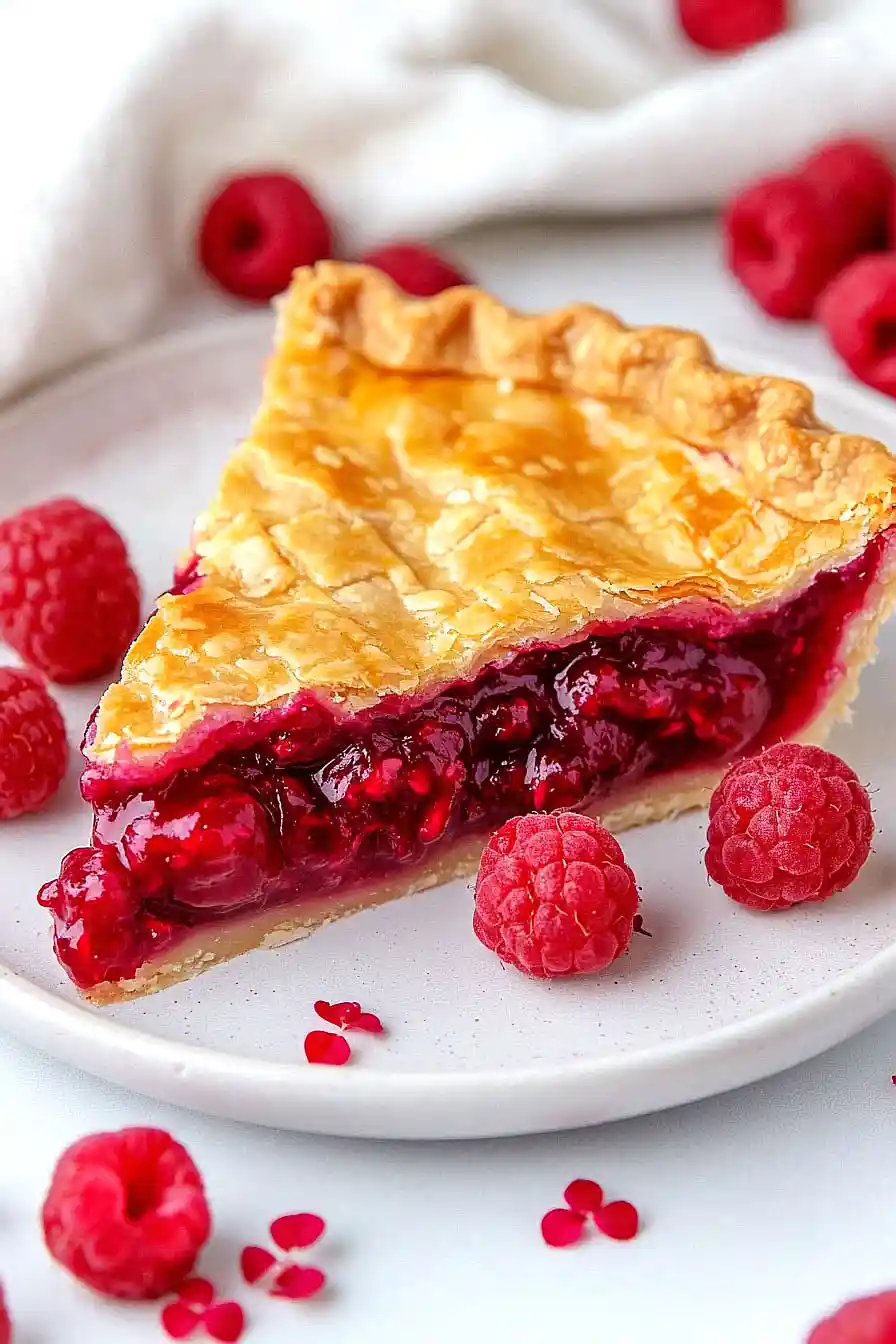
There’s something truly special about a homemade raspberry pie cooling on the kitchen counter. The sweet smell of berries always takes me back to summer afternoons at my grandmother’s house. I’ve probably made hundreds of pies over the years, but raspberry remains one of my favorites. It’s simple, classic, and never fails to make people smile.
I love how this pie doesn’t need much fuss or fancy ingredients to be good. Just fresh (or frozen) raspberries, a buttery crust, and a little patience while it bakes. Sometimes I’ll make it the night before if I know company’s coming over – it tastes even better the next day when all the flavors have had time to settle.
Want to know the best part? This recipe is pretty forgiving, even if you’re new to pie-making. Trust me, I’ve had my share of not-so-perfect pies, but they’ve always tasted good. That’s the beauty of working with raspberries – they’re naturally sweet and flavorful all on their own.

Why You’ll Love This Raspberry Pie
- Simple ingredients – With just a handful of basic ingredients like fresh raspberries, sugar, and pie crust, you can create this classic dessert without any fancy or hard-to-find items.
- Perfect balance of flavors – The natural tartness of raspberries combined with just the right amount of sugar creates a filling that’s not too sweet and not too tart – it’s just right.
- Make-ahead friendly – You can prepare this pie in advance and store it in the fridge, making it perfect for holidays, gatherings, or when you want to plan ahead.
- Classic comfort dessert – There’s nothing quite like a homemade fruit pie – the flaky crust and warm filling make this the kind of dessert that brings back childhood memories.
What Kind of Raspberries Should I Use?
Fresh raspberries are the top choice for pie-making, but frozen ones can work just as well if fresh aren’t in season. If you’re using frozen berries, don’t thaw them first – add them to your pie while they’re still frozen to prevent them from getting too mushy and releasing excess liquid. When shopping for fresh raspberries, look for ones that are bright red, firm, and free from mold or mushiness. The berries should easily pull away from their container and shouldn’t look wet or squished. Keep in mind that raspberries are quite delicate, so plan to use them within a day or two of purchase for the best results.
Options for Substitutions
This classic raspberry pie recipe can be adapted with several ingredient swaps if needed:
- Raspberries: Fresh or frozen raspberries work equally well here. You can also try a mix of berries – blackberries, boysenberries, or even strawberries can be used. Just keep the total amount to 4 cups.
- Tapioca: If you don’t have tapioca, you can use cornstarch (2 tablespoons) or all-purpose flour (4 tablespoons) as thickeners. Note that flour might make the filling slightly cloudy.
- Half-and-half cream: For the pie crust wash, you can use milk, heavy cream, or even a beaten egg instead. Each will give you a slightly different finish on the crust.
- Store-bought pie crust: While store-bought crust is convenient, you can make your own using flour, butter, salt, and ice water. Just remember to keep ingredients cold for the flakiest crust.
- White sugar: Brown sugar can be used for a deeper flavor, or reduce sugar to 3/4 cup if your berries are particularly sweet. Sugar substitutes aren’t recommended as they can affect the texture of the filling.
Watch Out for These Mistakes While Baking
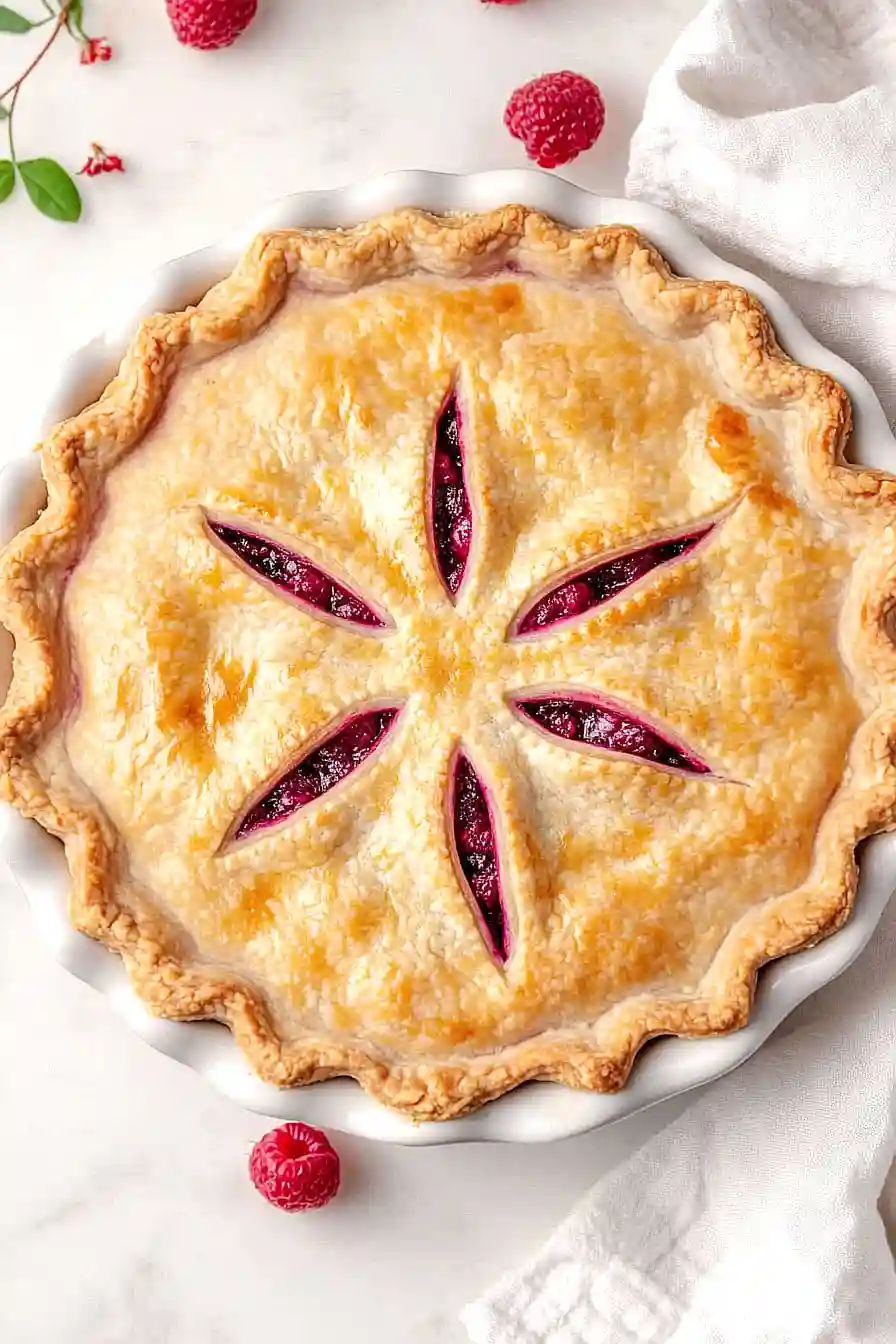
The biggest challenge when making raspberry pie is dealing with excess moisture – to prevent a soggy bottom crust, try sprinkling a tablespoon of tapioca directly on the bottom crust before adding the filling, and make sure to let your berries drain in a colander for about 15 minutes. Another common mistake is underbaking the pie, which can lead to a raw bottom crust – for perfect results, start baking at 425°F for 15 minutes to set the crust, then reduce to 375°F and continue baking until the filling bubbles consistently through the vents. To achieve that picture-perfect golden brown top crust, don’t skip brushing it with half-and-half cream, and remember to cut proper vents in the top crust to allow steam to escape – otherwise, your filling might bubble over and create a mess in your oven. For the best texture and easier slicing, resist the temptation to cut into the pie while it’s still hot – letting it cool for at least 3 hours allows the filling to set properly.
What to Serve With Raspberry Pie?
This sweet and tart raspberry pie practically begs for a scoop of vanilla ice cream on top! If you’re not in the mood for ice cream, a dollop of freshly whipped cream or a pour of cold heavy cream works just as well. I love serving this pie with a hot cup of coffee or tea to balance out the sweetness – plus there’s something so cozy about warm pie and coffee. For an extra special touch, try adding a few fresh raspberries on the side of each plate, or sprinkle some powdered sugar over the top right before serving.
Storage Instructions
Counter or Fridge: Your raspberry pie can hang out on the counter for about 2 days if covered with foil or plastic wrap. If you want it to last longer, pop it in the fridge where it’ll stay good for up to 5 days. Just keep it covered to prevent it from drying out or picking up other flavors.
Freeze: This pie freezes really well! Let it cool completely, then wrap it tightly in plastic wrap and aluminum foil. It’ll keep in the freezer for up to 4 months. You can freeze it whole or in individual slices – perfect for when you need a quick dessert fix!
Enjoy Later: When you’re ready to dig into your frozen pie, let it thaw overnight in the fridge. Want it warm? Pop it in a 350°F oven for about 15-20 minutes. The crust might not be quite as crispy as fresh-baked, but it’ll still be delicious with a scoop of vanilla ice cream!
| Preparation Time | 15-20 minutes |
| Cooking Time | 45-50 minutes |
| Total Time | 60-70 minutes |
| Level of Difficulty | Medium |
Estimated Nutrition
Estimated nutrition for the whole recipe (without optional ingredients):
- Calories: 2200-2400
- Protein: 15-20 g
- Fat: 80-90 g
- Carbohydrates: 350-370 g
Ingredients
For the crust:
- 1 package double pie crust pastry (thawed according to package directions)
For the filling:
- 1 tbsp fresh lemon juice (squeezed from about half a lemon)
- 1 cup granulated sugar
- 4 cups fresh raspberries
- 4 tsp unsalted butter (cut into small pieces)
- 2.5 tbsp instant tapioca (preferably Minute Tapioca, for thickening)
- 1/4 tsp ground cinnamon
- 1/8 tsp salt
For the topping:
- 1 tbsp half-and-half
Step 1: Prepare the Pie Crust
- 1 package (14.1 oz) double-crust pie dough, thawed
Preheat your oven to 425 degrees F (220 degrees C).
Meanwhile, gently fit one of the thawed pie crusts into the bottom and sides of a 9-inch pie plate, smoothing out any air pockets.
This creates the base to hold your delicious fruit filling.
Step 2: Make the Raspberry Filling
- 4 cups fresh raspberries
- 1 cup granulated sugar
- 2 1/2 tbsp tapioca
- 1 tbsp fresh lemon juice
- 1/4 tsp ground cinnamon
- 1/8 tsp salt
- 4 tsp unsalted butter
In a large bowl, combine the fresh raspberries, granulated sugar, tapioca, fresh lemon juice, ground cinnamon, and salt.
Gently toss until the raspberries are thoroughly coated and the mixture is evenly combined.
Pour the mixture into the prepared pie crust, spreading the filling evenly.
Dot the top of the filling with the unsalted butter, distributing the pieces across the surface.
I like to use cold butter, as it melts more slowly during baking and helps yield a flakier crust.
Step 3: Assemble and Top the Pie
- 1 package (14.1 oz) double-crust pie dough, thawed
- 1 tbsp half-and-half
Unroll the second pie crust and carefully place it over the raspberry filling in the pie plate.
Flute or crimp the edges of both crusts together to seal the pie.
Use a sharp knife to cut several small slits in the top crust to allow steam to escape during baking.
Gently brush the top of the pie with half-and-half for a golden, shiny finish.
Step 4: Bake the Pie
Place the assembled pie in the preheated oven and bake for 15 minutes at 425 degrees F (220 degrees C).
After 15 minutes, reduce the oven temperature to 375 degrees F (190 degrees C) and continue baking for an additional 30 to 35 minutes, or until the crust is golden brown and the filling is bubbling.
If the edges brown too quickly, you can cover them with foil to prevent overbrowning.
Step 5: Cool and Serve
Remove the pie from the oven and let it cool completely on a wire rack before slicing.
Allowing the pie to cool ensures the filling sets, making it easier to cut clean slices.
I always wait until the pie is fully cooled—it’s worth the patience for neat servings and maximum flavor.
