I’ve always been the person who gets a little nervous about making dessert for dinner parties. Don’t get me wrong – I can whip up a mean chocolate chip cookie or apple pie. But when I want something that looks fancy without making me want to hide in the kitchen all day, I turn to fruit tarts.
There’s something about a vanilla custard fruit tart that makes people think you spent hours in the kitchen. The truth is, it’s way easier than it looks. You make the crust, whip up some custard, and arrange whatever fruit you have on hand. No fancy piping skills needed.
The best part? You can make most of it ahead of time. I’ll bake the tart shell in the morning and make the custard while my kids are watching cartoons. Then when guests arrive, I just arrange the fruit and pretend like it was no big deal.
Why You’ll Love This Vanilla Custard Fruit Tart
- Impressive presentation – This beautiful tart looks like it came from a fancy bakery, but you can make it right at home with simple techniques.
- Make-ahead friendly – You can prepare the crust and custard components ahead of time, then assemble when you’re ready to serve, making it perfect for entertaining.
- Rich, creamy vanilla custard – The homemade custard filling is silky smooth and packed with real vanilla flavor that beats any store-bought version.
- Easy graham cracker crust – No rolling or chilling required – just crush, mix, and press into your tart pan for a sweet, crunchy base.
- Customizable with seasonal fruit – Top it with whatever fresh fruit looks best at the market, from berries in summer to citrus in winter.
What Kind of Milk Should I Use?
For the custard filling, you have a couple of great options when it comes to milk. Whole milk will give you a smooth, creamy custard that’s rich but not too heavy, while half and half will create an even richer, more indulgent result. I wouldn’t recommend going lower than whole milk since the fat content is what helps create that silky custard texture we’re after. If you only have 2% milk on hand, it will still work, but your custard might be a bit thinner than ideal. Just make sure whatever milk you choose is fresh – nothing ruins a custard faster than milk that’s starting to turn.
Options for Substitutions
This tart is pretty forgiving when it comes to swapping ingredients, so here are some easy substitutions:
- Graham crackers: You can easily swap these for vanilla wafers, digestive biscuits, or even shortbread cookies. Just crush them up the same way and you’ll get a similar texture for your crust.
- Whole milk or half & half: Heavy cream will make your custard extra rich, while 2% milk works fine too – just expect a slightly lighter texture. Avoid skim milk as it won’t give you that creamy consistency.
- Vanilla bean: If you don’t have a vanilla bean, use 2½ teaspoons of good vanilla extract instead. Add it after you remove the custard from heat to preserve the flavor.
- Brown sugar in crust: Regular granulated sugar works just fine here, or you can try coconut sugar for a slightly different flavor profile.
- Cornstarch: You can substitute with the same amount of all-purpose flour, but whisk it really well to avoid lumps. The custard might be slightly less glossy but will taste just as good.
- Unsalted butter: Salted butter is fine to use – just reduce the added salt in the recipe by half to balance things out.
Watch Out for These Mistakes While Baking
The biggest mistake when making vanilla custard is cooking it over high heat, which can cause the eggs to scramble and turn your smooth custard into a lumpy disaster – always use medium-low heat and stir constantly with a whisk.
Another common error is not tempering the egg yolks properly by adding the hot milk too quickly, so slowly drizzle about half the warm milk into the yolks while whisking continuously before adding the mixture back to the pan.
Your graham cracker crust can easily become soggy if you add the custard while it’s still warm, so make sure both the crust and custard are completely cooled before assembly.
Don’t skip pressing plastic wrap directly onto the surface of your finished custard while it chills – this prevents that rubbery skin from forming on top that nobody wants in their tart.
What to Serve With Vanilla Custard Fruit Tart?
This vanilla custard fruit tart is pretty much a showstopper dessert on its own, but it pairs beautifully with a cup of coffee or black tea to balance out the sweetness. If you’re serving it for a special occasion, a glass of champagne or prosecco makes everything feel more celebratory and the bubbles cut through the rich custard nicely. For a cozy afternoon treat, try it alongside some fresh berries on the side or a dollop of lightly sweetened whipped cream. The tart is rich enough that you really don’t need much else – maybe just some good conversation and a comfortable spot to enjoy every creamy, fruity bite!
Storage Instructions
Refrigerate: This vanilla custard fruit tart needs to stay chilled in the refrigerator and will keep beautifully for up to 3 days. Cover it loosely with plastic wrap or store it in a cake container to prevent the custard from absorbing any fridge odors. The custard stays creamy and the crust holds up really well when kept cold.
Make Ahead: You can definitely prep parts of this tart ahead of time! The graham cracker crust can be made and baked up to 2 days in advance, and the vanilla custard can be made a day ahead and stored covered in the fridge. Just assemble with fresh fruit on the day you plan to serve it for the best results.
Serve: This tart is best enjoyed chilled straight from the fridge. If you’ve added fresh fruit on top, try to serve it within a few hours since some fruits can release juices that might make the custard a bit watery. Cut with a sharp knife wiped clean between slices for the prettiest presentation.
| Preparation Time | 20-30 minutes |
| Cooking Time | 10-15 minutes |
| Total Time | 200-300 minutes |
| Level of Difficulty | Medium |
Estimated Nutrition
Estimated nutrition for the whole recipe (without optional ingredients):
- Calories: 2000-2200
- Protein: 24-28 g
- Fat: 110-120 g
- Carbohydrates: 240-260 g
Ingredients
For the crust:
- 12 whole graham crackers (about 1.5 cups crushed)
- 1/4 tsp fine sea salt
- 3 tbsp light brown sugar
- 6 tbsp unsalted butter (melted for easy mixing)
For the pastry cream:
- 2 cups whole milk (or half & half for a richer cream)
- 5 large egg yolks (at room temperature for better emulsion)
- 1/3 cup granulated sugar
- 1/4 cup granulated sugar
- 1 vanilla bean (seeds scraped, or 2 1/2 tsp vanilla extract)
- Pinch kosher salt
- 4 tbsp unsalted butter (I like Kerrygold for this)
- 3 tbsp cornstarch
Step 1: Prepare and Bake the Graham Cracker Crust
- 12 whole graham crackers (1 1/2 cups, 7 oz)
- 6 tbsp unsalted butter, melted
- 3 tbsp light brown sugar
- 1/4 tsp fine sea salt
Preheat the oven to 350°F and position a rack in the center.
Place the graham crackers in the bowl of a food processor and pulse until fine crumbs form.
Add the light brown sugar, fine sea salt, and melted unsalted butter to the processor.
Blend until the mixture resembles wet sand and is evenly moistened.
Transfer the mixture to a tart pan, spreading the crumbs to cover the bottom and sides evenly.
Firmly press down on the base and up the sides to create a compact crust with a rim about 1/4 inch thick.
Bake in the preheated oven until golden brown and fragrant, about 10 minutes.
Remove and let the crust cool completely on a rack.
(Tip: I sometimes make the crust a day ahead and keep it at room temperature, tightly wrapped in plastic.)
Step 2: Infuse Milk with Vanilla
- 2 cups whole milk or half & half
- 1/3 cup granulated sugar
- pinch kosher salt
- 1 vanilla bean, seeds scraped (or 2 1/2 tsp vanilla extract)
In a medium saucepan, combine the whole milk or half & half, 1/3 cup granulated sugar, a pinch of kosher salt, and the seeds and pod from the vanilla bean (if using vanilla extract, skip resting and add it later).
Heat the mixture over medium-high, bringing it just to a simmer without boiling.
If using the vanilla bean, remove from heat and let the mixture sit for 15 minutes to infuse.
If using vanilla extract, proceed directly to the next step.
Step 3: Combine Egg Yolks, Sugar, and Cornstarch
- 5 large egg yolks, at room temperature
- 3 tbsp cornstarch
- 1/4 cup granulated sugar
While the milk is infusing, whisk together the egg yolks, cornstarch, and the remaining 1/4 cup granulated sugar in a medium bowl.
Whisk until the mixture is fully combined and slightly thickened.
Step 4: Prepare and Cook the Pastry Cream
- warm milk mixture from Step 2
- egg yolk mixture from Step 3
- 4 tbsp unsalted butter
- vanilla extract (if using, from Step 2)
Remove the vanilla pod from the infused milk (if used) and bring the milk mixture back to a simmer.
Slowly drizzle about half of the hot milk into the egg yolk mixture, whisking constantly to temper the yolks.
Then, pour the tempered yolk mixture back into the saucepan with the remaining milk, whisking constantly.
Cook over low heat, stirring with a wooden spoon, until the custard thickens, about 5 to 7 minutes.
If it looks curdled, switch to a whisk and beat vigorously.
Continue cooking, whisking constantly, for another 2 minutes until the custard is very thick, like pudding.
Remove from heat and immediately whisk in the unsalted butter and, if using, vanilla extract.
If necessary, strain the pastry cream through a fine mesh sieve to remove any lumps.
Place a layer of plastic wrap directly on the surface and refrigerate until fully set and cold, at least 3 hours or up to 2 days.
I always recommend this chilling time to ensure the cream sets properly for easy slicing later.
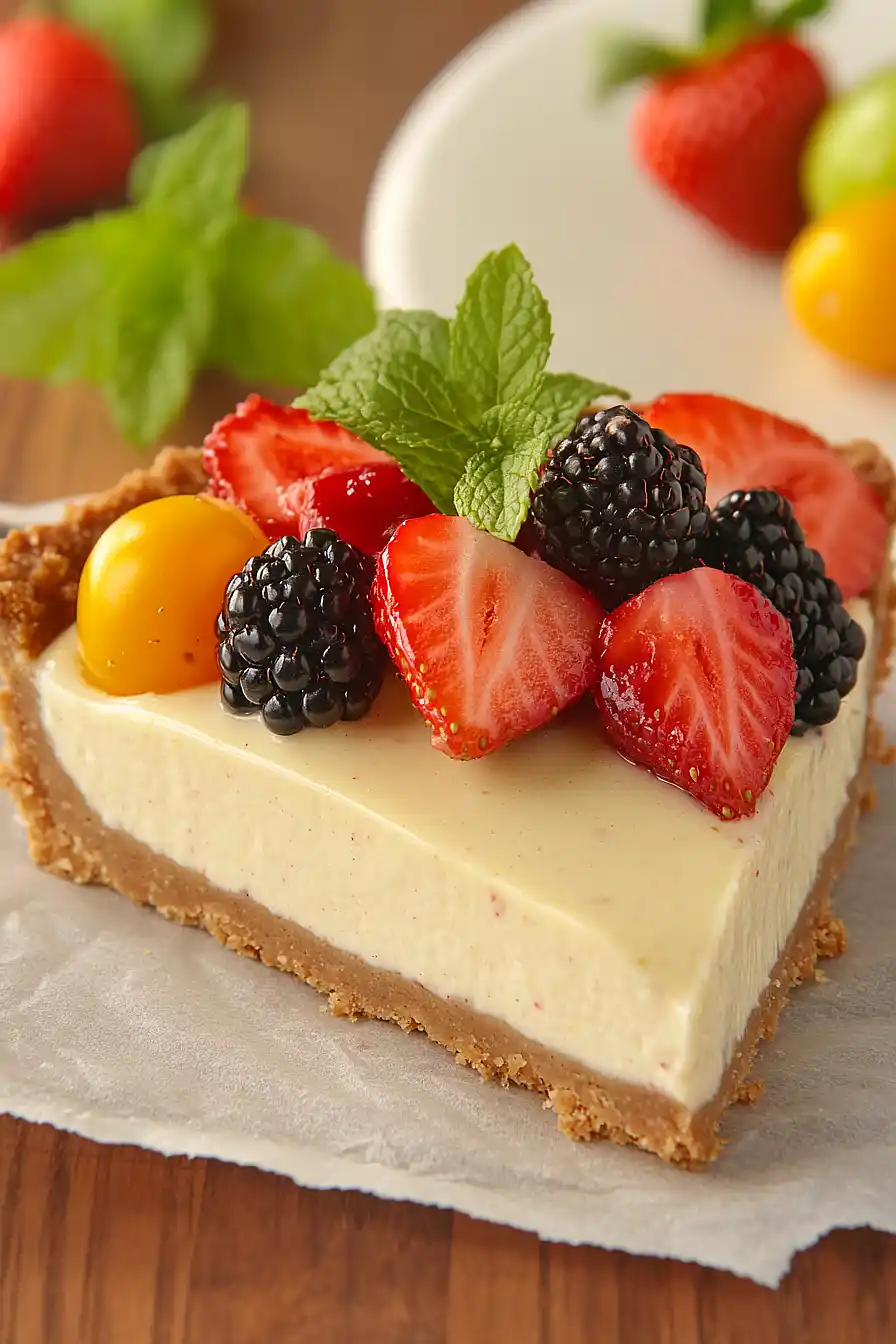
Step 5: Fill the Tart and Serve
- baked tart crust from Step 1
- chilled pastry cream from Step 4
Once the pastry cream is completely chilled, use a hand whisk or a stand mixer with a paddle attachment to whisk 3 cups of the cold pastry cream until light and smooth, about 1-2 minutes.
Pour the whipped pastry cream into the cooled crust from Step 1 and smooth the top.
At this point, you can refrigerate the tart for up to a day, but add fruit or decoration just before serving to preserve freshness.
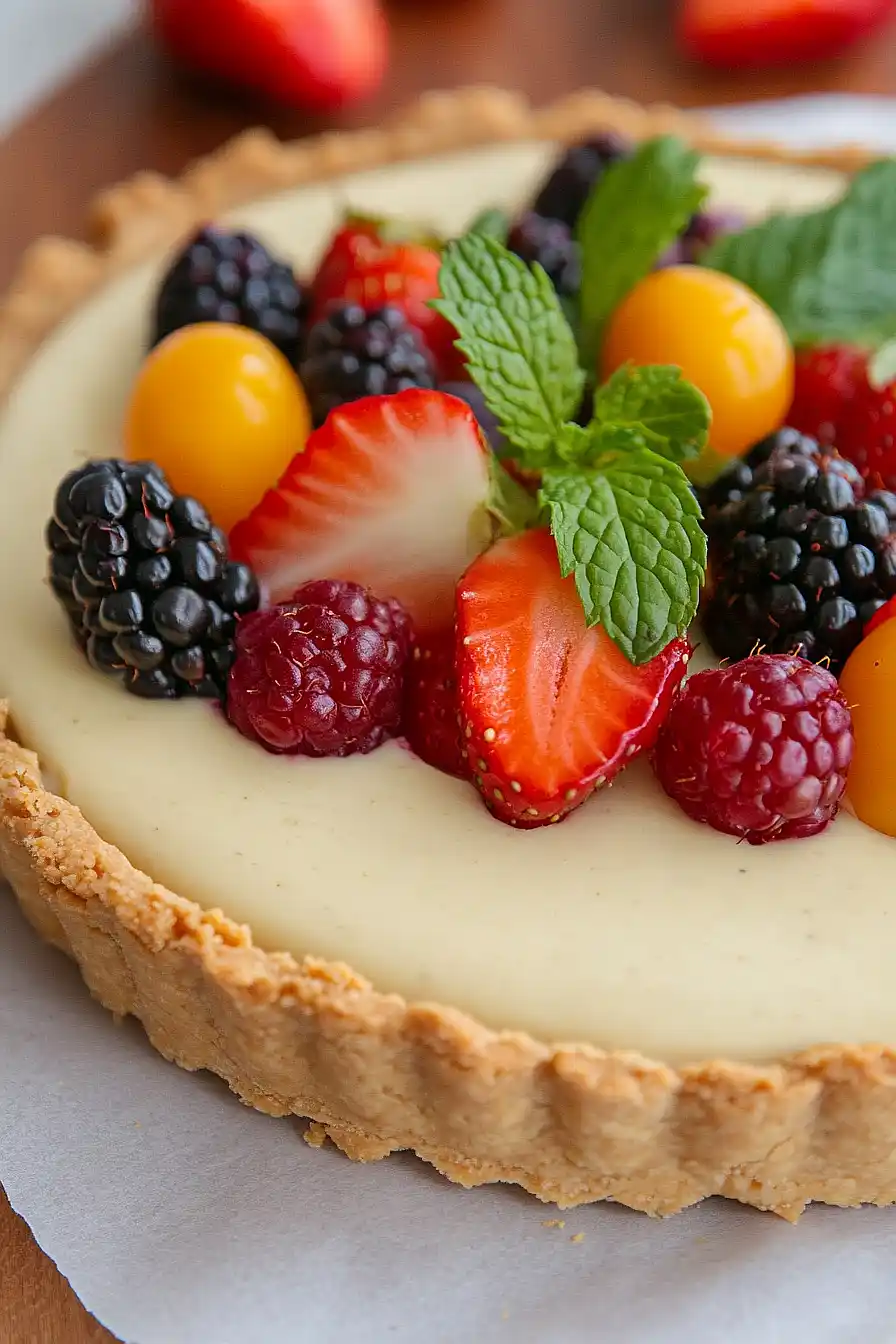
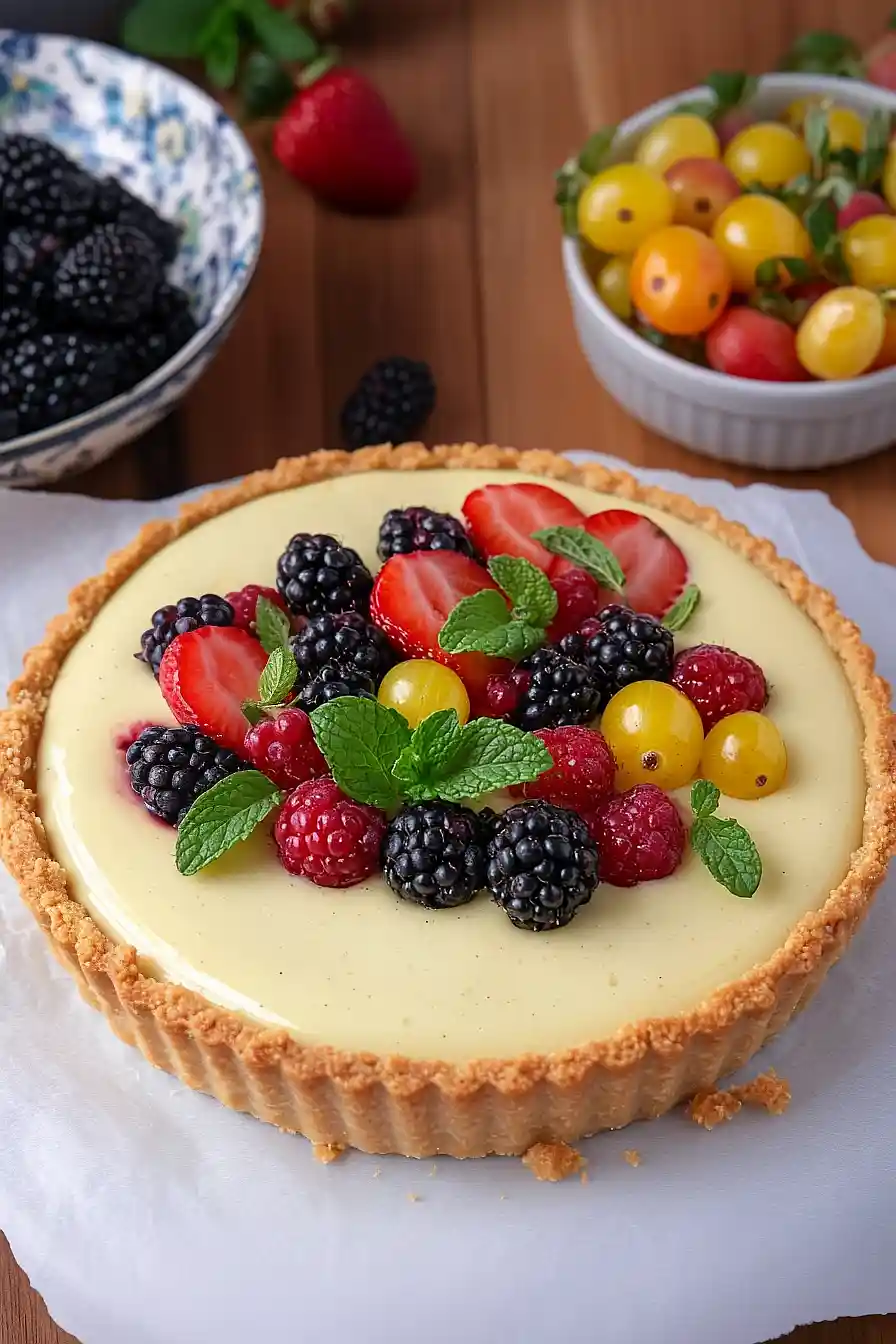
For a classic finish, top with berries and mint sprigs as desired, and to achieve a glossy look, brush the berries lightly with jam thinned with hot water.
(Tip: I love using a mix of fresh berries for color and flavor variation.)
