Halloween treats have always been my favorite part of the season. I get just as excited about making spooky desserts as I do about picking out costumes for the kids. But that doesn’t mean I want to spend hours in the kitchen when there are decorations to hang and pumpkins to carve. I prefer desserts that look impressive but come together quickly.
That’s why these graveyard dirt cake cups are my go-to Halloween dessert. They’re made with simple ingredients you probably already have, and the kids can help assemble them without making a huge mess. I usually make the components while dinner is cooking. No fancy decorating skills needed.
Love chocolate and cookies? This is your dessert. Want something that looks spooky but tastes familiar? Perfect choice. Honestly, I make a double batch because they disappear faster than candy on Halloween night.
Why You’ll Love This Dirt Cake
- No-bake dessert – You can whip this up in just 20-30 minutes without turning on the oven, making it perfect for last-minute Halloween parties or when you need a quick treat.
- Kid-friendly fun – Children love the spooky graveyard theme and getting their hands dirty with the crushed Oreo ‘dirt’ – it’s like playing with your food, but totally acceptable!
- Simple assembly – Just layer pudding, whipped topping, and crushed cookies in cups, then add your Halloween decorations. No special baking skills required.
- Perfect for parties – Individual cups make serving easy at Halloween gatherings, and the spooky decorations always get people talking and laughing.
- Make-ahead friendly – You can prepare these cups hours or even a day before your event, giving you more time to focus on other party preparations.
What Kind of Oreo Cookies Should I Use?
For this graveyard dirt cake, regular Oreo cookies work perfectly and give you that classic “dirt” look when crushed up. You don’t need to get fancy with different flavors – the original chocolate sandwich cookies are exactly what you want here. The family size packages are convenient since you need quite a bit for this recipe, but you can always buy regular-sized packages if that’s what’s available. When crushing them up, you can either pulse them in a food processor for a finer crumb or put them in a sealed bag and crush them with a rolling pin for a chunkier texture that really looks like dirt.
Options for Substitutions
This spooky treat is pretty forgiving when it comes to swaps and substitutions:
- Oreo cookies: If you can’t find Oreos, chocolate sandwich cookies or chocolate wafers work great for that dirt effect. You can even use chocolate graham crackers – just crush them up the same way.
- Instant chocolate pudding: Vanilla pudding works if you want a lighter base, or try butterscotch for a different flavor. You can also make homemade pudding, but let it cool completely before mixing with the whipped topping.
- Whipped topping: Heavy cream whipped with 2-3 tablespoons of powdered sugar makes a great substitute. Just make sure it’s nice and thick before folding in.
- Milano cookies: Any oblong cookie works for tombstones – try vanilla wafers, shortbread cookies, or even graham crackers cut into rectangles.
- Halloween decorations: Get creative with your spooky toppings! Gummy worms, candy corn, chocolate chips, or any small Halloween candies work perfectly. No peeps? Try marshmallows with a bit of black icing for ghosts.
- Chocolate syrup: Hot fudge sauce or melted chocolate chips thinned with a little milk work just as well for that extra chocolate layer.
Watch Out for These Mistakes While Making
The biggest mistake when making graveyard dirt cake cups is crushing your Oreos too finely – you want chunky “dirt” pieces, not powder, so pulse them in a food processor just until you get coarse crumbs with some bigger chunks remaining.
Another common error is not letting your pudding mixture set properly before layering, which can cause your carefully arranged dirt layers to mix together and look muddy instead of distinct.
To prevent your whipped topping from deflating, make sure it’s completely thawed and fold it gently into the pudding mixture rather than stirring vigorously, and always chill your assembled cups for at least 2 hours before serving so everything holds its shape.
For the best presentation, add your Milano cookie “tombstones” and decorations right before serving, as the moisture from the pudding can make them soggy if left too long.
What to Serve With Graveyard Dirt Cake Cups?
These spooky dirt cake cups are pretty much a party all by themselves, but they’re perfect for Halloween gatherings alongside other themed treats. I love setting them out with hot apple cider or chocolate milk for the kids, and maybe some coffee for the adults who need a little caffeine boost after all that trick-or-treating. Since they’re already loaded with chocolate and sweetness, you might want to balance things out with some salty snacks like popcorn or pretzels nearby. These cups also look amazing as part of a dessert table with other Halloween goodies like candy corn, chocolate-covered strawberries, or mini cupcakes.
Storage Instructions
Keep Cool: These spooky dirt cake cups need to stay chilled in the refrigerator to keep that pudding layer nice and set. Cover each cup with plastic wrap or store them in an airtight container for up to 3 days. The Oreo crumbs might get a little softer over time, but they’ll still taste great!
Make Ahead: This is actually one of those desserts that gets better when you make it ahead! You can assemble everything except the final decorative touches up to 24 hours before your party. Just add the ghost peeps and Halloween sprinkles right before serving so they don’t get soggy.
Serve Chilled: Pull these treats straight from the fridge when you’re ready to serve – no thawing needed. The whipped topping and pudding layers taste best when they’re nice and cold. If you’re taking them to a party, keep them in a cooler until it’s time to dig in!
| Preparation Time | 20-30 minutes |
| Cooking Time | 0-0 minutes |
| Total Time | 20-30 minutes |
| Level of Difficulty | Easy |
Estimated Nutrition
Estimated nutrition for the whole recipe (without optional ingredients):
- Calories: 6800-7400
- Protein: 65-80 g
- Fat: 310-350 g
- Carbohydrates: 960-1050 g
Ingredients
For the crumb layers:
- 2 packages (19.1 oz each, family size) oreo cookies
- 1 cup chocolate syrup (divided)
For the pudding filling:
- 4 cups whole milk
- 2 packages (3.9 oz each) instant chocolate pudding mix
- 16 oz whipped topping, thawed
For the spooky decorations:
- Milano cookies
- Black cookie decorating icing
- Ghost-shaped marshmallow treats (peeps)
- Mini pumpkin-shaped candies
- Assorted halloween-themed sprinkles
Step 1: Prepare Oreo Cookie Crumbs
- 2 packages (19.1 oz each, family size) Oreo cookies
Place the Oreo cookies into a food processor in batches and process until they form fine crumbs.
Transfer all the processed crumbs into a large bowl and set aside for assembly.
Step 2: Make the Chocolate Pudding Mixture
- 4 cups whole milk
- 2 packages (3.9 oz each) instant chocolate pudding mix
- 16 oz whipped topping, thawed
In a large bowl, whisk together the whole milk and instant chocolate pudding mix for about 2 minutes, until the mixture begins to thicken.
Gently fold in the thawed whipped topping until there are no visible streaks, forming a creamy pudding mixture.
Step 3: Add Chocolate Syrup to Pudding
- 1/2 cup chocolate syrup (from 1 cup chocolate syrup)
- pudding mixture from Step 2
Drizzle 1/2 cup of the chocolate syrup into the pudding mixture.
Gently swirl it a few times, so the syrup appears streaky through the pudding.
Place the pudding mixture in the fridge until you are ready to assemble.
Step 4: Assemble the Individual Graveyard Cups
- Oreo cookie crumbs from Step 1
- pudding mixture from Step 3
Arrange 18 serving cups (about 9 ounces each).
Add 2 tablespoons of the Oreo crumbs (from Step 1) to the bottom of each cup.
Spoon just under 1/4 cup of the pudding mixture (from Step 3) over the crumbs.
Repeat with another layer: 2 more tablespoons of Oreo crumbs, then the remaining pudding.
Finally, top each cup with 1 tablespoon of Oreo crumbs.
I like to gently tap the cups between layers to even them out.
Step 5: Make ‘Fresh Dirt’ Cookie Crumbs
- 1/2 cup chocolate syrup (remaining from 1 cup chocolate syrup)
- remaining Oreo cookie crumbs from Step 1
Stir the remaining 1/2 cup of chocolate syrup into the leftover Oreo cookie crumbs in a small bowl.
Mix until the crumbs become clumpy and have a moist, uneven appearance.
Set these aside for decoration.
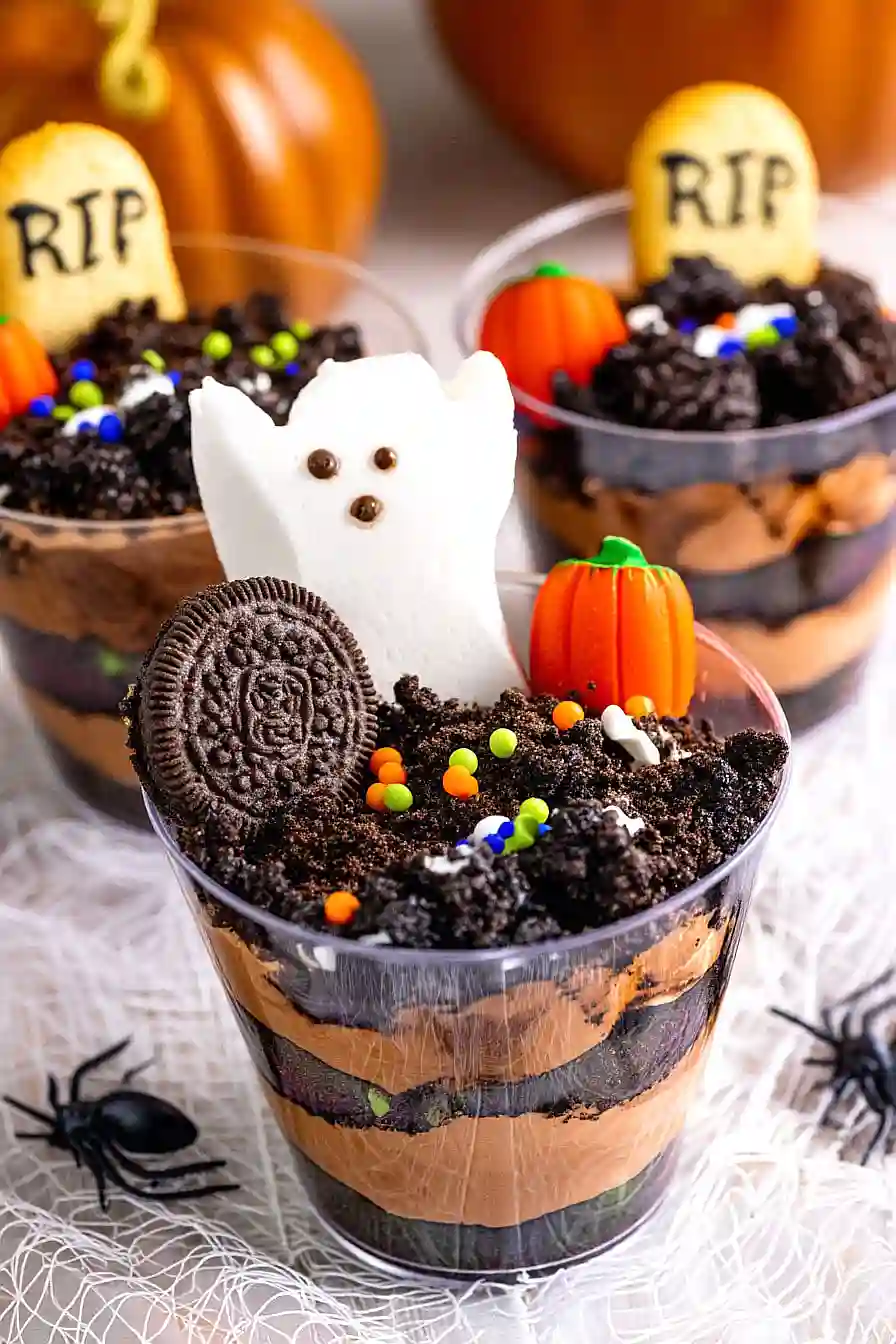
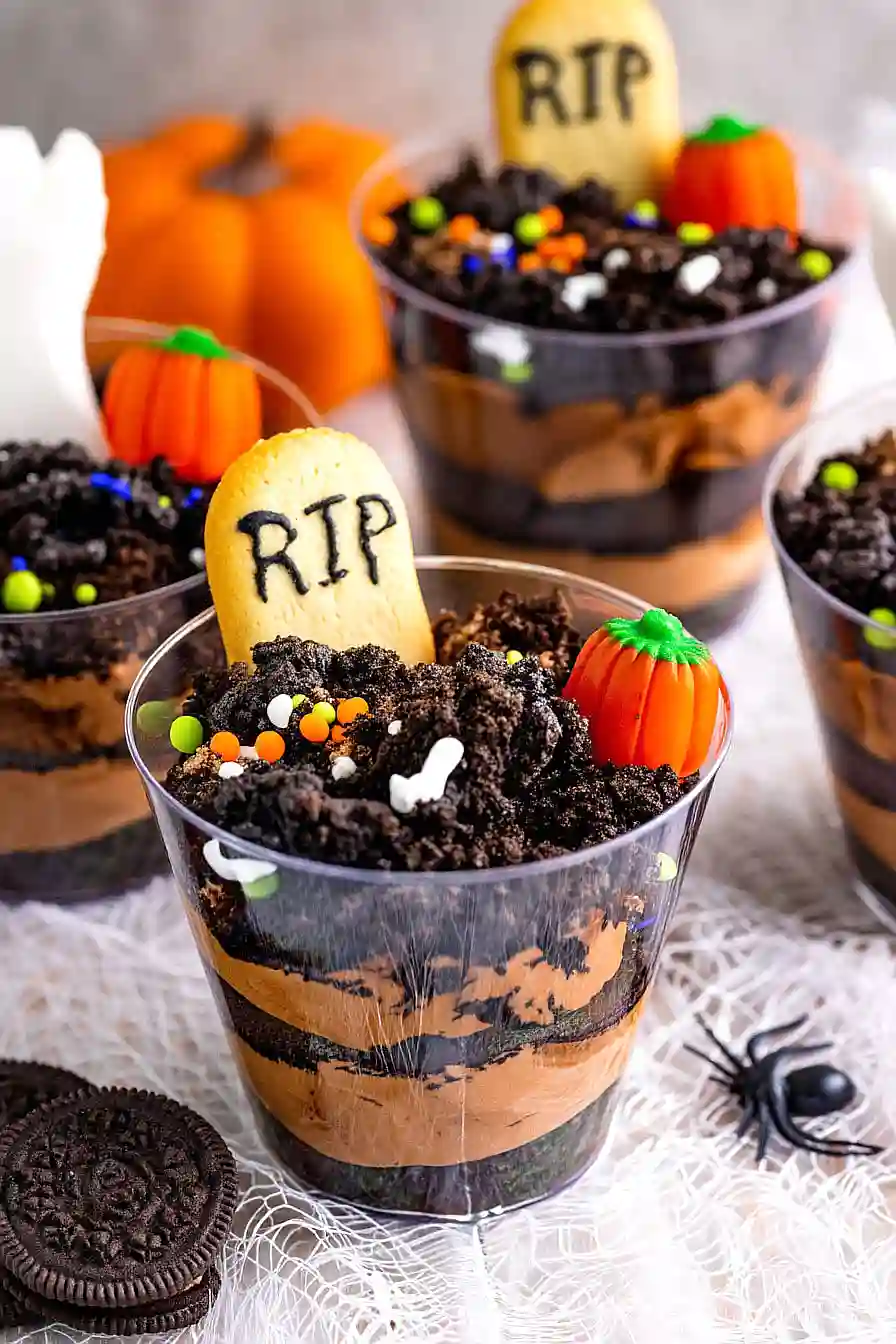
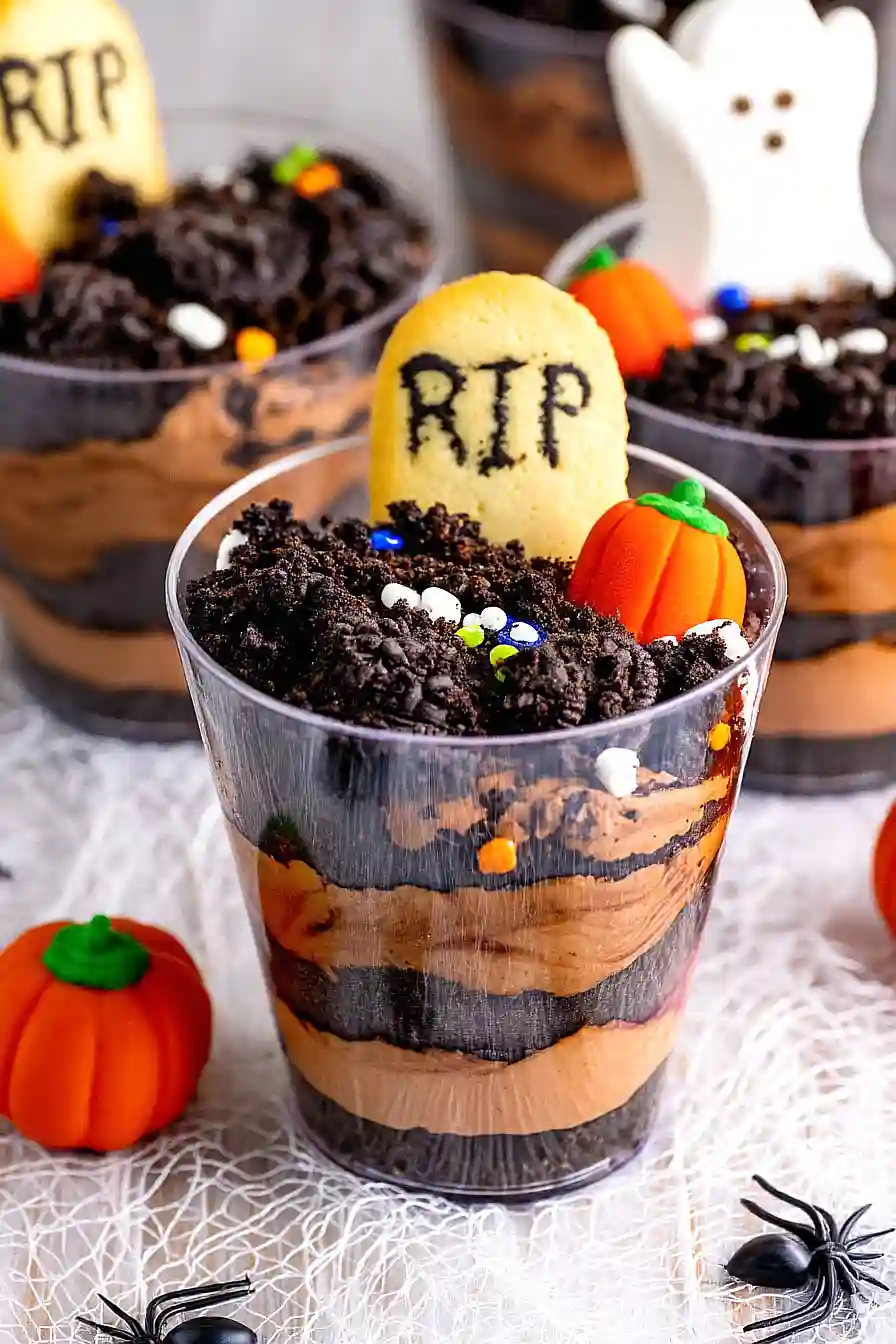
Step 6: Decorate the Graveyard Cups
- Milano cookies
- black cookie decorating icing
- ghost-shaped marshmallow treats (peeps)
- mini pumpkin-shaped candies
- assorted Halloween-themed sprinkles
- clumpy cookie crumbs from Step 5
Use black decorating icing to personalize Milano cookies with ‘RIP’ or spooky sayings.
Gently press them into the tops of the cups to resemble gravestones.
Add ghost-shaped marshmallow treats and mini pumpkin-shaped candies for extra Halloween fun, pressing gently so they stand upright.
If desired, only decorate half the cups for variety.
Sprinkle on assorted Halloween-themed sprinkles.
Top each cup with some of the clumpy ‘fresh dirt’ cookie crumbs (from Step 5) to replicate freshly dug earth.
I like to get creative with the designs—kids love decorating their own ghoulish cups!
Step 7: Chill and Serve
Chill the decorated graveyard cups in the refrigerator until ready to serve, or enjoy them immediately for a spooky treat!

Fun Graveyard Dirt Cake Cups
Ingredients
For the crumb layers:
- 2 packages (19.1 oz each, family size) Oreo cookies
- 1 cup chocolate syrup (divided)
For the pudding filling:
- 4 cups whole milk
- 2 packages (3.9 oz each) instant chocolate pudding mix
- 16 oz whipped topping, thawed
For the spooky decorations:
- Milano cookies
- black cookie decorating icing
- ghost-shaped marshmallow treats (peeps)
- mini pumpkin-shaped candies
- assorted Halloween-themed sprinkles
Instructions
- Place the Oreo cookies into a food processor in batches and process until they form fine crumbs. Transfer all the processed crumbs into a large bowl and set aside for assembly.
- In a large bowl, whisk together the whole milk and instant chocolate pudding mix for about 2 minutes, until the mixture begins to thicken. Gently fold in the thawed whipped topping until there are no visible streaks, forming a creamy pudding mixture.
- Drizzle 1/2 cup of the chocolate syrup into the pudding mixture. Gently swirl it a few times, so the syrup appears streaky through the pudding. Place the pudding mixture in the fridge until you are ready to assemble.
- Arrange 18 serving cups (about 9 ounces each). Add 2 tablespoons of the Oreo crumbs (from Step 1) to the bottom of each cup. Spoon just under 1/4 cup of the pudding mixture (from Step 3) over the crumbs. Repeat with another layer: 2 more tablespoons of Oreo crumbs, then the remaining pudding. Finally, top each cup with 1 tablespoon of Oreo crumbs. I like to gently tap the cups between layers to even them out.
- Stir the remaining 1/2 cup of chocolate syrup into the leftover Oreo cookie crumbs in a small bowl. Mix until the crumbs become clumpy and have a moist, uneven appearance. Set these aside for decoration.
- Use black decorating icing to personalize Milano cookies with 'RIP' or spooky sayings. Gently press them into the tops of the cups to resemble gravestones. Add ghost-shaped marshmallow treats and mini pumpkin-shaped candies for extra Halloween fun, pressing gently so they stand upright. If desired, only decorate half the cups for variety. Sprinkle on assorted Halloween-themed sprinkles. Top each cup with some of the clumpy 'fresh dirt' cookie crumbs (from Step 5) to replicate freshly dug earth. I like to get creative with the designs—kids love decorating their own ghoulish cups!
- Chill the decorated graveyard cups in the refrigerator until ready to serve, or enjoy them immediately for a spooky treat!
