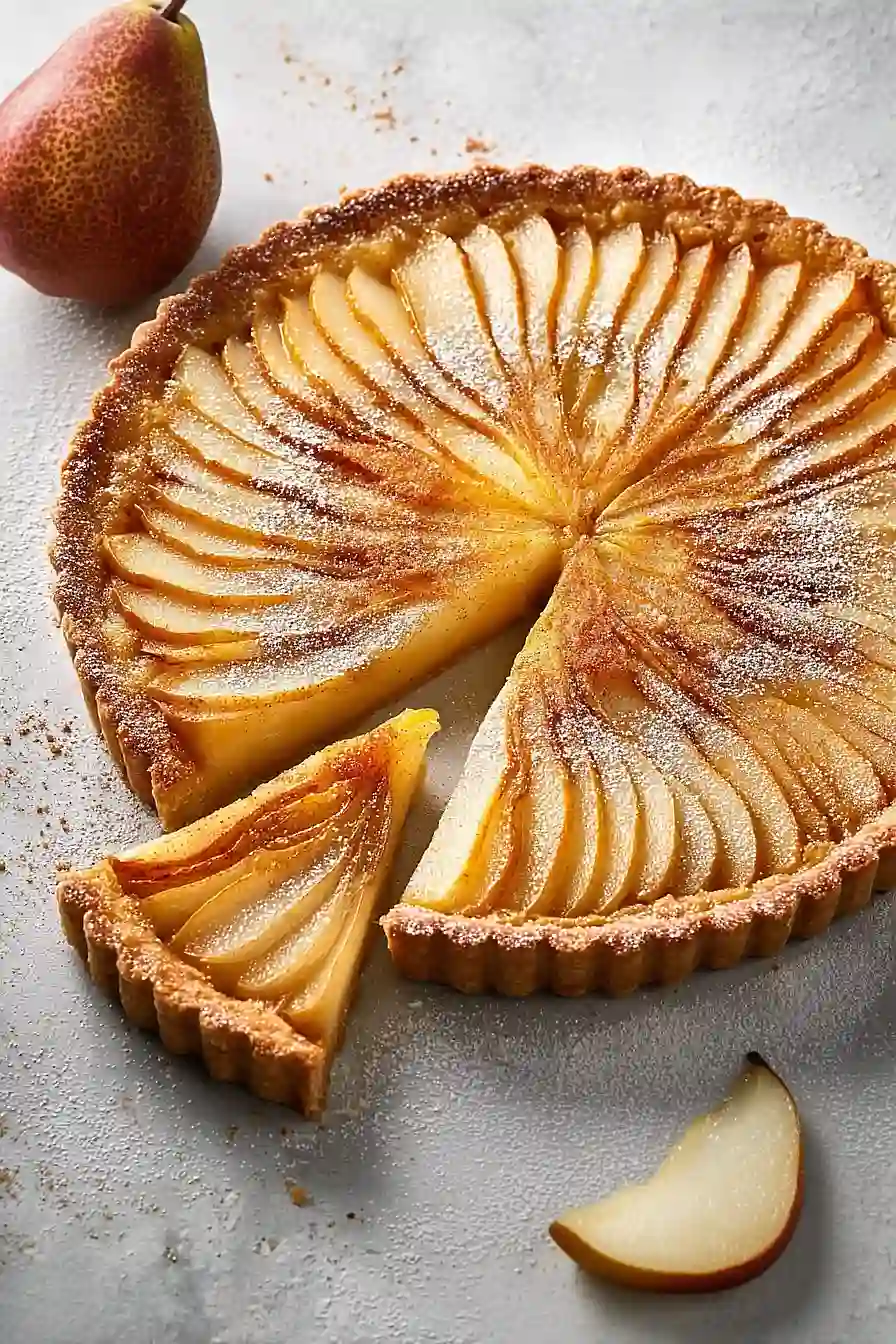
Here is my favorite pear tart recipe, with a simple, buttery pastry crust, and a sweet filling made with fresh pears, warm spices, and a touch of honey.
This pear tart is what I make when I want something that feels fancy but is actually pretty easy to put together. My kids love helping me arrange the pear slices on top, and it always disappears quickly at dinner parties.
Why You’ll Love This Pear Tart
- Lighter dessert option – Made with reduced-fat cream cheese and reduced-sugar pears, this tart lets you enjoy a sweet treat without all the guilt.
- Simple ingredients – You probably have most of these pantry staples on hand already, and canned pears make it accessible year-round.
- Quick and easy – Ready in just over an hour, this tart comes together faster than most homemade desserts and doesn’t require any fancy techniques.
- Perfect for entertaining – The creamy filling and tender pears look impressive enough for guests, but it’s simple enough to make on a weeknight.
- Cozy fall flavors – The warm cinnamon and sweet pears create that comforting autumn taste that pairs perfectly with coffee or tea.
What Kind of Pears Should I Use?
While this recipe calls for canned pears, you can absolutely use fresh pears if you prefer. Bartlett and Anjou pears work great for tarts since they hold their shape well when baked and have a nice sweet flavor. If you’re going the fresh route, make sure to choose pears that are ripe but still firm – overly soft pears can make your tart soggy. When using fresh pears, peel them and slice them about the same thickness as canned pears would be, and consider tossing them with a little lemon juice to prevent browning.

Options for Substitutions
This pear tart is pretty adaptable, so here are some swaps you can make if needed:
- Reduced-fat cream cheese: Regular full-fat cream cheese works perfectly fine here – just use the same amount. You can also try mascarpone for a richer flavor, though it will be a bit sweeter.
- Canned pears: Fresh pears are actually great in this recipe! Use 2-3 ripe but firm pears, peeled and thinly sliced. You might need to bake a few extra minutes since fresh fruit has more moisture.
- Walnuts: Feel free to swap these with pecans, almonds, or hazelnuts. You can also leave them out completely if you have nut allergies – the crust will still taste good.
- All-purpose flour: You can use a 1:1 gluten-free flour blend if needed, though the texture might be slightly different.
- Butter: Margarine or even coconut oil (softened) can work as substitutes, though butter gives the best flavor for the crust.
- Pears: Try thinly sliced apples, peaches, or even plums for a different fruit tart. Just make sure to drain canned fruits well or pat fresh fruits dry.
Watch Out for These Mistakes While Baking
The biggest mistake when making pear tart is not draining the canned pears thoroughly enough, which can make your tart watery and prevent the crust from getting crispy – pat them dry with paper towels and let them sit for a few minutes before slicing.
Another common error is overbaking the cream cheese filling, so keep an eye on it and remove the tart when the center is just set but still slightly jiggly, as it will continue to firm up as it cools.
Don’t skip pressing the walnut crust mixture firmly into the pan, because a loose crust will crumble when you try to slice the tart, and make sure your cream cheese is fully softened to avoid lumps in the filling.
For the best texture, let the tart cool completely before cutting – this gives the filling time to set properly and makes for clean, neat slices.

What to Serve With Pear Tart?
This pear tart is perfect on its own, but I love serving it with a dollop of whipped cream or a scoop of vanilla ice cream to make it extra special. A cup of hot coffee or black tea pairs beautifully with the warm cinnamon and sweet pear flavors, making it an ideal dessert for fall gatherings. If you want to add a little crunch, try sprinkling some extra chopped walnuts on top or serving it alongside a small handful of toasted nuts. For a fancy touch, you can even drizzle a bit of caramel sauce over each slice before serving.
Storage Instructions
Refrigerate: This pear tart tastes best when chilled and will keep beautifully in the fridge for up to 4 days. Just cover it loosely with plastic wrap or store it in an airtight container. The cream cheese filling actually gets even better after a day, so don’t worry about making it ahead!
Freeze: You can freeze this tart for up to 2 months if you want to save some for later. Wrap it tightly in plastic wrap and then in foil, or store individual slices in freezer bags. I like to slice it first so I can grab just what I need.
Serve: Let frozen slices thaw in the fridge overnight, or at room temperature for about 30 minutes if you’re in a hurry. This tart is actually delicious served cold straight from the fridge, so no need to warm it up unless you prefer it that way.
| Preparation Time | 30-45 minutes |
| Cooking Time | 25-30 minutes |
| Total Time | 55-75 minutes |
| Level of Difficulty | Medium |
Estimated Nutrition
Estimated nutrition for the whole recipe (without optional ingredients):
- Calories: 1400-1550
- Protein: 28-34 g
- Fat: 75-85 g
- Carbohydrates: 155-170 g
Ingredients
For the crust:
- 3/4 tsp cinnamon powder (for warmth and aroma)
- 1/3 cup walnuts (finely chopped for an even crust texture)
- 1/2 cup granulated sugar
- 3 tbsp butter (I use Land O’Lakes unsalted butter)
- 3/4 cup all-purpose flour
For the filling and topping:
- 1 tsp vanilla extract (Rodelle vanilla extract for best flavor)
- 1 can (15 oz) reduced-sugar sliced pears (drained well and thinly sliced)
- 1 tbsp sugar
- 1/4 cup sugar
- 1 large egg
- 8 oz reduced-fat cream cheese (room temperature for a smooth filling)
- 1/4 tsp ground cinnamon
Step 1: Prepare the Tart Crust
- 3 tbsp butter, softened
- 1/2 cup granulated sugar
- 3/4 tsp cinnamon powder
- 3/4 cup all-purpose flour
- 1/3 cup walnuts, finely chopped
Preheat your oven to 425°F.
In a large bowl, beat together the softened butter, 1/2 cup granulated sugar, and 3/4 teaspoon cinnamon powder until the mixture is crumbly.
Add the 3/4 cup all-purpose flour and 1/3 cup finely chopped walnuts, then beat again until everything is incorporated and you have a crumbly mixture.
Spray a 9-inch fluted tart pan with a removable bottom with cooking spray.
Pour the crumbly crust mixture into the pan and press it firmly into the bottom and up the sides to form a sturdy edge.
I like to use the flat bottom of a measuring cup or glass to press the crust evenly for the perfect finish.
Step 2: Make the Cream Cheese Filling
- 8 oz reduced-fat cream cheese
- 1/4 cup sugar
- 1 large egg
- 1 tsp vanilla extract
In a separate bowl, beat the reduced-fat cream cheese and 1/4 cup sugar until smooth and creamy.
Add the large egg and vanilla extract, beating until the mixture is well combined and smooth.
Spread the cream cheese filling over the pressed crust in the tart pan, smoothing it out evenly.
Step 3: Arrange Pears and Add Cinnamon Sugar Topping
- 1 can (15 oz) reduced-sugar sliced pears, drained and thinly cut
- 1 tbsp sugar
- 1/4 tsp ground cinnamon
Arrange the drained and thinly sliced pears over the cream cheese filling, creating a decorative pattern on top.
In a small bowl, mix 1 tablespoon sugar with 1/4 teaspoon ground cinnamon.
Sprinkle this cinnamon sugar mixture evenly over the pears.
Step 4: Bake the Tart
Place the tart pan in the preheated oven and bake for 10 minutes at 425°F.
Then, reduce the oven temperature to 350°F and continue baking for 15 to 20 more minutes, or until the filling is set.
Once fully baked, carefully remove the tart from the oven and place it on a wire rack to cool for one hour.
I like to let it sit out until it’s close to room temperature before moving to the next step; this ensures the filling sets nicely.
Step 5: Cool, Chill, and Serve the Tart
After cooling on the wire rack for one hour, refrigerate the tart for at least two hours before serving.
This chilling step is important—think of the tart like a cheesecake, where a cold set gives you the creamiest filling and cleanest slices.
Don’t rush this step!
When ready to serve, carefully remove the tart from the pan, slice, and enjoy.
