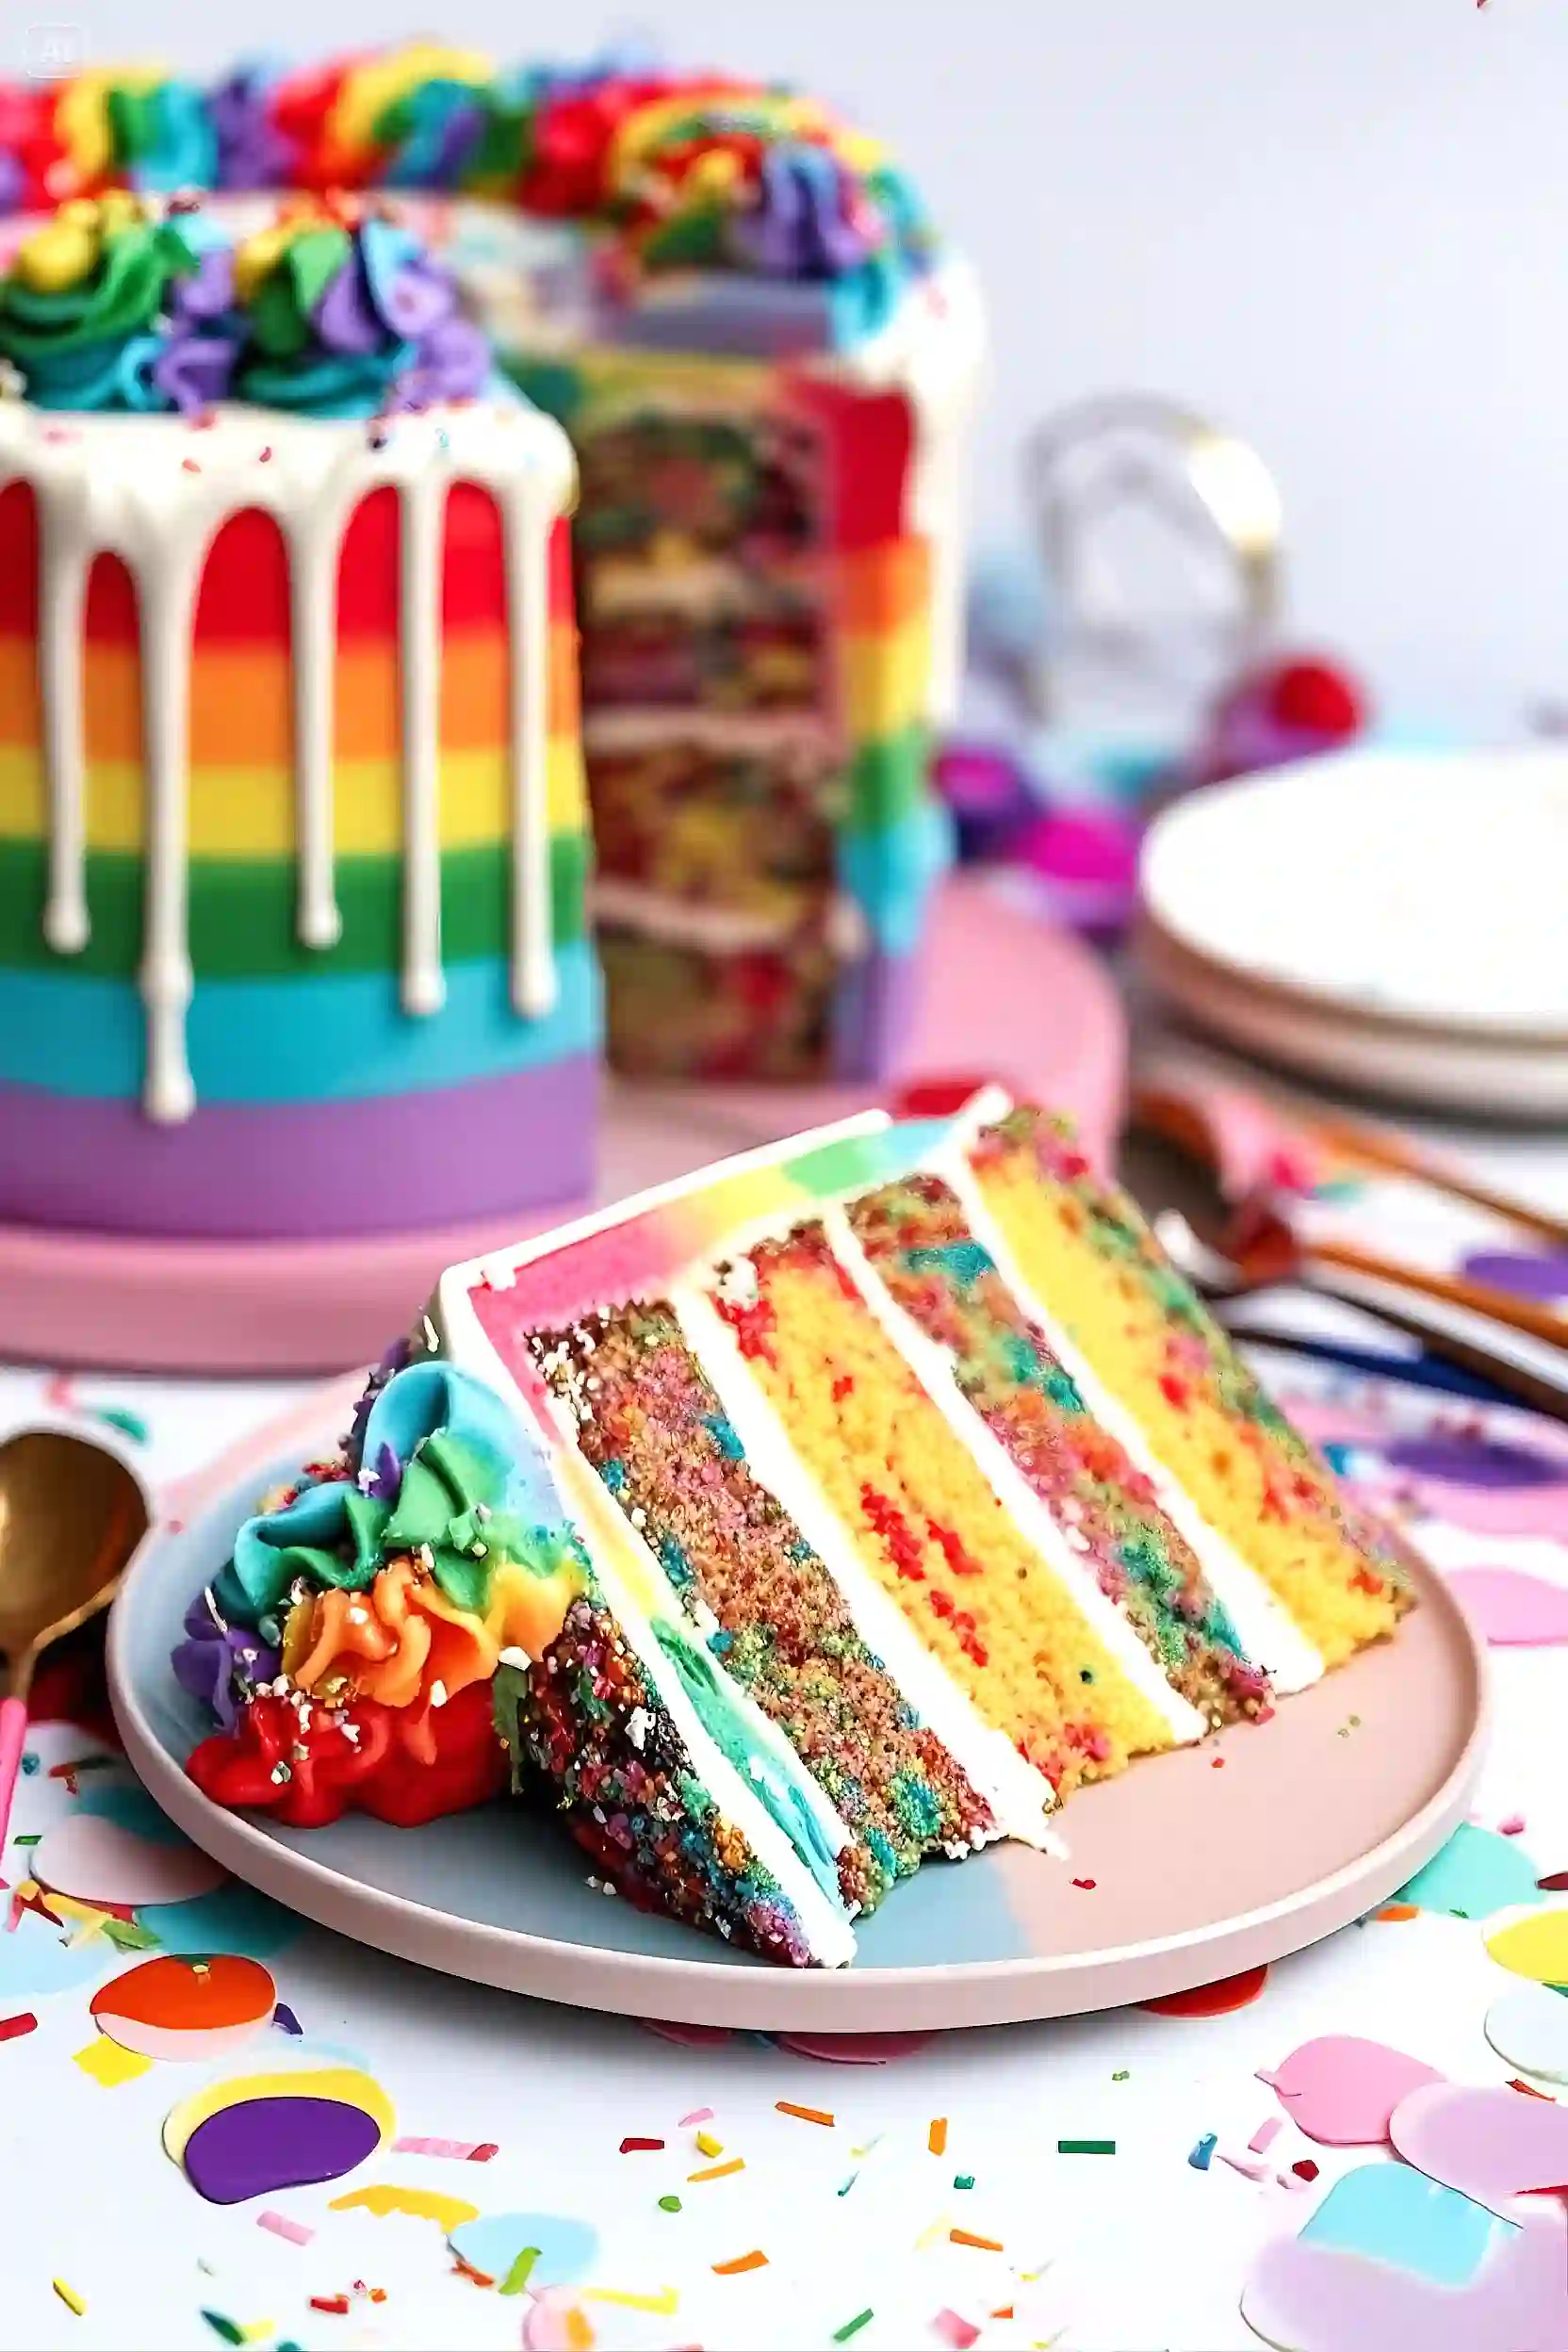
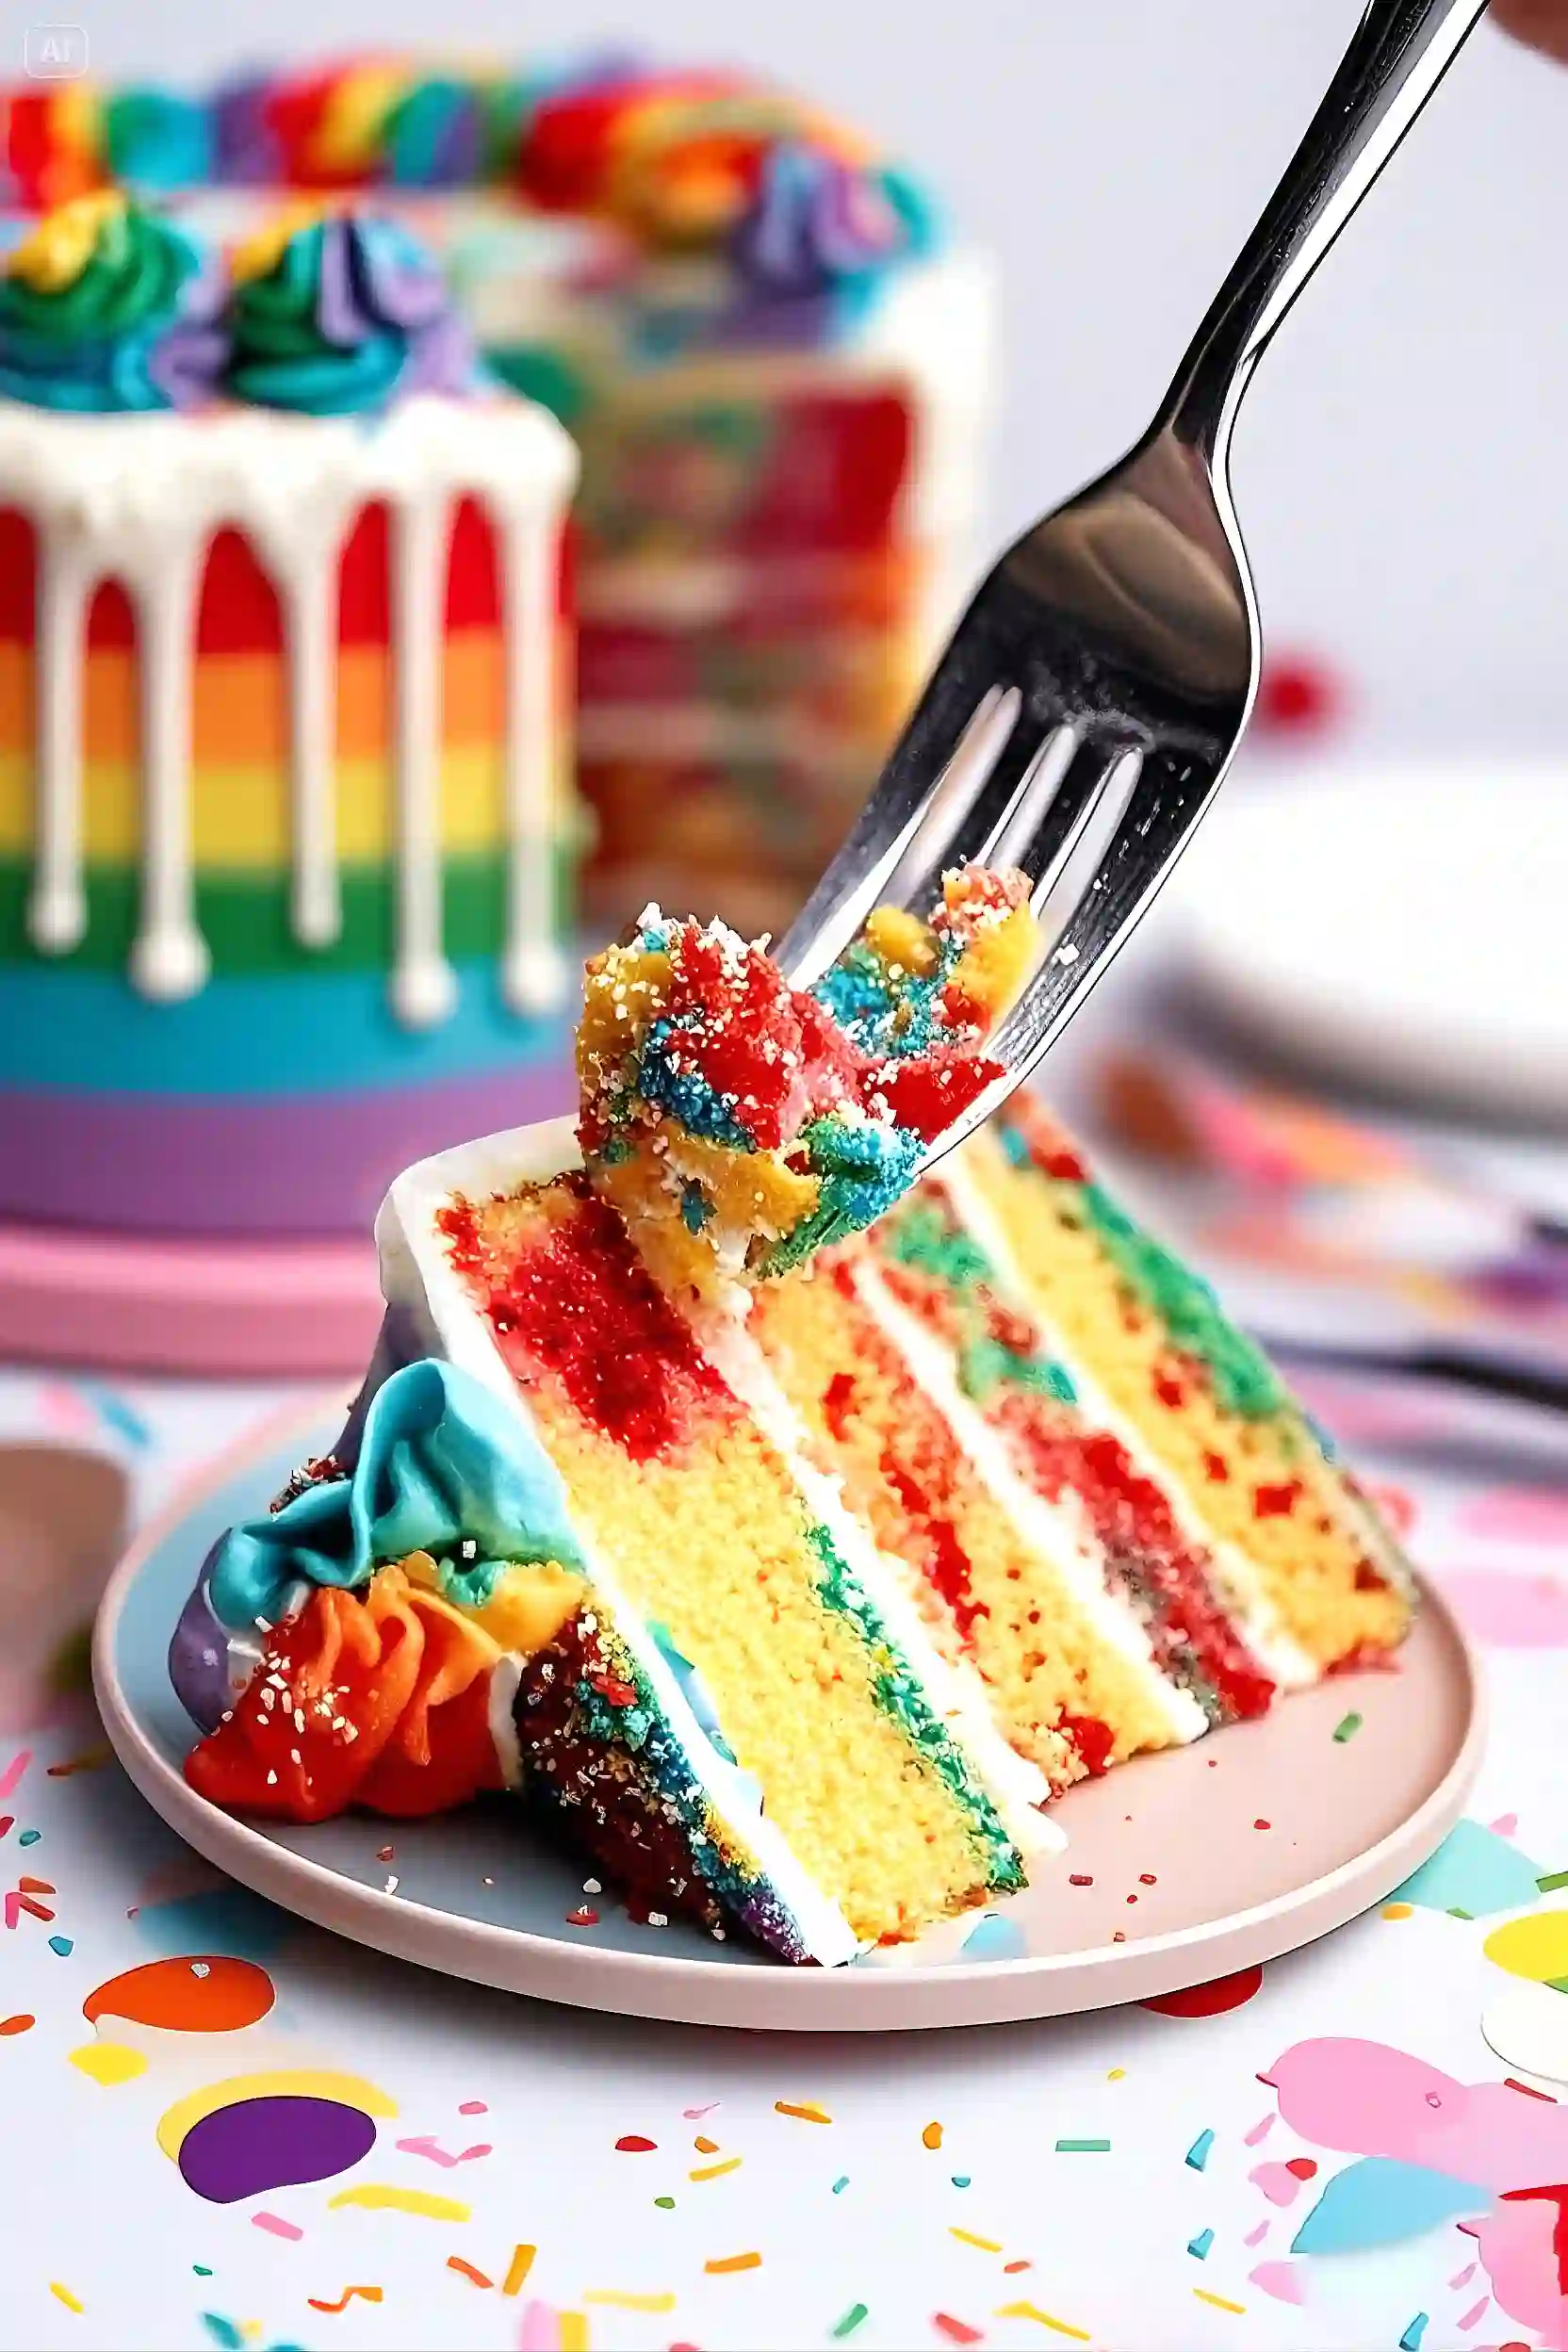
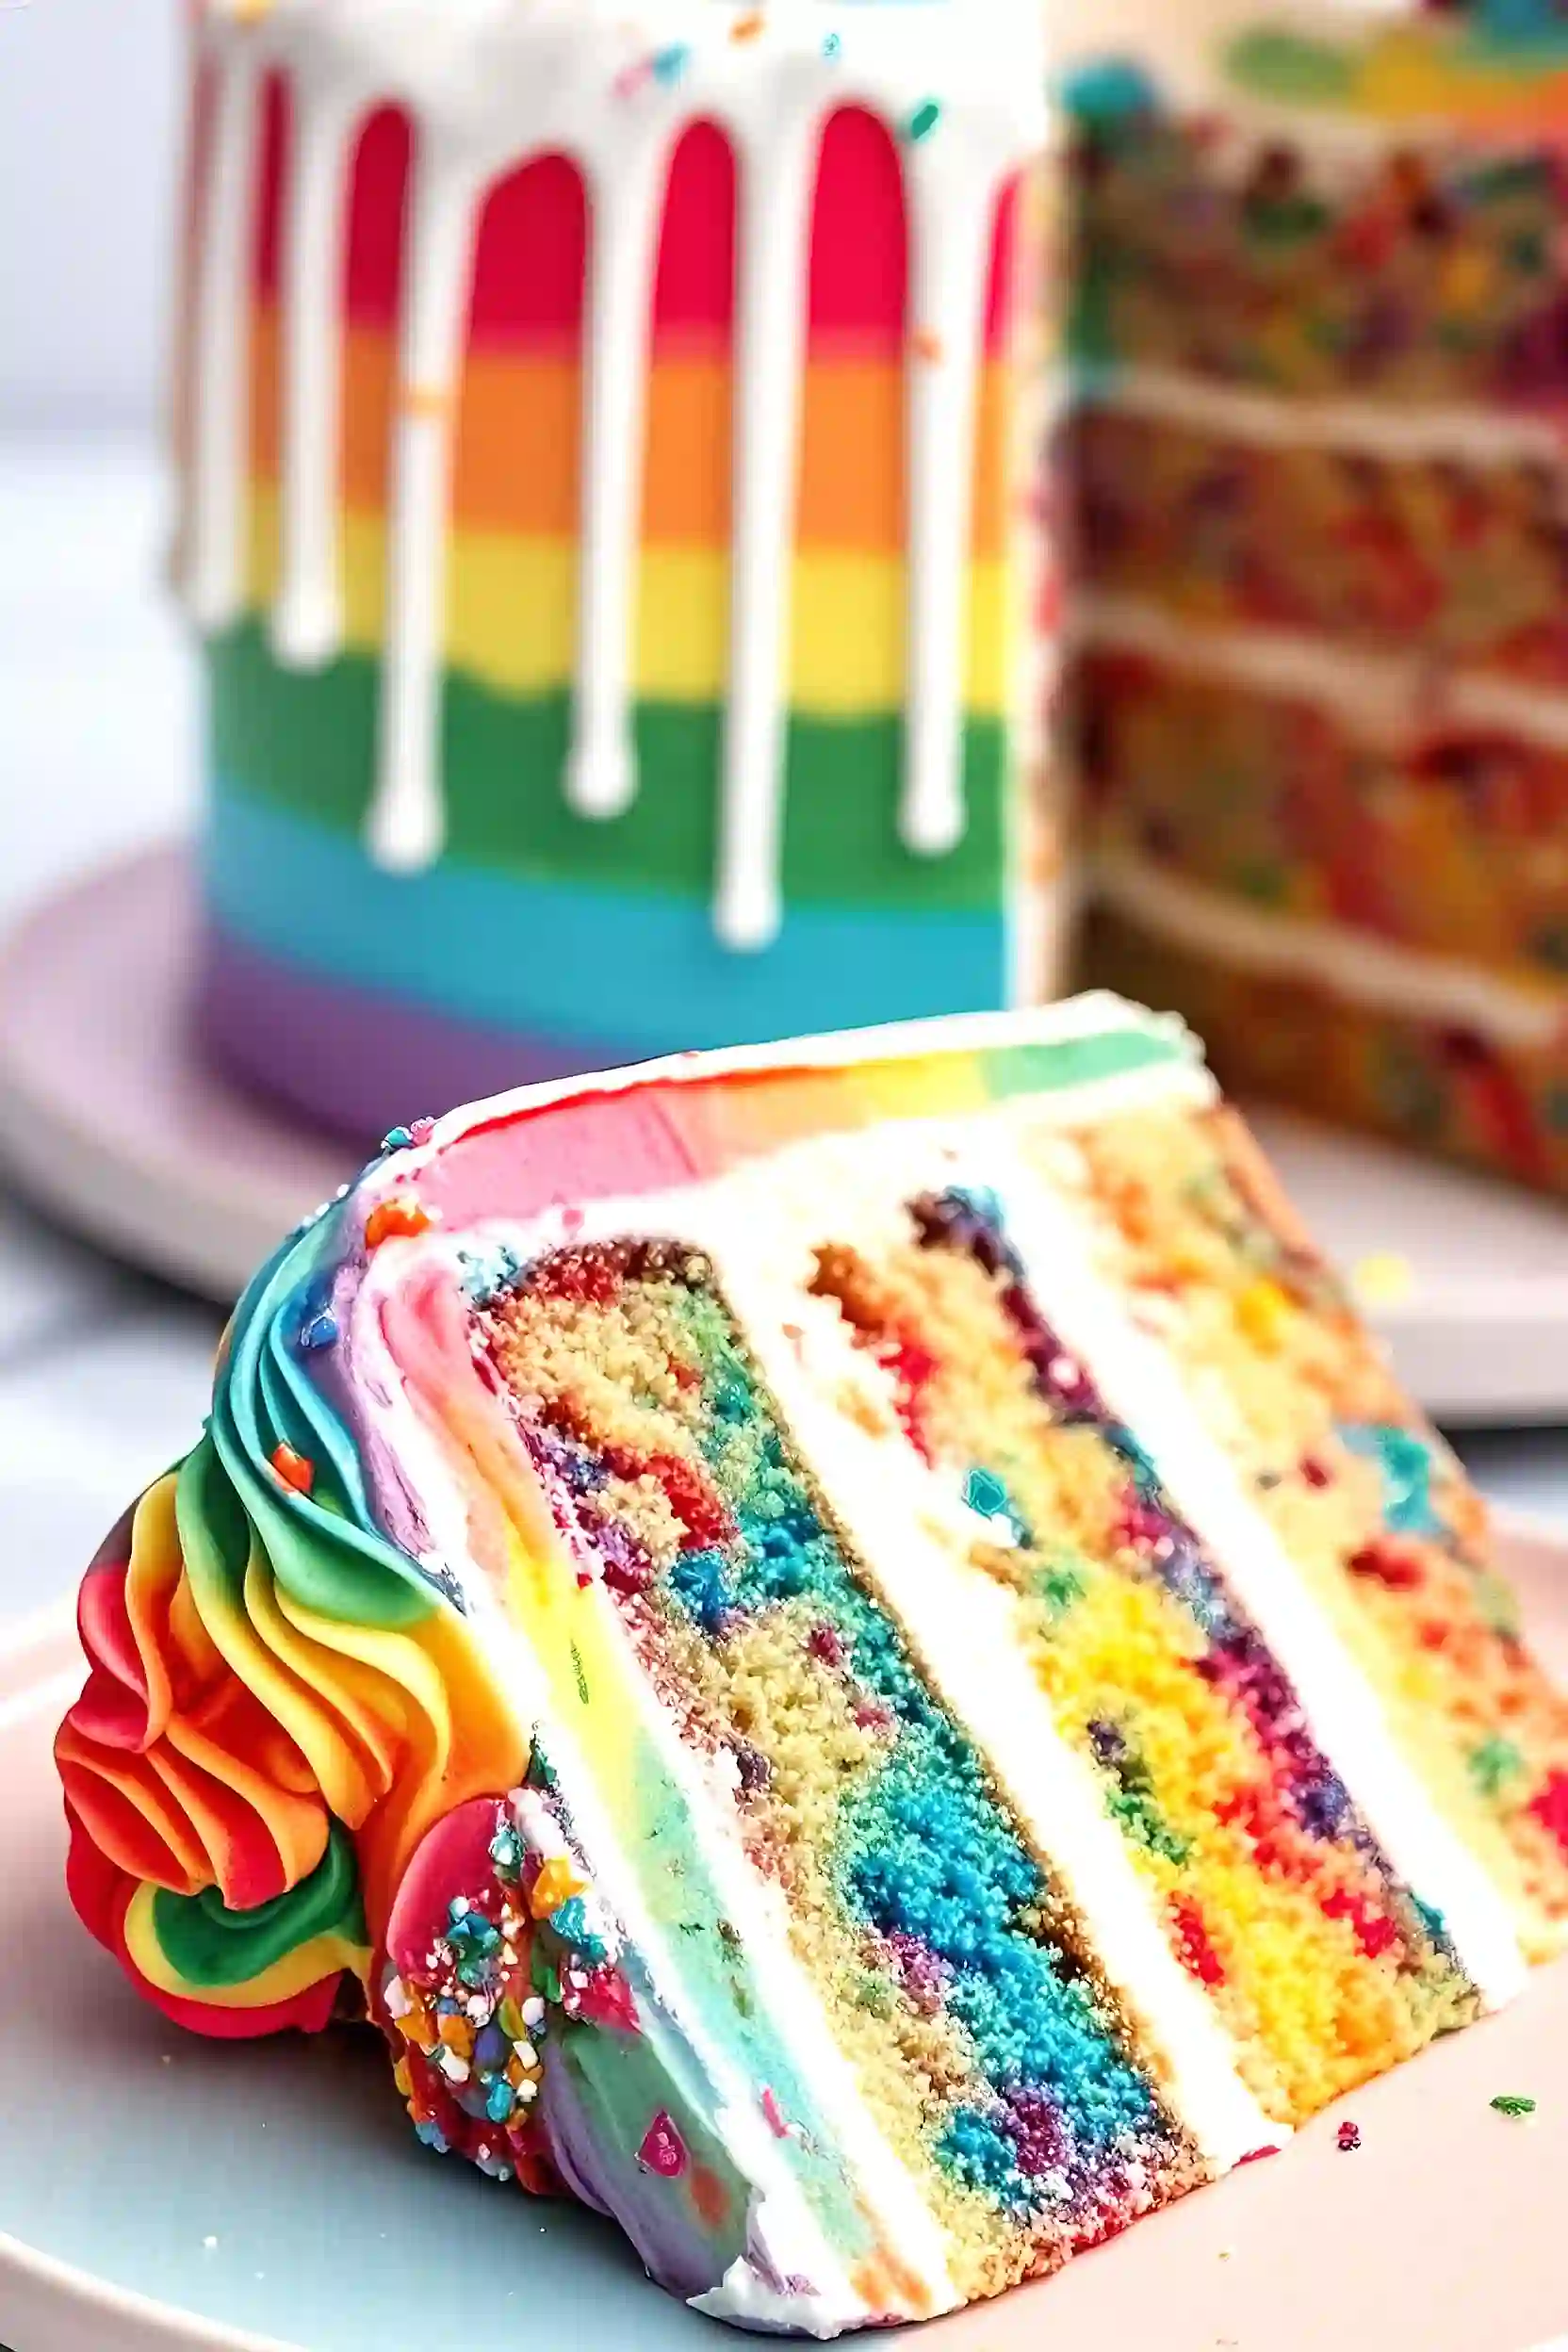
When my daughter asked for a rainbow explosion cake for her birthday, I knew I was in for a fun adventure in the kitchen. There’s something magical about seeing all those colors come together in each slice – it never fails to make everyone smile. I’ve made quite a few of these cakes over the years, and let me tell you, they’re not as complicated as they might look. The best part? You don’t need to be a professional baker to create one that’ll make the kids (and grown-ups!) wide-eyed with excitement.
I remember the first time I tried making this cake – I was so nervous about getting the layers right. But now it’s become one of my go-to celebration recipes. It’s perfect for birthday parties, school events, or any time you want to turn an ordinary day into something special. Trust me, once you see everyone’s faces light up when you cut into this cake, you’ll understand why it’s worth the extra effort.
Why You’ll Love This Rainbow Cake
- Show-stopping appearance – This rainbow cake is perfect for birthdays and celebrations – the colorful layers and sprinkles make everyone smile when you cut into it.
- Foolproof recipe – The simple 1:1:1:1 ratio of main ingredients makes this cake easy to remember and hard to mess up, even if you’re new to baking.
- Make-ahead friendly – You can bake the layers ahead of time and freeze them, then assemble when needed – perfect for planning ahead for special occasions.
- Rich and moist texture – The butter-based recipe creates a tender, moist cake that stays fresh for days, while the white chocolate drip adds an extra touch of decadence.
- Customizable colors – You can adjust the colors to match any theme or occasion – make it rainbow, stick to two colors for team spirit, or create your own color combination.
What Kind of Butter Should I Use?
For this showstopper cake, you’ll want to stick with high-quality unsalted butter – and yes, you’ll need quite a bit of it! Unsalted butter is key here because it lets you control the exact amount of salt in your recipe, which is especially important in baking. European-style butter (like Plugrá or Kerrygold) works particularly well because it has a higher fat content, which creates a richer texture in both the cake and frosting. Make sure your butter is at the right temperature – room temperature means you can easily press your finger into it, but it shouldn’t be so soft that it’s greasy or melting. If your butter is too cold or too warm, it won’t cream properly with the sugar, which can affect how your cake turns out.
Options for Substitutions
Let me share some helpful substitution tips for this fun cake recipe:
- Self-rising flour: If you don’t have self-rising flour, use all-purpose flour and add 2 teaspoons of baking powder and 1/2 teaspoon of salt for every cup of flour.
- Unsalted butter: For the cake batter, you can use salted butter (just skip adding any extra salt), but for the frosting, stick to unsalted butter – margarine won’t give you the right texture and might make your frosting too soft.
- Food coloring: Gel food colors work best, but you can use liquid ones – just know you’ll need more to get bright colors. Natural food dyes are an option too, but the colors won’t be as bright.
- Raspberry preserves: Any berry jam works here – try strawberry or mixed berry preserves if you don’t have raspberry.
- Heavy cream: For the white chocolate ganache, you can use half-and-half, but the ganache will be a bit thinner. Don’t use milk as it won’t set properly.
- Sprinkles: Any type of rainbow sprinkles work fine – jimmies, nonpareils, or confetti sprinkles. Just avoid chocolate sprinkles as they might bleed into the batter.
Watch Out for These Mistakes While Baking
The biggest challenge when making a rainbow explosion cake is maintaining the vibrancy of your colors – make sure your food coloring is gel-based rather than liquid, as liquid colors can throw off the consistency of your batter and result in muted shades. Temperature control is crucial too – your butter should be soft enough to leave a slight indent when pressed (about 65-70°F), but not so warm that it’s greasy or melting, which can lead to dense, greasy cake layers. When working with white chocolate for the drip, avoid overheating it as this can cause it to become grainy or seize up – instead, heat the cream first and pour it over the chopped chocolate, letting it sit for 5 minutes before stirring until smooth. For the sprinkle core filling, don’t add the sprinkles until just before assembly, as they can bleed their colors if mixed too far in advance with any moisture-containing ingredients. Finally, when stacking your layers, make sure each one is completely cool and level – even slightly warm layers can cause your buttercream to melt and your colors to run together.
What to Serve With Rainbow Explosion Cake?
This fun and colorful cake is already a show-stopper on its own, but you can make the experience even more special with some simple additions! A scoop of vanilla ice cream on the side helps balance out the sweetness of the cake and creates a nice temperature contrast. I like to serve this cake with cold milk or chocolate milk for the kids, while adults might enjoy a cup of coffee or tea to cut through the richness. For parties, you can set up a simple ice cream sundae bar alongside the cake, letting guests add their own toppings like extra sprinkles, whipped cream, or chocolate sauce.
Storage Instructions
Keep Fresh: Your rainbow explosion cake will stay fresh at room temperature for up to 2 days when stored in a cake container. If you live somewhere warm, it’s better to keep it in the fridge to prevent the buttercream from getting too soft. Just make sure to use an airtight container to protect all those pretty colors and keep the cake from drying out.
Refrigerate: Pop your cake in the fridge and it’ll stay good for up to 5 days. The buttercream will firm up when cold, which is totally normal. If you’re making this cake ahead for a party, you can definitely prepare it 2-3 days in advance and keep it refrigerated until the big day.
Serve: When you’re ready to serve the cake after refrigeration, let it sit at room temperature for about 30 minutes. This allows the buttercream to soften back up, making it easier to slice and giving you that perfect texture we all love in a good cake!
| Preparation Time | 30-45 minutes |
| Cooking Time | 60-65 minutes |
| Total Time | 90-110 minutes |
| Level of Difficulty | Medium |
Estimated Nutrition
Estimated nutrition for the whole recipe (without optional ingredients):
- Calories: 11500-12500
- Protein: 100-120 g
- Fat: 600-620 g
- Carbohydrates: 1300-1350 g
Ingredients
For the cake:
- 500g unsalted butter (room temperature for easy creaming)
- 500g granulated sugar
- 500g self-rising flour (sifted for a lighter cake)
- 500g whole eggs
- 75g sprinkles
For the buttercream:
- 750g unsalted butter (I like Kerrygold for this)
- 1 tsp purple food coloring
- 1 tsp blue food coloring
- 1 tsp green food coloring
- 1 tsp vanilla extract (pure vanilla for best flavor)
- 1 tsp white food coloring
- 1 tsp orange food coloring
- 200g raspberry preserves
- 1500g powdered sugar (sifted to prevent lumps)
- 1 tsp red food coloring
- 1 tsp yellow food coloring
For the ganache:
- 180g white chocolate (good quality for smooth ganache, such as Ghirardelli)
- rainbow sprinkles
- 1/2 tsp white food coloring
- 75 ml heavy cream
Step 1: Prepare Your Cake Tins and Batter
Begin by preheating your oven to 170ºC/150ºC fan.
Line two 8″/20cm springform tins with parchment paper and set aside.
In a large mixing bowl, beat together the butter and caster sugar until they are light and fluffy.
Then, add in the eggs and self-raising flour, beating again until the mixture is smooth.
Finally, fold in the funfetti sprinkles, ensuring they are evenly distributed throughout the batter.
Step 2: Bake and Cool the Cakes
Divide the batter evenly between the prepared tins and bake in the preheated oven for 60-65 minutes, or until a skewer inserted into the center comes out clean.
Once baked, let the cakes cool in the tins for 10 minutes before transferring them to a wire rack to cool completely.
Step 3: Make the Buttercream
With the cakes cooling, prepare the buttercream by beating room temperature unsalted butter on its own for a few minutes to soften and make it supple.
Gradually add the icing sugar, beating well after each addition until fully mixed in.
Continue beating as you add the white food coloring and vanilla extract, mixing for a few additional minutes.
Divide the buttercream into six small bowls, adding 300g to each, and color each bowl with a different color: red, yellow, orange, green, blue, and purple.
Set aside any leftover white buttercream.
Step 4: Assemble and Crumb Coat the Cake
Carefully slice each cake in half horizontally, creating a total of four layers.
Place the first layer on a 10″ cake board.
Spread a couple of tablespoons of buttercream over the sponge, then add a couple of spoons of jam to the center.
Repeat this process with the second and third layers, finishing with the final layer on top.
Use the leftover white buttercream to smooth over the cake’s sides and fill any gaps, creating a crumb coat.
Refrigerate or freeze the cake on the board for about an hour to set and firm up the layers.
Step 5: Decorate with Colored Buttercream
Once the cake has chilled, use a spatula or small piping bags to apply the colored buttercream around the sides of the cake.
Smooth the surface using a large metal scraper until the sides are even.
Don’t hesitate to add more buttercream as needed to achieve your desired finish.
Refrigerate the cake again while you prepare the drip.
Step 6: Add the Drip and Final Decorations
In a bowl, combine white chocolate and double cream and heat in the microwave in short 10-second bursts, stirring well after each interval, until the mixture is smooth.
Add some white food coloring and mix thoroughly.
Pour the ganache into a piping bag, snip off the end, and carefully drip it down the sides of the cake.
To create a multicolored buttercream swirl for the top, lay lines of each colored buttercream onto a large piece of cling film, roll it into a sausage, snip off the end, and place it inside a large piping bag with your favorite piping tip.
Pipe swirls onto the top of the cake.
Finish by sprinkling some funfetti sprinkles over the top and set the cake in the fridge to fully set.
In warm weather, store the cake in the fridge until serving.
Enjoy your colorful masterpiece!
