Here’s my go-to recipe for Bisquick lemon bars, featuring a simple shortcut crust using Bisquick mix, and a bright, tangy lemon filling that’s perfectly sweet and creamy.
These lemon bars are always the first to disappear at our neighborhood potlucks. I like to make a double batch – one for sharing and one for keeping at home. After all, who doesn’t love having a little something sweet with their afternoon coffee?

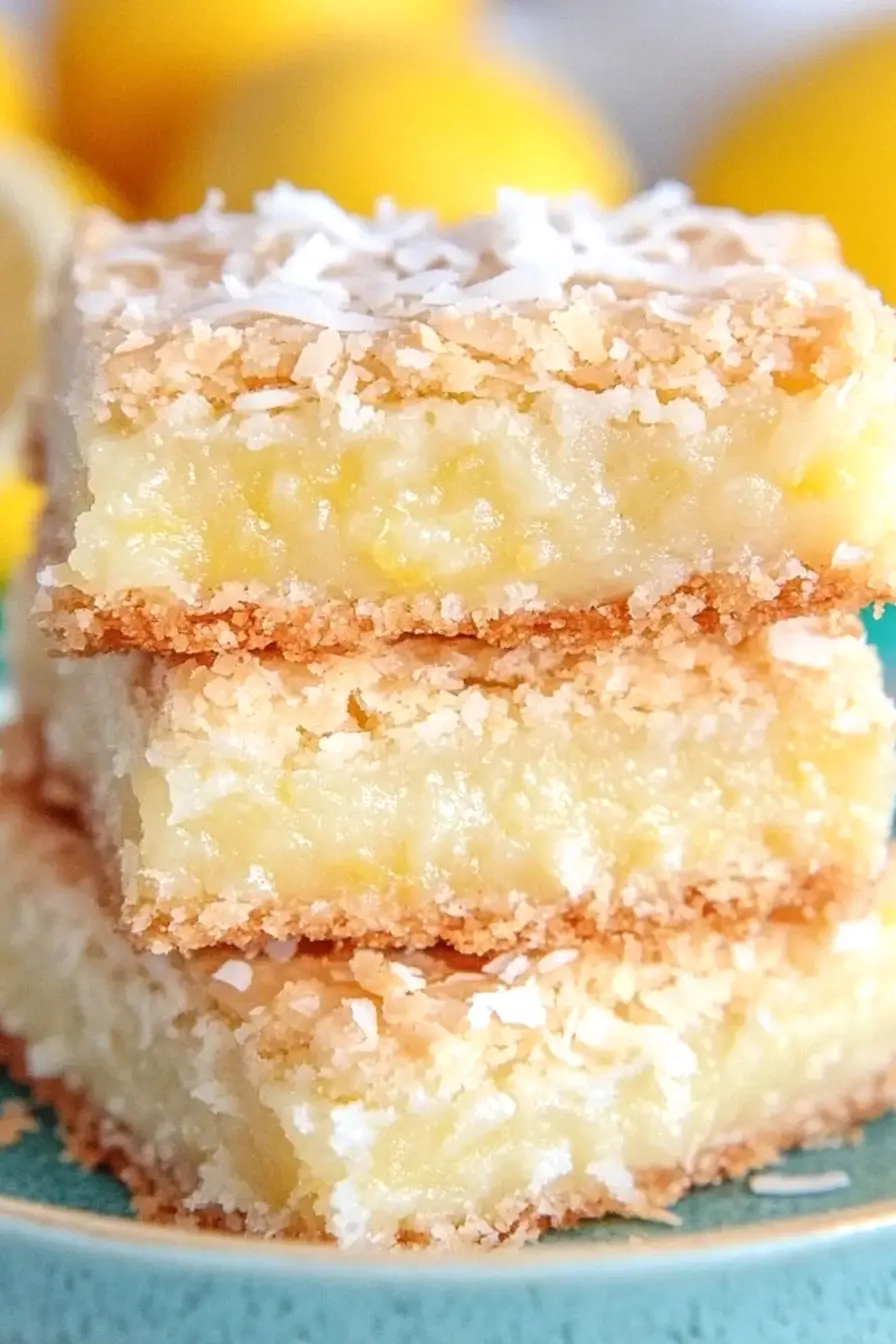
Why You’ll Love These Lemon Bars
- Time-saving shortcut – Using Bisquick mix instead of making a crust from scratch cuts down on prep time while still giving you that perfect buttery base.
- Simple ingredients – Most of these ingredients are probably already in your pantry, and you only need a few lemons to get that fresh citrus flavor.
- Perfect balance of flavors – The sweet coconut and powdered sugar topping pairs perfectly with the tangy lemon filling, while the buttery crust brings it all together.
- No special equipment needed – You don’t need a mixer or any fancy tools – just a bowl, a pan, and a spoon to make these delicious bars.
What Kind of Bisquick Should I Use?
Regular Bisquick mix is your best bet for these lemon bars, though Heart Smart Bisquick will work too if you’re looking to cut down on fat. The original Bisquick creates a better texture for the crust since it contains more shortening than its reduced-fat counterpart. If you’re working with an older box of Bisquick, give it a quick sniff test – the mix can take on a stale smell over time that might affect your bars. Just make sure to measure the Bisquick by spooning it into your measuring cup and leveling it off, rather than scooping directly from the box, which can pack too much mix into your cup.

Options for Substitutions
Need to make some swaps? Here are some helpful substitutions for these lemon bars:
- Bisquick mix: If you’re out of Bisquick, you can make your own by mixing 1 cup all-purpose flour, 1½ teaspoons baking powder, ¼ teaspoon salt, and 1 tablespoon shortening or cold butter.
- Liquid egg substitute: Regular eggs work perfectly here – use 2 large eggs. Or try 2 flax eggs (2 tablespoons ground flax mixed with 6 tablespoons water) for a vegan option, though the texture will be slightly different.
- Shredded coconut: Not a coconut fan? You can skip it entirely without affecting the recipe’s success.
- Lemon juice and zest: Fresh is best, but you can use bottled lemon juice in a pinch. For the zest, you can substitute with 1 teaspoon of lemon extract. Or try lime juice and zest for a fun twist!
- Confectioners’ sugar: You can make your own by blending regular sugar in a food processor until powdery, or skip the topping altogether.
Watch Out for These Mistakes While Baking
The trickiest part of making lemon bars with Bisquick is getting the base layer right – pressing too hard can make it tough and chewy, so use gentle, even pressure when patting the mixture into your pan. A common mistake is overbaking the crust; you’ll want to watch for just a light golden color around the edges, which usually takes about 12-15 minutes. For the filling, avoid overmixing after adding the eggs, as this can create air bubbles that will make your bars look uneven – mix just until the ingredients are combined. When it comes to the final dusting of powdered sugar, wait until the bars are completely cool, otherwise the sugar will melt and disappear into the bars. To get clean, neat cuts, dip your knife in hot water and wipe it clean between each slice.
What to Serve With Lemon Bars?
These sweet and tangy lemon bars are perfect for afternoon tea or as a light dessert after dinner. A hot cup of Earl Grey tea or a creamy cup of coffee makes an excellent companion to balance out the citrusy flavors. If you’re serving these at a dessert table, try pairing them with fresh berries on the side – raspberries and blackberries work especially well with the lemon taste. For a simple but nice presentation, you can add a small scoop of vanilla ice cream or a dollop of whipped cream on the plate alongside your lemon bar.
Storage Instructions
Keep Fresh: These zesty lemon bars stay fresh in an airtight container in the fridge for up to 5 days. I like to place wax paper or parchment paper between layers to prevent them from sticking together. The powdered sugar topping might absorb some moisture, but you can always give them a fresh dusting before serving.
Freeze: Want to save some for later? These bars freeze really well for up to 3 months. Just wrap them individually in plastic wrap, then place them in a freezer bag. Skip the powdered sugar topping until you’re ready to serve – it works better that way!
Thaw: When you’re craving a lemony treat, just pull them out of the freezer and let them thaw in the fridge overnight. Once they’re at room temperature, give them a fresh sprinkle of powdered sugar, and they’ll be good as new!
| Preparation Time | 15-20 minutes |
| Cooking Time | 35-40 minutes |
| Total Time | 50-60 minutes |
| Level of Difficulty | Easy |
Estimated Nutrition
Estimated nutrition for the whole recipe (without optional ingredients):
- Calories: 900-1000
- Protein: 10-15 g
- Fat: 35-45 g
- Carbohydrates: 135-150 g
Ingredients
For the base:
- 2 tbsp chilled butter (I like Kerrygold unsalted butter for this)
- 2 tbsp powdered sugar
- 1 cup Bisquick mix
For the filling:
- 2 tsp lemon zest (finely zested from fresh lemons)
- 1 tbsp Bisquick mix
- 2 tbsp lemon juice
- 1/2 cup liquid egg substitute
- 3/4 cup sugar
- 1/4 cup shredded coconut (sweetened for best flavor)
For the glaze:
- 1/2 cup confectioners’ sugar
- 1 tbsp lemon juice
Step 1: Prepare the Crust
Preheat your oven to 350°F (175°C).
In a small bowl, combine 1 cup of Bisquick mix with 2 tablespoons of powdered sugar.
Cut in the butter using a pastry blender or by pulling two table knives through the mixture in opposite directions until the mixture is crumbly.
Press this crust mixture evenly into an ungreased 8-inch square baking pan.
Step 2: Pre-bake the Crust
Bake the crust in the oven, uncovered, for about 10 minutes or until it is light brown.
While the crust is baking, move on to preparing the coconut mixture for the next layer.
Step 3: Prepare the Coconut Mixture and Bake Again
In a small bowl, mix together all the remaining bar ingredients to form your coconut mixture.
Once the crust is baked to a light brown color, pour the coconut mixture evenly over the baked layer.
Return the pan to the oven and bake for an additional 25 minutes, or until the mixture is set and turns golden brown.
Loosen the edges from the sides of the pan while the bars are still warm.
Step 4: Add the Lemon Glaze
In another small bowl, stir together the ingredients for the lemon glaze until smooth.
Spread this glaze evenly over the warm bars to give them a sweet and tangy finish.
Allow the bars to cool completely, which should take about 1 hour.
Step 5: Cut and Serve the Bars
Once the bars are completely cooled and the glaze has set, cut the dessert into 4 rows by 4 rows to yield 16 bars.
Serve and enjoy your deliciously sweet coconut lemon bars!
