Finding the perfect dessert for special occasions often feels like an impossible task. Between trying to please chocolate lovers, red velvet fans, and cheesecake enthusiasts, it’s easy to get stuck in an endless cycle of browsing recipes and second-guessing your choice, especially when you’re hosting a dinner party or holiday gathering.
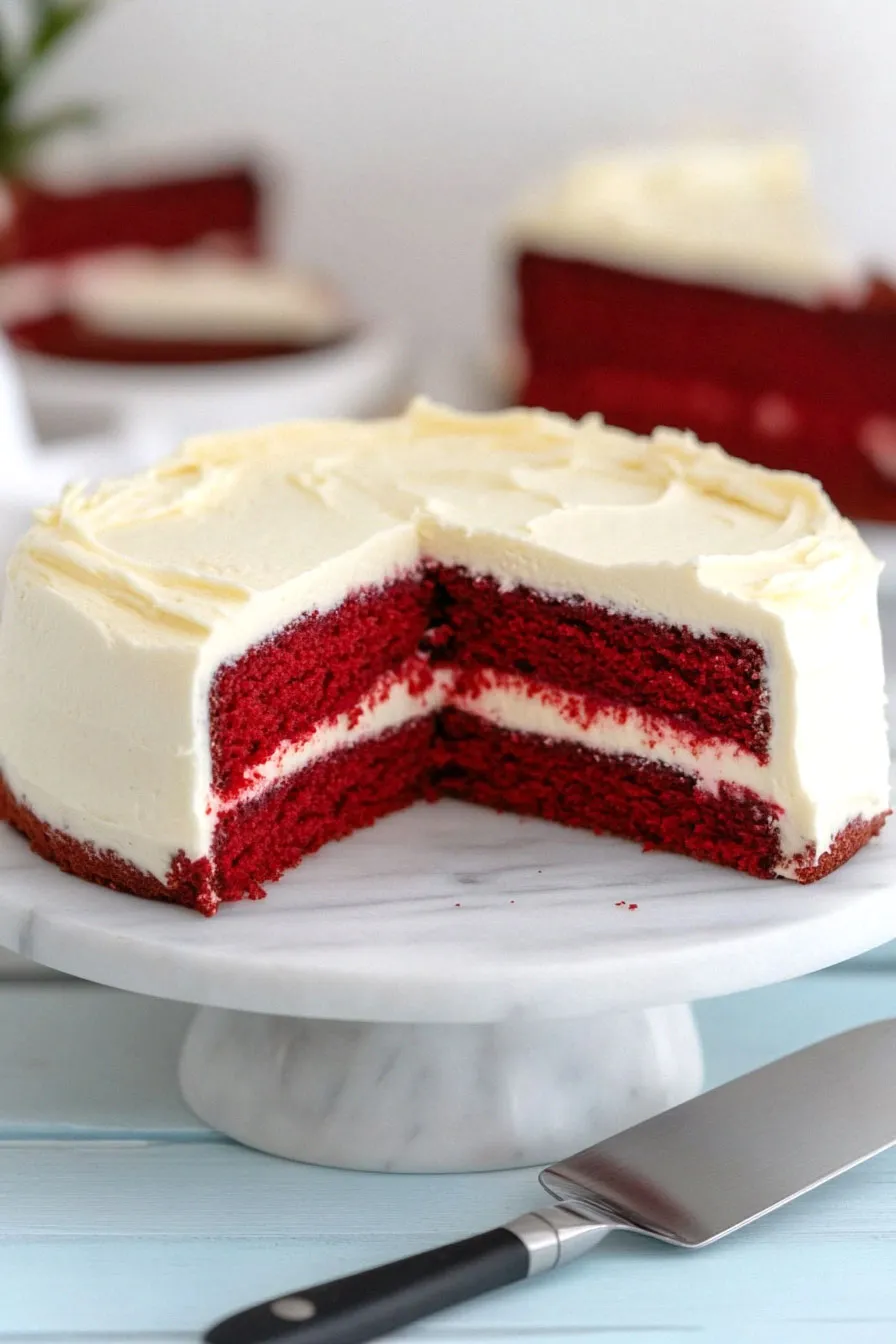
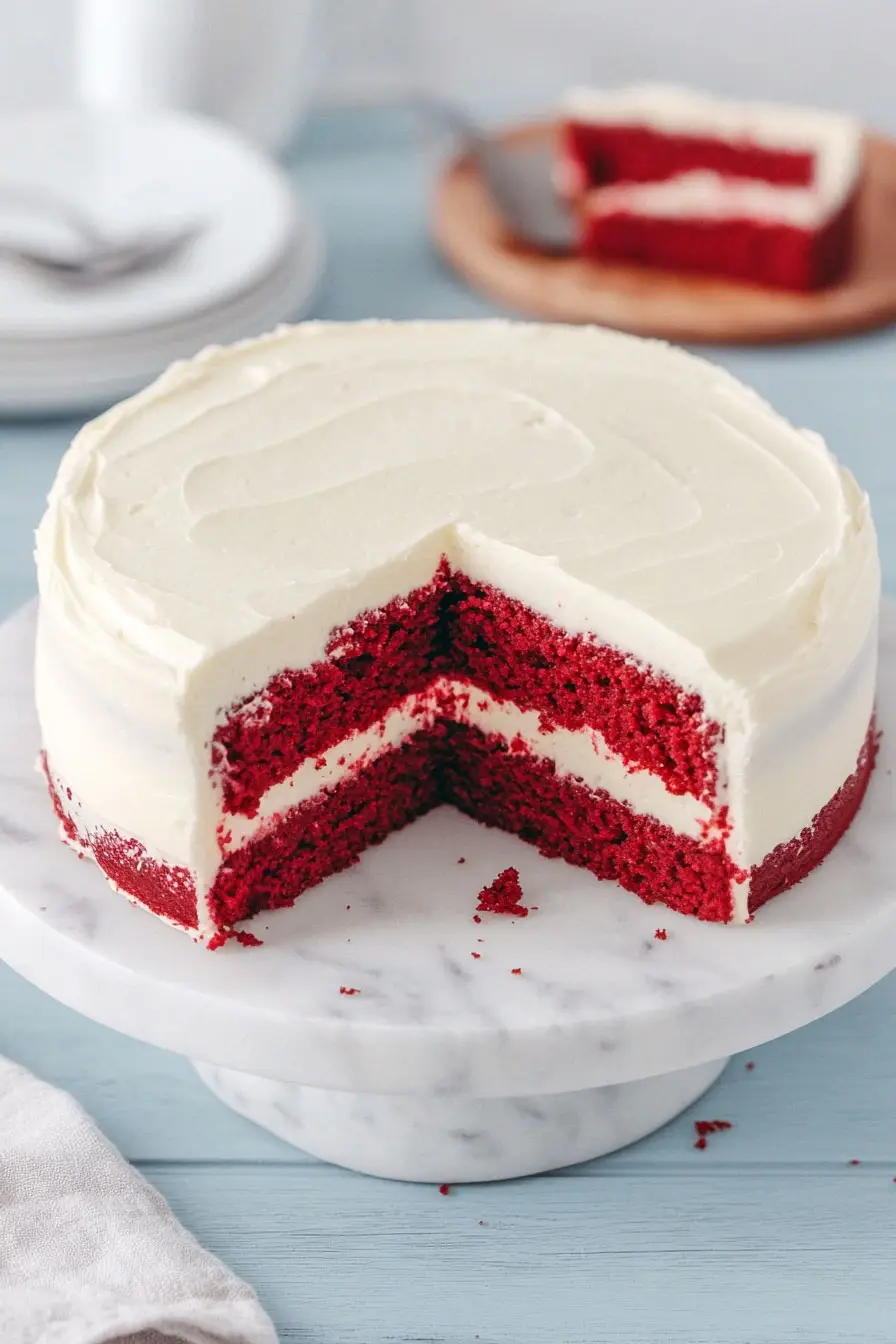
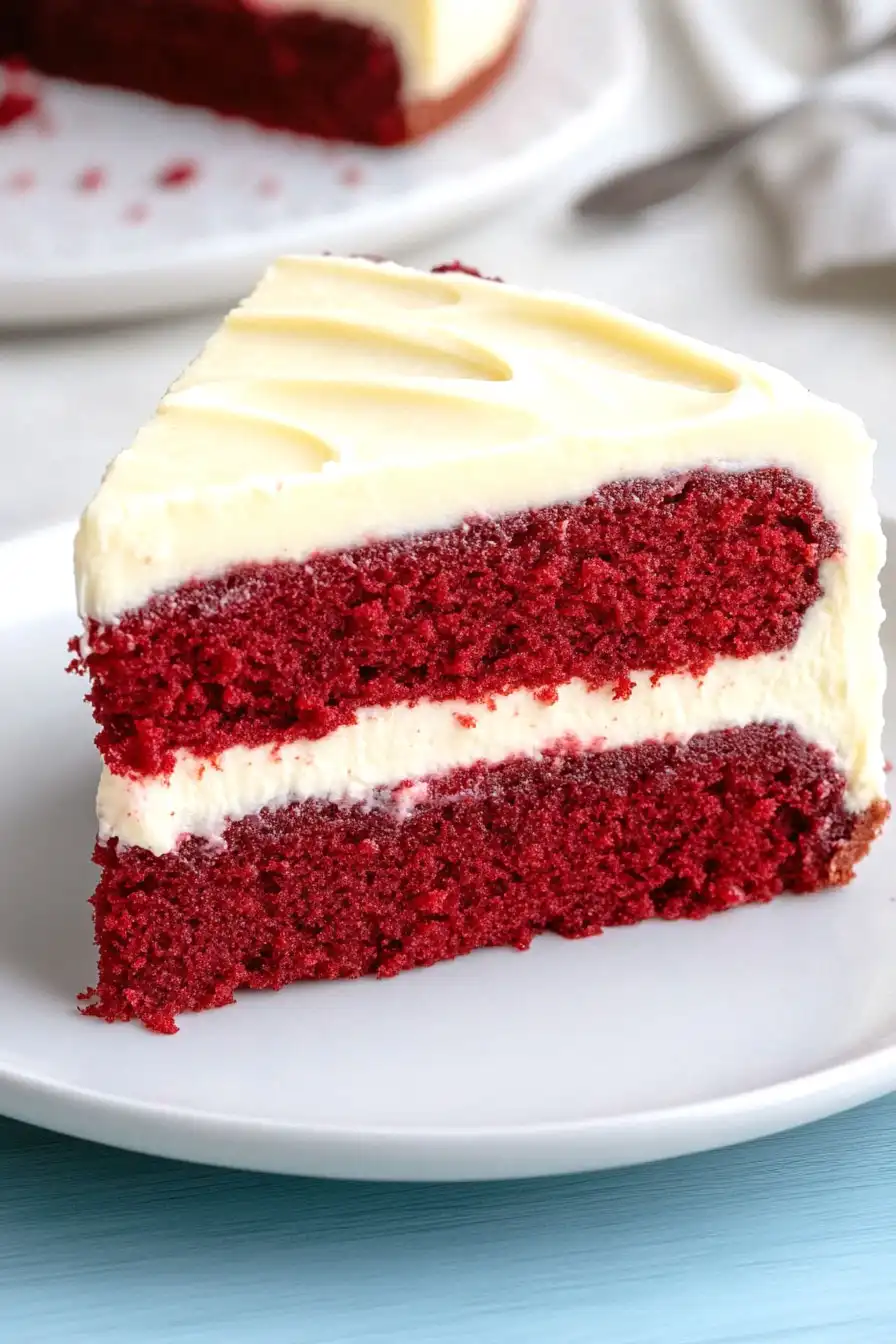
That’s why this cheesecake layered red velvet cake is such a game-changer: it combines two beloved desserts into one showstopper, satisfies multiple cravings at once, and proves that sometimes you really can have the best of both worlds.
Why You’ll Love This Red Velvet Cheesecake
- Show-stopping dessert – This combination of red velvet cake and cheesecake creates an impressive layered dessert that’s perfect for special occasions and celebrations.
- Two desserts in one – You get the best of both worlds – creamy New York-style cheesecake and classic red velvet cake, topped with rich cream cheese frosting.
- Make-ahead friendly – You can prepare this cake a day or two before serving, giving the flavors time to develop and making party planning easier.
- Familiar ingredients – While the recipe looks fancy, it uses basic baking ingredients you can find at any grocery store – no special shopping trips needed.
- Crowd favorite – The combination of moist cake, creamy cheesecake, and rich frosting makes this a dessert that everyone at the table will remember.
What Kind of Cream Cheese Should I Use?
For this red velvet cheesecake, regular full-fat block cream cheese is your best bet – specifically look for the ones in the 8-ounce blocks, not the spreadable kind that comes in tubs. Make sure to use plain cream cheese rather than flavored varieties, and always go for full-fat instead of reduced-fat versions since the fat content helps create that classic, rich cheesecake texture. It’s super important to let your cream cheese come to room temperature before mixing – this usually takes about an hour on the counter and helps prevent lumps in both your cheesecake layer and frosting. If you’re in a pinch, you can use generic store brands, but name brands like Philadelphia tend to give the most consistent results.
Options for Substitutions
This classic cake has some room for substitutions, though some ingredients are key to getting that perfect red velvet taste and texture:
- Cream cheese: For this recipe, stick with full-fat cream cheese – it’s essential for the right texture and taste. Light cream cheese won’t give you the same rich results.
- Buttermilk: No buttermilk? Mix 1 cup regular milk with 1 tablespoon lemon juice or white vinegar, let it sit for 5 minutes before using.
- Cake flour: You can make cake flour substitute by measuring out 2-1/2 cups all-purpose flour, removing 5 tablespoons, and replacing it with 5 tablespoons cornstarch. Sift together well.
- Canola oil: Any neutral-flavored vegetable oil works here – try safflower, sunflower, or even melted coconut oil (though this might add a slight coconut taste).
- Red food coloring: For a natural option, try 2 tablespoons of beet powder plus 2 tablespoons of water, though the color won’t be as bright. Gel food coloring works too – use about 2 tablespoons.
- Sour cream: Plain full-fat Greek yogurt makes a good substitute in the cheesecake layer. The texture will be slightly different but still tasty.
- Apple cider vinegar: White vinegar works just as well in this recipe – it helps activate the baking soda and won’t change the taste.
Watch Out for These Mistakes While Baking
The biggest challenge when making a cheesecake-layered red velvet cake is temperature control – using cold ingredients can lead to lumpy cream cheese layers and uneven baking, so make sure all your dairy products and eggs are at room temperature before starting. Another common mistake is overmixing the red velvet cake batter, which can lead to a tough, dense texture – mix just until the ingredients are combined, and stop as soon as you no longer see streaks of flour. The success of your cheesecake layer depends heavily on proper pan preparation – always line your pans with parchment paper and wrap the outside with foil to prevent water from seeping in during the water bath bake. For the smoothest cream cheese frosting, beat the cream cheese and butter separately before combining them, and add the powdered sugar gradually to avoid a grainy texture that can happen when you dump it all in at once.
What to Serve With Red Velvet Cheesecake?
This rich dessert calls for simple, complementary accompaniments that won’t overshadow its decadent layers. A scoop of good vanilla ice cream or a dollop of fresh whipped cream adds a nice temperature contrast and brings out the cake’s cream cheese flavors. For a fruity touch, serve each slice with fresh berries like raspberries or strawberries – their tartness helps balance the sweetness. If you’re serving coffee or tea (which pair wonderfully with this cake), consider adding some chocolate-covered espresso beans on the side for a fun garnish that ties in with the cake’s subtle cocoa notes.
Storage Instructions
Keep Fresh: This red velvet cheesecake cake needs to be kept in the refrigerator due to the cream cheese layers and frosting. Place it in a cake container or cover it well with plastic wrap, and it’ll stay fresh for up to 5 days. The cake actually tastes even better on day 2 after the flavors have had time to meld together!
Freeze: You can freeze this cake whole or in slices for up to 3 months. Wrap it tightly in plastic wrap, then add a layer of aluminum foil. For individual slices, place them in freezer-safe containers with wax paper between each piece. This is great for when you want to save some for later or prepare it ahead for a special occasion.
Thaw: When you’re ready to enjoy your frozen cake, move it to the refrigerator and let it thaw overnight. For the best texture and flavor, let it sit at room temperature for about 30 minutes before serving. The cream cheese frosting might need a gentle smoothing with a spatula after thawing.
| Preparation Time | 30-45 minutes |
| Cooking Time | 70-85 minutes |
| Total Time | 100-130 minutes |
| Level of Difficulty | Medium |
Estimated Nutrition
Estimated nutrition for the whole recipe (without optional ingredients):
- Calories: 5500-6000
- Protein: 60-70 g
- Fat: 350-400 g
- Carbohydrates: 600-650 g
Ingredients
For the cheesecake layer:
- 1/2 cup granulated sugar
- 1/2 cup sour cream (I prefer full-fat for richness)
- 2 (8 oz) blocks cream cheese (softened to room temperature)
- 1 1/2 tsp vanilla extract
- 2 large eggs (room temperature, lightly beaten)
- 4 tsp all-purpose flour
For the cake:
- 1 (1 oz) bottle red food coloring (for vibrant red color)
- 2 tsp apple cider vinegar
- 1 1/2 cups granulated sugar
- 2 tbsp cocoa powder
- 1 1/2 tsp baking soda
- 1 1/2 cups canola oil (or other neutral oil)
- 1 tsp vanilla extract
- 1 cup buttermilk
- 2 1/2 cups cake flour (sifted for best texture)
- 1 tsp salt
- 2 large eggs (room temperature)
For the frosting:
- 1 1/2 cups butter (unsalted, softened)
- 1 tbsp vanilla extract
- 3 to 3 1/2 cups powdered sugar (sifted to prevent lumps)
- 3 (8 oz) blocks cream cheese (softened)
Step 1: Prepare and Bake the Cheesecake Layer
Preheat your oven to 325°F (165°C).
Line the bottom of a 9-inch springform pan with parchment paper and grease the paper.
In a large bowl, beat together cream cheese and sugar until the mixture is smooth.
Add sour cream, flour, and vanilla, beating until well combined.
Add eggs, one at a time, beating on low speed just until blended after each addition.
Pour the cream cheese mixture into the prepared pan and place it on a baking sheet.
Bake for 40-50 minutes, or until the center is set.
Allow the cheesecake to cool on a wire rack for 10 minutes, then loosen the sides from the pan with a knife.
Continue cooling for 1 hour longer.
Refrigerate until ready to assemble, ensuring to cover the cheesecake once it’s completely cooled.
Step 2: Prepare and Bake the Cake Layers
Increase the oven setting to 350°F (175°C).
Line the bottoms of 2 greased 9-inch round baking pans with parchment paper and grease the paper as well.
In a large bowl, beat together sugar, oil, buttermilk, eggs, food coloring, vinegar, and vanilla until well blended.
In another bowl, whisk together flour, cocoa, baking soda, and salt.
Gradually add the dry ingredients into the sugar mixture, beating until well combined.
Divide the cake batter evenly between the prepared pans.
Bake for 30-35 minutes, or until a toothpick inserted into the center comes out clean.
Allow the cakes to cool in the pans for 10 minutes before removing them to wire racks.
Remove the parchment paper and cool completely.
Step 3: Prepare the Frosting
In a large bowl, beat together cream cheese, butter, and vanilla until the mixture is smooth.
Gradually add enough confectioners’ sugar to reach your desired frosting consistency.
Beat until the frosting is smooth and spreadable.
Step 4: Assemble the Cake
Place one cake layer on a serving plate.
Spread 1 cup of frosting evenly over this cake layer.
Carefully remove the cooled cheesecake from the refrigerator and place it on top of the frosting.
Spread another 1 cup of frosting over the cheesecake layer.
Top with the remaining cake layer.
Use the remaining frosting to cover the top and sides of the cake, smoothing it out as desired.
Step 5: Refrigerate and Serve
Refrigerate the assembled cake overnight to allow the flavors to meld and the cake to firm up.
Before serving, allow the cake to come to room temperature for about 10-15 minutes for easier slicing.
Enjoy your delicious creation!
