Here is my favorite sheet pan pecan pie recipe, with a simple, foolproof crust that bakes right in the pan, and a rich filling loaded with pecans, brown sugar, corn syrup, and a hint of vanilla.
This sheet pan pecan pie is perfect when you need to feed a crowd during the holidays. I love making it because it serves way more people than a regular pie, and cleanup is so much easier. Plus, everyone gets that perfect ratio of filling to crust in every bite.

Why You’ll Love This Sheet Pan Pecan Pie
- Feeds a crowd – This sheet pan version makes way more servings than a regular pie, so it’s perfect for holidays, potlucks, or big family gatherings without having to make multiple pies.
- Simple ingredients – You probably have most of these pantry staples on hand already, and the ingredient list is refreshingly short and straightforward.
- Easy serving and storage – No need to worry about perfect pie slices – just cut into squares and serve. Plus, it stores and travels much better than a traditional round pie.
- Quick preparation – Ready in just over an hour, this recipe comes together faster than you’d expect and requires minimal hands-on time.
- Classic pecan pie flavor – All the gooey, nutty goodness you love about traditional pecan pie, just in a more practical format that’s easier to make and share.
What Kind of Pecans Should I Use?
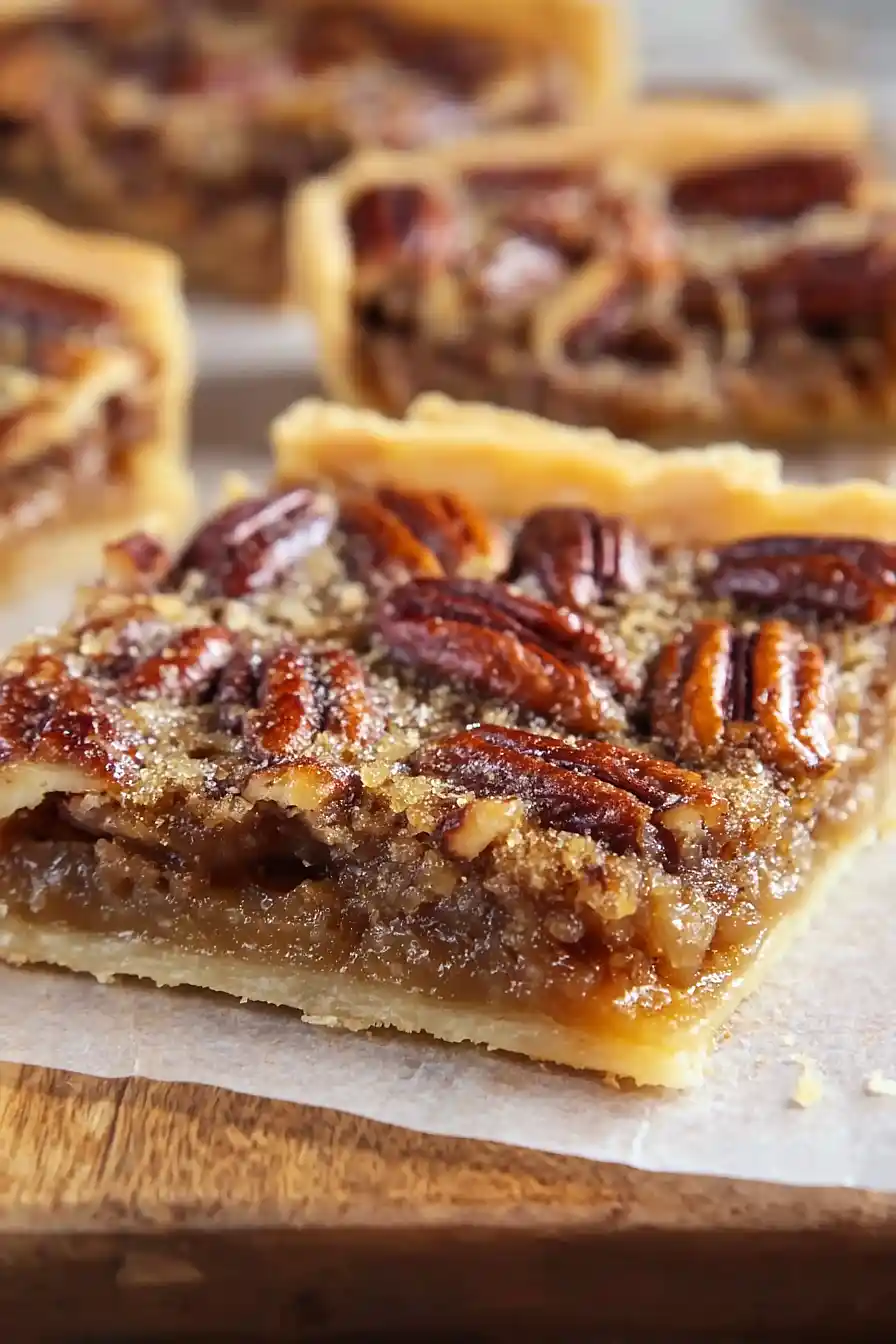
For sheet pan pecan pie, you’ll want to use pecan halves rather than pieces since they create a more attractive presentation and better texture. Fresh pecans will give you the best flavor, but if you only have access to pre-packaged ones from the grocery store, those work perfectly fine too. Just make sure to give them a quick taste test before using – pecans can go rancid pretty quickly due to their high oil content, so if they taste bitter or off, it’s time to get a fresh bag. You can use either raw or lightly toasted pecans, though toasting them for a few minutes beforehand will bring out even more of that rich, nutty flavor.

Options for Substitutions
This sheet pan pecan pie is pretty forgiving when it comes to swaps, though some ingredients work better than others:
- Pie crust: Store-bought crust works perfectly fine if you’re short on time. You can also try graham cracker crust for a different twist, though it won’t be as sturdy for a sheet pan.
- Light corn syrup: Dark corn syrup will give you a deeper, more molasses-like flavor. You can also substitute with honey or maple syrup, but expect a slightly different taste and texture.
- Light brown sugar: Dark brown sugar works great and adds more molasses flavor. Regular white sugar is fine too, but you’ll lose some of that rich, caramel-like taste.
- Butter: Coconut oil (melted) or vegetable oil can work in a pinch, though butter really gives the best flavor and texture.
- Pecan halves: Chopped pecans work just as well, or you can mix in some walnuts for variety. Just stick with the same total amount – pecans are really what make this pie special, so I wouldn’t recommend swapping them out completely.
- Vanilla extract: Bourbon or rum extract can add a nice twist if you want to get fancy, but regular vanilla is perfect as is.
Watch Out for These Mistakes While Baking
The biggest mistake when making sheet pan pecan pie is not pre-baking the crust, which leads to a soggy bottom that never gets crispy – blind bake your crust for 10-12 minutes before adding the filling to ensure it stays flaky and golden.
Another common error is not arranging the pecans evenly across the surface, so take a moment to distribute them by hand after pouring the filling to avoid bare spots or clumps.
Since sheet pan pies bake faster than traditional round pies, keep a close eye on the edges and cover them with foil if they start browning too quickly, and remember that the center should still have a slight jiggle when you remove it from the oven since it will continue setting as it cools.
For clean slices that don’t fall apart, let the pie cool completely for at least 2 hours before cutting – I know it’s tempting, but patience pays off here!
What to Serve With Sheet Pan Pecan Pie?
This rich, nutty dessert is perfect on its own, but a scoop of vanilla ice cream on the side really makes it special – the cold creaminess balances out all that sweet, buttery goodness. You could also try it with a dollop of freshly whipped cream or even a drizzle of caramel sauce if you’re feeling extra indulgent. Since pecan pie is pretty sweet and filling, I like to serve it with a hot cup of coffee or black tea to cut through the richness. For holidays or dinner parties, consider pairing it with other classic desserts like pumpkin pie or apple crisp so everyone can try a little bit of everything.
Storage Instructions
Keep Fresh: Your sheet pan pecan pie will stay delicious covered tightly with plastic wrap or foil at room temperature for up to 3 days. If your kitchen runs warm, pop it in the fridge where it’ll keep for up to a week. I actually think it tastes even better the next day once all those flavors have had time to meld together.
Freeze: This pie freezes like a dream! Wrap individual squares in plastic wrap, then place them in a freezer-safe container for up to 3 months. You can also freeze the whole pan if you prefer – just make sure it’s wrapped well to prevent freezer burn.
Serve: Thaw frozen pieces at room temperature for about 30 minutes, or overnight in the fridge if you’re planning ahead. If you want to warm it up, a quick 10-15 seconds in the microwave or a few minutes in a low oven will bring back that fresh-baked taste. It’s honestly just as good cold though!
| Preparation Time | 15-25 minutes |
| Cooking Time | 45-50 minutes |
| Total Time | 60-75 minutes |
| Level of Difficulty | Medium |
Estimated Nutrition
Estimated nutrition for the whole recipe (without optional ingredients):
- Calories: 3100-3400
- Protein: 35-40 g
- Fat: 210-230 g
- Carbohydrates: 320-350 g
Ingredients
For the crust:
- 1 pie pastry (homemade or prepared, for a 9×13 inch pan)
For the filling:
- 2 cups pecan halves (adds nice texture)
- 2 tsp vanilla extract
- 1/4 cup butter (melted and cooled slightly)
- 3 large eggs
- 1/2 cup light corn syrup (I use Karo brand)
- 1/2 cup packed light brown sugar
Step 1: Prepare the Pie Crust Base
- 1 recipe pie pastry (use homemade or prepared)
Preheat your oven to 350°F (175°C).
Line a 9×13-inch baking pan with parchment paper to prevent sticking.
Roll out the pie pastry, whether homemade or store-bought, to fit the bottom and slightly up the sides of the pan.
Carefully transfer the crust to the pan, crimping the edges as needed for an even finish.
Place the crust-lined pan in the freezer while you prepare the filling; this helps the crust hold its shape during baking.
Step 2: Mix the Pecan Filling
- 3 large eggs
- 1/2 cup light corn syrup
- 1/2 cup packed light brown sugar
- 1/4 cup butter, melted
- 2 tsp vanilla extract
- 2 cups pecan halves
In a large mixing bowl, combine the eggs, light corn syrup, packed light brown sugar, melted butter, and vanilla extract.
Whisk these ingredients together until the mixture is fully blended and smooth.
Gently stir in the pecan halves until they’re evenly coated with the mixture.
I like to reserve a handful of pecan halves to arrange on top for a decorative finish before baking.
Step 3: Assemble and Bake the Bars
- pie crust from Step 1
- pecan filling from Step 2
Remove the crust from the freezer and pour the pecan filling evenly into the prepared pie crust.
If you reserved a few pecan halves, arrange them decoratively on top of the filling now.
Carefully transfer the pan to the preheated oven and bake for 45-50 minutes, or until the filling is set in the center and the crust is golden brown at the edges.
If the edges brown too quickly, you can cover them loosely with foil partway through baking.
Step 4: Cool and Cut into Squares
Allow the bars to cool completely in the pan before removing them.
Once cooled, lift the bars out using the parchment paper and cut them into squares for serving.
For the neatest slices, I recommend using a sharp knife and wiping it clean between cuts.
