I’ve always been the type of person who can’t choose between dessert and ice cream. Why pick one when you can have both, right? That’s exactly how I feel about s’mores and ice cream. They’re both perfect summer treats, but together? They’re even better.
Making s’mores ice cream at home is easier than you might think. You get all those classic campfire flavors – chocolate, marshmallow, and graham crackers – in one creamy scoop. Plus, you don’t have to worry about burnt marshmallows or sandy graham crackers from an actual camping trip.
The best part is that you probably already have most of the ingredients in your kitchen. No special trips to the store or hunting down fancy ingredients. Just good old-fashioned s’mores flavors turned into the perfect summer dessert.

Why You’ll Love This S’mores Ice Cream
- Nostalgic campfire flavors – This ice cream captures all the classic s’mores taste you remember from childhood camping trips, but in a creamy, scoopable form you can enjoy anytime.
- Rich, homemade texture – The custard base made with egg yolks creates that luxurious, creamy ice cream texture that’s so much better than store-bought versions.
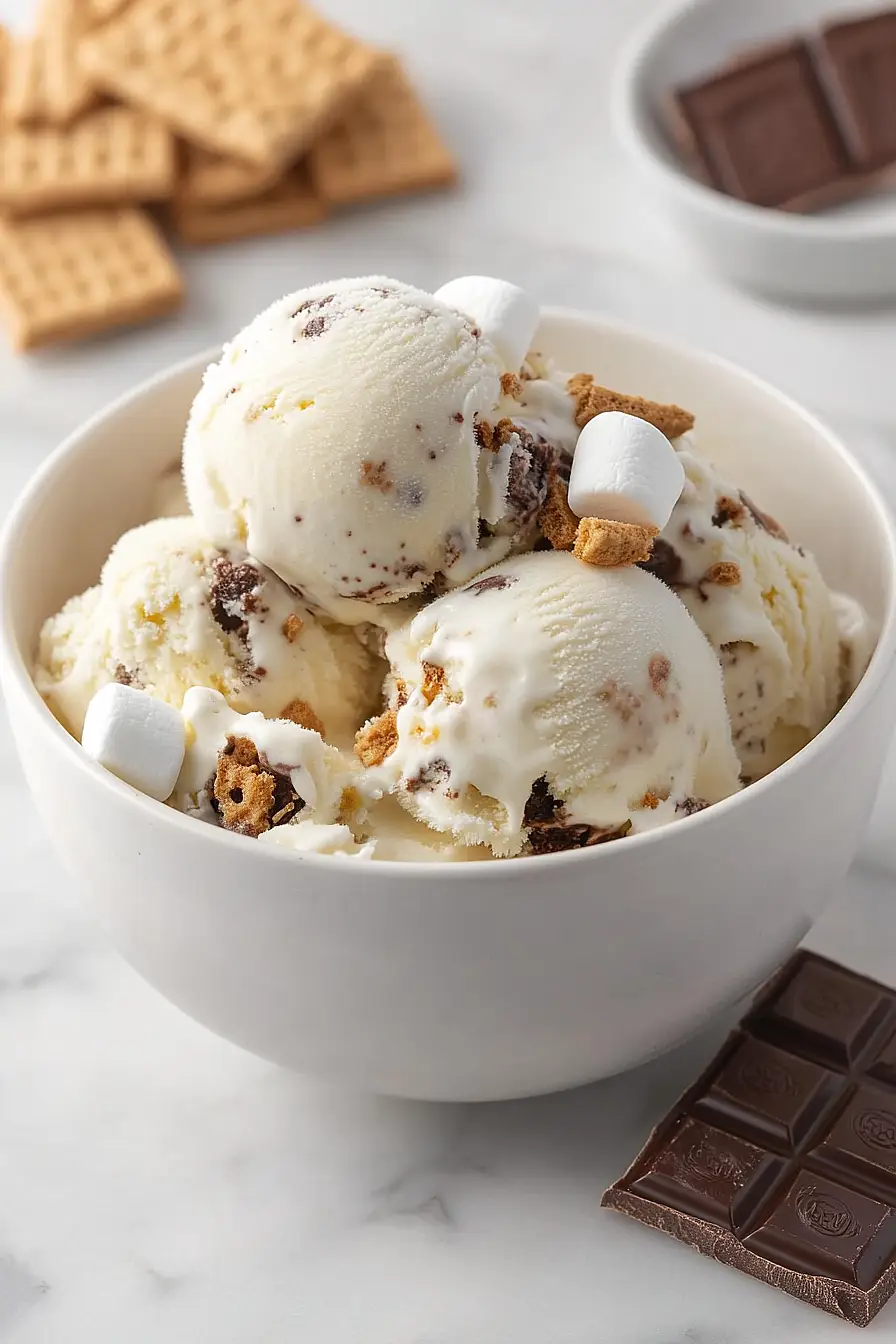
- Fun mix-ins – The toasted marshmallows, crumbled graham crackers, and chocolate pieces give you different textures and bursts of flavor in every bite.
- Perfect summer treat – When it’s too hot for a campfire but you’re craving s’mores, this ice cream hits the spot and keeps you cool at the same time.
- Customizable toppings – The optional marshmallow fluff and hot fudge let you go all out and make it as indulgent as you want.
What Kind of Chocolate Should I Use?
For s’mores ice cream, you’ll want to stick with milk chocolate since that’s what makes traditional s’mores so good. A standard Hershey’s chocolate bar works perfectly and gives you that nostalgic s’mores flavor everyone expects. You can also use any other milk chocolate bar you have on hand – just avoid dark chocolate since it might be too intense and overpower the sweet marshmallow and graham cracker flavors. When chopping your chocolate, aim for chunks that are big enough to give you a nice bite but small enough that they won’t be too hard when frozen. If you’re feeling fancy, you can even use chocolate chips, but there’s something special about using an actual chocolate bar that makes it feel more like the real s’mores experience.
Options for Substitutions
This s’mores ice cream is pretty forgiving when it comes to swaps, so here are some options if you need to make changes:
- Heavy whipping cream: You can substitute with half-and-half, but your ice cream will be less rich and creamy. For a lighter version, try using 1 cup heavy cream and 1 cup whole milk instead of the full 2 cups of cream.
- Egg yolks: If you’re worried about raw eggs or want to skip the custard base, you can make a simple no-churn version using 2 cups heavy cream whipped to soft peaks, then folded into 1 can of sweetened condensed milk with the vanilla.
- Toasted marshmallows: Regular mini marshmallows work fine if you don’t want to toast them, though you’ll miss that smoky flavor. You can also use marshmallow fluff – just swirl in about 1/2 cup after churning.
- Graham crackers: Honey graham crackers, cinnamon grahams, or even crushed vanilla wafers make good substitutes. Just keep the same amount for that crunchy texture.
- Chocolate bar: Any chocolate works here – milk chocolate chips, dark chocolate chunks, or even chopped up Hershey’s bars. About 4-6 ounces total should do the trick.
Watch Out for These Mistakes While Cooking
The biggest mistake when making homemade ice cream is rushing the custard base and ending up with scrambled eggs instead of smooth, creamy goodness – keep your heat on medium-low and stir constantly while slowly adding the hot milk mixture to the egg yolks.
Another common error is not chilling your custard base completely before churning, which can result in ice cream that takes forever to freeze or has a grainy texture, so plan ahead and let it chill for at least 4 hours or overnight.
When adding your s’mores mix-ins, wait until the last few minutes of churning to fold in the graham crackers, chocolate, and marshmallows – adding them too early can cause them to break down and muddy the flavors.
For the best texture, make sure your toasted marshmallows are completely cooled before adding them, otherwise they’ll melt and create sticky clumps throughout your ice cream.

What to Serve With S’mores Ice Cream?
This s’mores ice cream is pretty amazing on its own, but there are some fun ways to make it even more special! I love serving it in waffle cones or bowls to play up that campfire treat vibe, and you can even dip the rim of the cone in melted chocolate and crushed graham crackers for extra flair. It’s also fantastic alongside warm brownies or chocolate chip cookies – the temperature contrast between the cold ice cream and warm dessert is perfect. For a real showstopper, try making ice cream sandwiches using actual graham crackers, or serve scoops with a drizzle of hot fudge and a few toasted marshmallows on top.
Storage Instructions
Keep Frozen: Your s’mores ice cream will stay creamy and delicious in the freezer for up to 2 months when stored in an airtight container. I like to press a piece of plastic wrap directly onto the surface before putting the lid on to prevent ice crystals from forming on top.
Make Ahead: This is actually one of those desserts that’s perfect for making ahead! The flavors get even better after sitting in the freezer for a day or two. You can make it up to a week before you need it, and it’ll be ready to scoop whenever you want that campfire taste.
Serve: Let the ice cream sit out for about 5-10 minutes before scooping if it’s been in the freezer for a while. This makes it much easier to get those perfect scoops without breaking your ice cream scoop! If you added the optional marshmallow fluff and hot fudge, give it a gentle stir before serving to distribute those goodies.
| Preparation Time | 20-30 minutes |
| Cooking Time | 15-20 minutes |
| Total Time | 1-2 hours |
| Level of Difficulty | Medium |
Estimated Nutrition
Estimated nutrition for the whole recipe (without optional ingredients):
- Calories: 1800-2100
- Protein: 20-25 g
- Fat: 160-180 g
- Carbohydrates: 160-180 g
Ingredients
For the custard base:
- 2 cups heavy cream (for a richer, creamier base)
- 3/8 cup granulated sugar
- 1 cup whole milk
- 1 1/2 tsp vanilla extract (I use pure Nielsen-Massey vanilla extract)
- 3/8 cup granulated sugar
- 5 egg yolks
- 2 pinches salt (fine sea salt is best)
For the ice cream mix-ins:
- 1 chocolate bar, cut into chunks (dark chocolate is recommended)
- 2 cups marshmallows, toasted (mini marshmallows work well)
- 6 graham crackers, broken into pieces
For optional finishing layers:
- 1/2 cup marshmallow spread
- 1/2 cup warm chocolate fudge
Step 1: Heat Milk and Cream Base
- 1 cup whole milk
- 2 cups heavy cream
- 3/8 cup granulated sugar (half of 3/4 cup)
- 2 pinches salt
- 1 1/2 tsp vanilla extract
In a medium saucepan, combine 1 cup whole milk, 2 cups heavy cream, 3/8 cup granulated sugar (half of the 3/4 cup), 2 pinches salt, and 1 1/2 teaspoons vanilla extract.
Whisk intermittently as you bring the mixture to a boil over medium heat.
This forms the base for your ice cream.
Step 2: Prepare Egg Yolk Mixture
- 5 egg yolks
- 3/8 cup granulated sugar (remaining half of 3/4 cup)
While the dairy mixture is heating, combine 5 egg yolks and the remaining 3/8 cup granulated sugar (the other half of 3/4 cup) in a medium bowl.
Whisk vigorously until the yolks are well combined and slightly pale.
This step helps create a creamy, custard-like texture for the ice cream.
Step 3: Temper Egg Yolks and Cook Custard
- milk and cream base (from Step 1)
- egg yolk mixture (from Step 2)
Once the milk and cream mixture is boiling, slowly pour 1/3 of it into the yolk mixture while whisking constantly to temper the yolks.
Repeat with the second and final third, whisking well after each addition.
Then pour the combined mixture back into the saucepan.
Heat gently over medium-low, stirring continuously for 2 minutes without letting it boil.
This thickens the custard.
I like to use a heatproof spatula to ensure nothing sticks to the pan.
Step 4: Chill the Ice Cream Base
Transfer the cooked custard to a bowl and let it cool to room temperature.
Once cooled, refrigerate the mixture for 1-2 hours until it is well chilled.
Chilling ensures the base churns up smooth and creamy in the ice cream maker.
Step 5: Churn the Ice Cream and Prepare Mix-ins
- chilled custard base (from Step 4)
- 2 cups marshmallows, toasted
- 1 chocolate bar, cut into chunks
- 6 graham crackers, broken into pieces
Once the base is chilled, process it in your ice cream maker according to the manufacturer’s instructions.
While the ice cream is churning, toast 2 cups marshmallows until lightly golden, chop 1 chocolate bar into chunks, and break 6 graham crackers into small pieces.
Add these mix-ins to the churning ice cream in the last 3 minutes for even distribution.
Step 6: Layer and Freeze the Ice Cream
- 1/2 cup marshmallow spread
- 1/2 cup warm chocolate fudge
- churned ice cream with mix-ins (from Step 5)
Once the ice cream is finished churning and mix-ins have been added, transfer it into a freezer-safe container.
If you’d like, drizzle 1/2 cup marshmallow spread and 1/2 cup warm chocolate fudge between the layers as you fill the container for extra pockets of flavor.
Freeze until firm.
I like to add the fudge and marshmallow spread in thin ribbons so every bite has some gooey goodness.
Step 7: Serve and Garnish
When ready to serve, scoop the ice cream into bowls and top each serving with additional toasted marshmallows for garnish.
Enjoy your homemade s’mores ice cream!
