Here’s my go-to Mexican nachos recipe, with crispy tortilla chips layered with melted cheese, seasoned ground beef, fresh tomatoes, and all your favorite toppings piled high.
These nachos are my kids’ most-wanted weekend snack, and I often make a huge platter for game days or casual get-togethers. Sometimes I make a double batch because they disappear so quickly – and let’s be honest, cold nachos just aren’t the same the next day!

Why You’ll Love These Nachos
- Fresh and authentic – Made with real corn tortillas that you fry yourself, these nachos deliver that perfect crunch and authentic Mexican flavor you can’t get from store-bought chips.
- Customizable toppings – From spicy jalapeños to cool Mexican cream, you can pile on exactly what you like and adjust the heat level to your preference.
- Perfect for sharing – These nachos are ideal for game day, movie night, or any gathering where you want to serve something that everyone can dig into together.
- Quick assembly – Once your chips are fried, it’s just a matter of layering on your favorite toppings – you can have these ready in no time.
- Restaurant quality at home – With fresh ingredients and homemade tortilla chips, you’ll get that same satisfying taste you’d expect from your favorite Mexican restaurant.
What Kind of Tortillas Should I Use?
Corn tortillas are the traditional and best choice for making authentic Mexican nachos – flour tortillas just won’t give you that classic crunch and flavor you’re looking for. Yellow corn tortillas tend to be sturdier and hold up better during frying compared to white corn varieties, though either will work well. When shopping, look for tortillas that are fresh and pliable without any dry or brittle edges, as these may break unevenly when frying. If your tortillas feel stiff right out of the package, you can wrap them in slightly damp paper towels and microwave them for about 30 seconds to make them more flexible before cutting and frying. Just make sure they’re completely dry before they hit the hot oil.

Options for Substitutions
Making nachos is fun and there’s plenty of room to switch things up based on what you have in your kitchen:
- Corn tortillas: While corn tortillas give you that classic nacho crunch and authentic taste, you can save time by using store-bought tortilla chips. Just make sure they’re thick enough to hold toppings.
- Refried beans: You can swap refried beans with black beans or pinto beans – just mash them slightly and season with cumin and garlic powder. Or skip the beans altogether if you prefer.
- Cheddar cheese: Feel free to use Monterey Jack, pepper jack, or a Mexican cheese blend. For a dairy-free option, there are several plant-based shredded cheese alternatives available.
- Jalapeños: If jalapeños are too spicy, try milder pickled jalapeños or bell peppers. For more heat, serrano peppers work great.
- Mexican cream: Can’t find Mexican cream? Use sour cream or Greek yogurt instead. For a dairy-free version, try cashew cream.
- Guacamole: If you can’t find ripe avocados for guacamole, you can simply slice some avocados or skip it – though it does add nice creaminess to the nachos.
Watch Out for These Mistakes While Cooking
The biggest challenge when making nachos is ending up with soggy chips – to avoid this, make sure to fry your tortilla quarters in small batches at 350-375°F until they’re golden brown and crispy, then drain them well on paper towels and let them cool completely before adding toppings.
When it comes to layering, a common mistake is piling everything on top, which leads to bare chips at the bottom – instead, create multiple thin layers of chips, beans, and cheese, ensuring every chip gets some love.
The temperature of your refried beans matters more than you might think – they should be warm but not piping hot when added to prevent making the chips soft, and it’s best to thin them slightly with water so they’re easily spreadable but not runny.
For the crispiest results, add cold toppings like guacamole, pico de gallo, and Mexican cream only after the cheese has melted and you’re ready to serve, keeping your nachos crunchy until the last bite.
What to Serve With Nachos?
These loaded nachos can easily be turned into a complete meal with just a few extra sides! A bowl of Mexican rice makes a great accompaniment, helping to soak up all those tasty toppings that might fall off your chips. I love setting up a DIY salsa bar with different options like smoky chipotle, fresh mango salsa, or extra pico de gallo so everyone can customize their plate. For something fresh and cool to balance out the heat from the jalapeños, try serving a simple cabbage slaw dressed with lime juice and cilantro. And don’t forget some ice-cold Mexican beer or fresh lime margaritas to wash it all down!
Storage Instructions
Keep Components Separate: For the best nacho experience, store each topping separately in airtight containers in the fridge. The toppings like guacamole, pico de gallo, and Mexican cream will stay fresh for 2-3 days. The homemade tortilla chips can be kept in a sealed bag at room temperature for up to 5 days.
Save: If you have leftover assembled nachos (though this rarely happens!), they won’t be as crispy the next day. But you can store them in the fridge for up to 24 hours – just know the chips will soften under the toppings. The refried beans can be kept in an airtight container in the fridge for up to 5 days.
Assemble Fresh: For the tastiest results, I recommend preparing your toppings ahead but assembling the nachos just before serving. This way, you’ll get that perfect combination of warm, melted cheese and crispy chips that makes nachos so good!
| Preparation Time | 15-20 minutes |
| Cooking Time | 20-30 minutes |
| Total Time | 35-50 minutes |
| Level of Difficulty | Medium |
Estimated Nutrition
Estimated nutrition for the whole recipe (without optional ingredients):
- Calories: 2500-2800
- Protein: 50-60 g
- Fat: 200-220 g
- Carbohydrates: 250-270 g
Ingredients
For the nachos:
- 1 large jalapeño (thinly sliced)
- 1 cup vegetable oil (or canola oil)
- 8 corn tortillas
- 2 green onions
- 4 oz shredded cheddar cheese (sharp cheddar works best)
For the refried beans:
- 1.5 cups water
- 1 package refried beans (I use Rosarita refried beans)
For serving:
- 1 cup pico de gallo salsa
- 1 cup guacamole (homemade for best flavor)
- 1 cup Mexican cream
Step 1: Prepare the Oven and Cook Refried Beans
Place the oven rack on the lower shelf and preheat the oven to 350°F.
To prepare the Herdez refried beans, bring 1 ½ cups of water to a boil in a 1 to 2-quart pot or frying pan.
Once boiling, stir in the pouch contents, then cover and simmer on low heat for 5 minutes, stirring occasionally.
Remove from heat, uncover, stir, and let sit for 5 minutes.
If you prefer a creamier texture, stir in a couple of tablespoons of extra hot water.
Set aside while you fry the tortillas.
Step 2: Prepare for Frying Tortillas
Before frying the tortillas, cover a large plate with several paper towels to absorb excess oil.
This will help keep your fried tortillas crisp and less oily.
Step 3: Fry the Tortillas
Heat oil in a skillet over medium-high heat.
Place several tortilla triangles into the hot oil in a single layer, taking care not to overcrowd them.
Use kitchen tongs or a slotted spatula to turn the tortillas over, frying both sides for about 2 minutes per batch, until they are crispy and lightly golden.
Place the fried tortillas on the prepared plate to absorb any excess oil.
Continue frying the remaining tortillas, ensuring the oil stays hot for each batch.
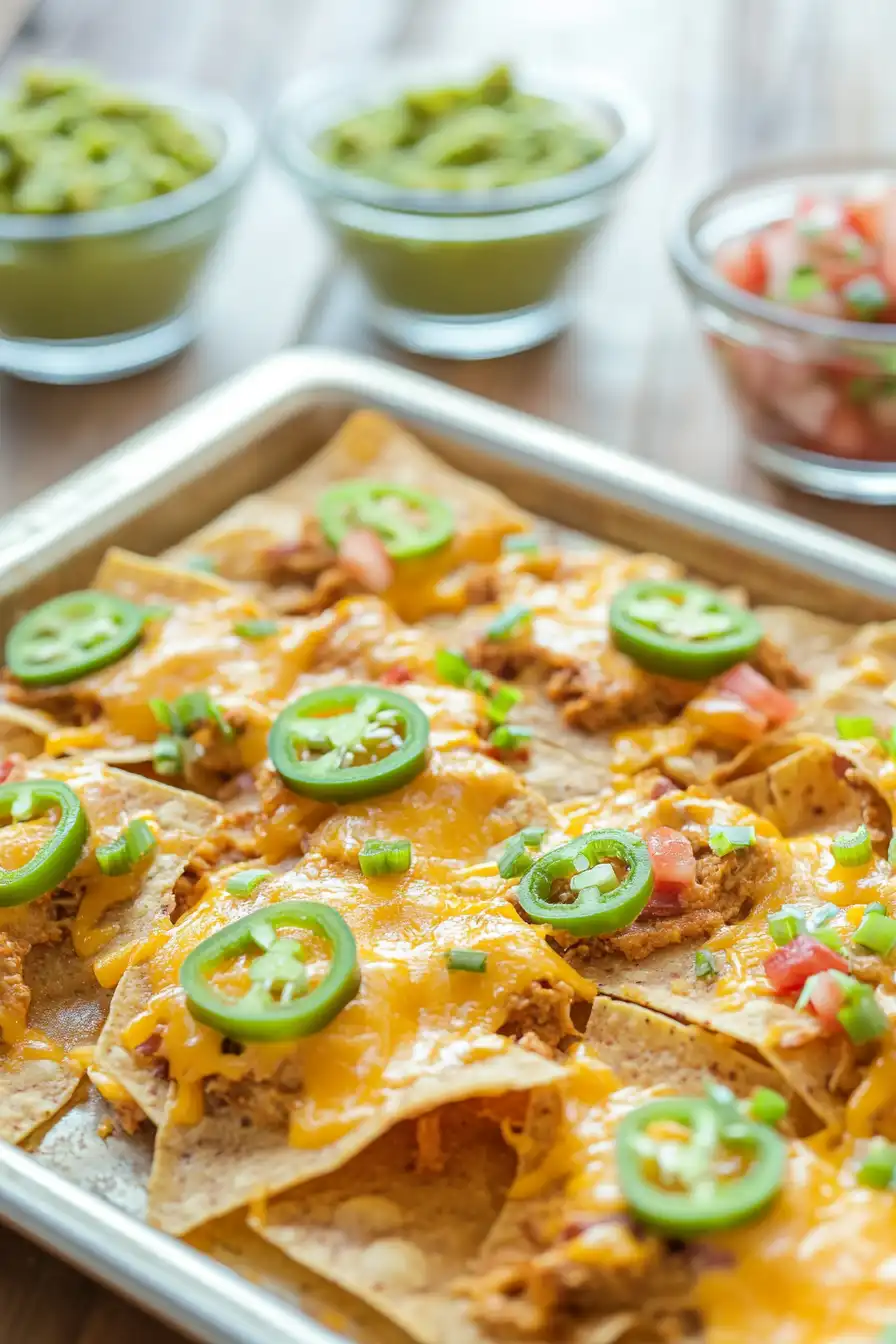
Step 4: Assemble the Nachos
Line a baking sheet with parchment paper or aluminum foil, and lightly coat with cooking spray.
Spread a small portion of refried beans over each tortilla chip and place them on the baking sheet in a single layer.
Sprinkle cheddar cheese and chopped green onions over each chip, then top with a slice of jalapeño pepper.
Step 5: Bake and Serve the Nachos
Place the baking sheet on the lower rack of the preheated oven and bake for about 5-7 minutes or until the cheese begins to melt.
Once ready, remove from the oven and serve the nachos hot.
Enjoy your homemade crispy and cheesy nachos!
