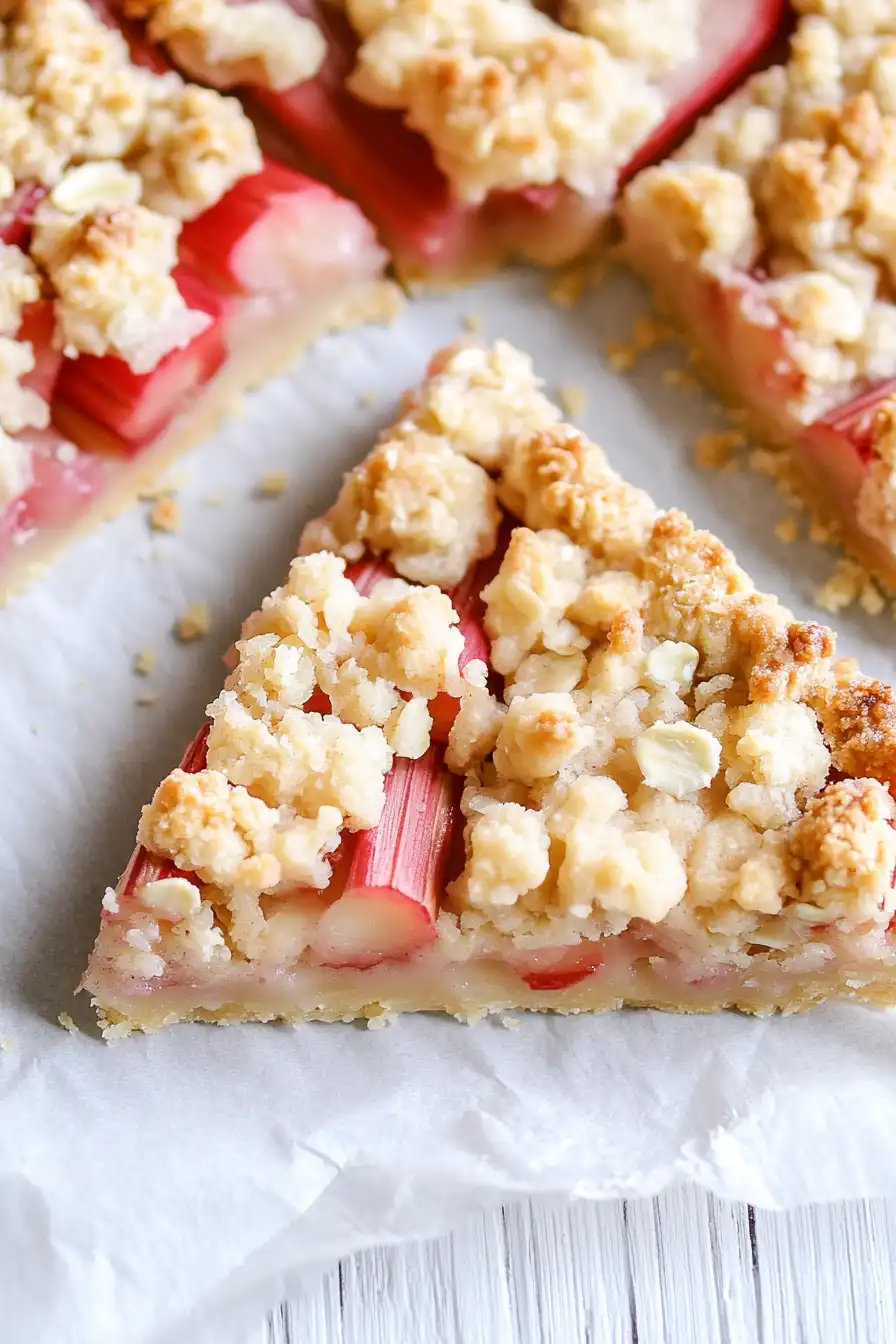
Here’s my go-to rhubarb tart recipe, featuring a simple, buttery shortbread crust and a filling made with fresh rhubarb, just the right amount of sugar, and a hint of vanilla to balance the tartness.
This rhubarb tart has become a springtime tradition in our house, and I always make an extra one to share with neighbors. There’s something special about that sweet-tart combination that makes everyone ask for seconds – and the recipe!

Why You’ll Love This Rhubarb Tart
- Simple ingredients – This tart uses basic pantry staples like butter, sugar, and flour, plus seasonal rhubarb – no fancy or hard-to-find ingredients needed.
- Make-ahead friendly – The shortbread crust can be made a day ahead, and the finished tart keeps well for several days in the fridge.
- Perfect balance of flavors – The buttery shortbread crust pairs beautifully with the tangy rhubarb filling, while the vanilla adds a lovely warmth to every bite.
- No special equipment needed – You don’t need any fancy tools or tart pans – a regular baking dish and basic kitchen equipment is all it takes to make this rustic dessert.
What Kind of Rhubarb Should I Use?
For the best tasting tart, look for rhubarb stalks that are firm and crisp, with a bright pink to deep red color – though color isn’t actually an indicator of ripeness or sweetness. The thinner stalks are typically more tender and require less cooking time, but thicker stalks work just fine when sliced properly. If you’re buying rhubarb at the store or farmers market, avoid any stalks that are limp, split, or have obvious blemishes. Fresh spring rhubarb (April to June) tends to be more tender than the late-season variety, but both will work well in this recipe. If you’re using frozen rhubarb, thaw it completely and drain off any excess liquid before using it in your tart.

Options for Substitutions
Let’s talk about what you can swap in this tart recipe if you need to:
- Rhubarb: If rhubarb isn’t in season, you can use tart apples, sour cherries, or even strawberries (though reduce sugar to 3 tablespoons if using strawberries). Each will give you a different but equally tasty result.
- Vanilla bean paste: Don’t worry if you can’t find vanilla bean paste – regular vanilla extract works just fine in equal amounts. Or use the seeds from one vanilla pod for each teaspoon of paste needed.
- Cornstarch: You can swap cornstarch with arrowroot powder (same amount) or regular flour (use 2 tablespoons instead of 1). Instant Clearjel works great too if you have it.
- Rolled oats: Quick oats can work in place of rolled oats for the topping. You could also use chopped nuts like almonds or pecans, or leave them out completely.
- Plain flour: For the crust, stick with plain flour – this is one ingredient you shouldn’t substitute as it’s crucial for the shortbread texture. If you need gluten-free, use a 1:1 gluten-free flour blend specifically made for baking.
- Unsalted butter: If you only have salted butter, that’s fine – just skip the added salt in the recipe. The butter should be real butter though, as margarine or butter substitutes will change the texture of the shortbread.
Watch Out for These Mistakes While Baking
The biggest challenge when working with rhubarb is managing its moisture content – if you skip the step of tossing it with sugar and letting it sit for 15-20 minutes before baking, you might end up with a soggy tart bottom. Another common mistake is overworking the shortbread dough; mixing it too much will develop the gluten and result in a tough rather than tender crust, so stop mixing as soon as the dough comes together. When preparing the rhubarb filling, don’t forget to drain off any excess liquid that accumulates after the sugar maceration, and make sure to evenly spread the cornstarch throughout to avoid any gummy spots in your finished tart. For the best texture, let the tart cool completely before slicing – rushing this step will give you messy servings and might cause the filling to run.
What to Serve With Rhubarb Tart?
This tart really shines when served with a scoop of good vanilla ice cream – the cold, creamy sweetness is perfect against the warm, tangy rhubarb filling. If you’re not in the mood for ice cream, a dollop of lightly whipped cream or even crème fraîche adds a nice richness that balances out the tartness of the rhubarb. For a cozy afternoon treat, serve your tart with a cup of Earl Grey tea or coffee, which helps cut through the buttery shortbread crust. You could also add a drizzle of caramel sauce if you’re feeling extra indulgent!
Storage Instructions
Keep Fresh: This rhubarb tart stays good in the fridge for up to 4 days when kept in an airtight container. The shortbread crust might soften a bit over time, but it’ll still taste great! I like to place a piece of parchment paper over the top to keep it extra fresh.
Freeze: You can freeze the whole tart or individual slices for up to 3 months. Just wrap it well in plastic wrap and aluminum foil to prevent freezer burn. Pro tip: if you’re freezing slices, place parchment paper between them so they don’t stick together.
Make Ahead: Want to prep this ahead? You can make the shortbread crust up to 2 days before and keep it wrapped in the fridge. The rhubarb filling can also be cooked and stored separately in the fridge for up to 2 days. When you’re ready, just assemble and bake!
| Preparation Time | 20-30 minutes |
| Cooking Time | 35-45 minutes |
| Total Time | 55-75 minutes |
| Level of Difficulty | Medium |
Estimated Nutrition
Estimated nutrition for the whole recipe (without optional ingredients):
- Calories: 2500-2800
- Protein: 20-30 g
- Fat: 150-170 g
- Carbohydrates: 280-300 g
Ingredients
For the filling:
- 1 tbsp cornstarch
- 2 cups sliced rhubarb (finely sliced for even cooking)
- 1 tsp vanilla bean paste (adds a more intense vanilla flavor than extract)
- 1/4 cup white sugar
For the crust and topping:
- 2 cups plain flour (King Arthur all-purpose flour works wonderfully here)
- 2 tsp vanilla bean paste (adds depth to the shortbread flavor)
- 2/3 cup white sugar
- 1/4 tsp salt
- 1 cup unsalted butter (softened completely, I use Kerrygold)
- 3 tbsp rolled oats
Step 1: Prepare the Oven and Tart Pan
Preheat your oven to 350°F (175°C).
Ensure you have a 9-inch tart pan ready, preferably one with a removable bottom for easy release later.
This preparation will help your tart cook evenly and come out of the pan smoothly.
Step 2: Mix the Rhubarb Filling
In a bowl, toss the rhubarb with the rest of the filling ingredients.
Mix thoroughly so the rhubarb is well-coated with the mixture.
Set aside as the flavors meld together and give the filling a chance to absorb the ingredients.
Step 3: Make the Dough
Cream together the soft butter and sugar until light and fluffy.
This should take about 3-4 minutes.
Remember to scrape down the sides of the bowl as needed.
Next, beat in the vanilla paste and salt.
Ensure your butter is at room temperature for the perfect creamy texture.
With the mixer on low, gradually add the flour and mix until no dry flour remains.
Be careful not to over mix to keep the dough tender.
Step 4: Form the Base of the Tart
Take 2/3 of the dough and scatter it in crumbles across the bottom of your tart pan.
Pat it down evenly to form a flat layer without going up the sides.
Flour your fingers or use the bottom of a metal measuring cup for smooth patting.
Once even, refrigerate the crust for 10 minutes to set it slightly.
Step 5: Prepare Topping and Assemble the Tart
Mix the remaining dough with the rolled oats, using your fingers to create coarse crumbles.
Place the reserved rhubarb filling over the cold crust.
Top the rhubarb evenly with the crumbled dough mixture, allowing a bit of the rhubarb to peek through for a rustic look.
Step 6: Bake and Cool the Tart
Set the tart pan on a baking sheet to catch any drips and bake in the preheated oven for about 35 minutes, or until the top is just starting to become pale golden.
To prevent over-browning, you might cover it loosely with foil halfway through baking.
Once baked, let the tart cool on a rack for 15 minutes before releasing the bottom from the pan’s sides.
Finish cooling completely on the rack.
Step 7: Slice and Serve
Once the tart is fully cooled, slice it into 8 to 10 pieces.
Serve as it is or with a dollop of lightly sweetened whipped cream for an added touch of indulgence.
