Growing up, our family’s idea of a party dip was a jar of salsa and some chips. My mom wasn’t big on layered dips – she’d say they were “too fussy.” But at my first Super Bowl party after college, I tried a seven layer dip that changed everything.
The thing is, that dip was missing something important – meat! Adding ground beef takes this classic party favorite from a side dish to a filling meal. Now when I make it for my family game nights, there’s never any left over, and my kids actually ask for it by name. Who knew some simple layers in a dish could make everyone so happy?

Why You’ll Love This Seven Layer Dip
- Make-ahead friendly – You can prepare this dip hours before your gathering and keep it refrigerated until party time – the flavors actually get better as they meld together.
- Crowd-pleasing appetizer – This hearty dip combines everyone’s favorite Mexican-inspired flavors into one dish that’s perfect for game day, potlucks, or any gathering.
- Filling and satisfying – With protein-packed ground beef and beans, plus fresh vegetables and cheese, this isn’t just a dip – it’s practically a complete meal.
- Customizable layers – You can easily adjust the ingredients to suit your taste – swap out different types of onions, add jalapeños for heat, or use different cheese blends.
What Kind of Ground Beef Should I Use?
For a seven layer dip, you’ll want to start with lean ground beef – something in the 80/20 or 85/15 range works perfectly. While you could use extra lean ground beef (93/7), it tends to be a bit drier and doesn’t carry the taco seasonings quite as well. When you’re at the store, look for beef that’s bright red in color and avoid any packages with excessive liquid or brown spots. For the best results, bring your ground beef to room temperature before cooking, and be sure to drain off any excess fat after browning to prevent your dip from becoming greasy.

Options for Substitutions
This seven layer dip is super adaptable and you can make several swaps based on what you have on hand:
- Ground beef: You can easily swap ground beef with ground turkey or chicken for a lighter option. Plant-based ground meat alternatives work well too. Just remember to season well with the taco mix.
- Taco mix: Out of taco seasoning? Mix 1 tablespoon chili powder, 1 teaspoon each of cumin and paprika, and ½ teaspoon each of garlic powder, onion powder, and oregano as a quick substitute.
- Refried beans: You can use black beans or pinto beans mashed with a fork as an alternative. Just warm them up first and add some garlic powder and cumin for extra flavor.
- Sour cream and cream cheese: Greek yogurt makes a great substitute for sour cream. For cream cheese, try using mashed avocado – it’ll give you a different but equally good taste and texture.
- Mexican cheese: Any shredded cheese works here – cheddar, Monterey Jack, or a combination. Just avoid very mild cheeses like mozzarella as they won’t add enough flavor.
- Lettuce: Any crisp lettuce works – iceberg, romaine, or even cabbage can add that needed crunch. Just make sure it’s shredded finely and very dry to prevent water pooling.
Watch Out for These Mistakes While Cooking
The biggest challenge when making seven layer dip is managing moisture – watery tomatoes or wet lettuce can make your dip soggy and unappetizing, so make sure to thoroughly drain your tomatoes and pat your shredded lettuce dry with paper towels before adding them.
Temperature control is crucial for the best texture – letting your cream cheese come to room temperature makes it easier to spread without tearing through the layers, while cooling the ground beef completely prevents the cheese from melting prematurely.
A common mistake is rushing the layering process – take your time to spread each layer evenly to the edges of your serving dish, and gently press down each layer to prevent air pockets that can cause the dip to separate.
For the best results, chill your dip for at least 30 minutes before serving to allow the layers to set, and if you’re making it ahead, wait to add the lettuce and tomatoes until just before serving to maintain their crispness.
What to Serve With Seven Layer Dip?
This hearty seven layer dip is practically a meal on its own, but it really shines when served with the right dips and sides! Tortilla chips are the classic choice – I recommend thick, restaurant-style chips that won’t break when scooping up all those delicious layers. For a fresher option, set out some crisp vegetables like bell pepper strips, cucumber rounds, or carrot sticks. If you’re hosting a party, round out your spread with some Mexican-inspired dishes like elote (Mexican street corn), warm flour tortillas, or a simple bowl of guacamole and salsa on the side.
Storage Instructions
Keep Fresh: Your seven layer dip will stay good in the fridge for up to 3 days when covered tightly with plastic wrap or in an airtight container. Keep in mind that the lettuce might get a bit wilted and the tomatoes could make things slightly watery after the first day, so it’s best enjoyed within 24 hours of making it.
Make Ahead: Want to prep this dip in advance? You can make most layers ahead of time – cook the beef, mix the beans, and prepare the cream cheese mixture. Store these components separately in the fridge for up to 2 days. When you’re ready to serve, just layer everything together and add the fresh toppings like lettuce and tomatoes right before serving.
Leftovers: If you have leftovers, just know that the texture of the fresh ingredients will change a bit. The good news is that the flavors actually blend together nicely overnight! Just be aware that this dip isn’t the best candidate for freezing because of all the fresh ingredients and dairy products.
| Preparation Time | 20-30 minutes |
| Cooking Time | 10-15 minutes |
| Total Time | 90-105 minutes |
| Level of Difficulty | Medium |
Estimated Nutrition
Estimated nutrition for the whole recipe (without optional ingredients):
- Calories: 1900-2100
- Protein: 90-100 g
- Fat: 130-150 g
- Carbohydrates: 80-90 g
Ingredients
For the seasoned beef:
- 3 to 4 tbsp water
- 1 lb ground beef
- 2 tbsp taco mix (I use Old El Paso)
For the bean layer:
- 1/3 cup water or milk (for a smoother consistency)
- 16 oz refried beans
For the sour cream layer:
- 8 oz sour cream (full-fat for richness)
- 4 oz softened cream cheese
- 2 tbsp taco mix
For the final layers and toppings:
- 2 roma tomatoes, chopped (freshly chopped for best flavor)
- 1 1/2 cups shredded lettuce (iceberg for crispness)
- 1 1/2 cups grated Mexican cheese
- 1 medium white onion, diced
Step 1: Prepare the Seasoned Ground Beef
Begin by cooking one pound of ground beef on the stovetop over medium heat until there is no pink remaining.
Drain any excess fat if necessary.
Add 2 tablespoons of taco seasoning and 3-4 tablespoons of water to the beef.
Mix well to ensure the meat is evenly coated with the seasoning.
Set the seasoned beef aside for later use.
Step 2: Layer the Refried Beans
In a small glass bowl, add 1/3 cup of water or milk.
Microwave the liquid for 45-60 seconds, then stir (alternatively, heat on the stovetop in a medium-sized pot over low heat).
Spread the refried beans evenly across the bottom of a 9×13 glass dish, forming the first layer of your dip.
Step 3: Add the Seasoned Beef Layer
Take the seasoned ground beef you prepared earlier and spread it evenly over the layer of refried beans in the glass dish.
This will become the flavorful second layer of your dip.
Step 4: Prepare and Spread the Cream Cheese Mixture
Warm 4 ounces of cream cheese in a microwave-safe bowl for 15-25 seconds to soften it.
Add 8 ounces of sour cream to the bowl.
Using a hand-held mixer, blend both cheeses together until the mixture is light and creamy.
Add 2 tablespoons of taco seasoning and mix until fully combined.
Spread this creamy mixture over the seasoned beef layer.
Step 5: Add Cheese and Lettuce Layers
Sprinkle 1 and 1/2 cups of shredded cheese evenly on top of the creamy cheese layer.
This will form the fourth layer.
Next, spread 2 cups of shredded lettuce over the cheese to create the fifth layer, adding a refreshing crunch to your dip.
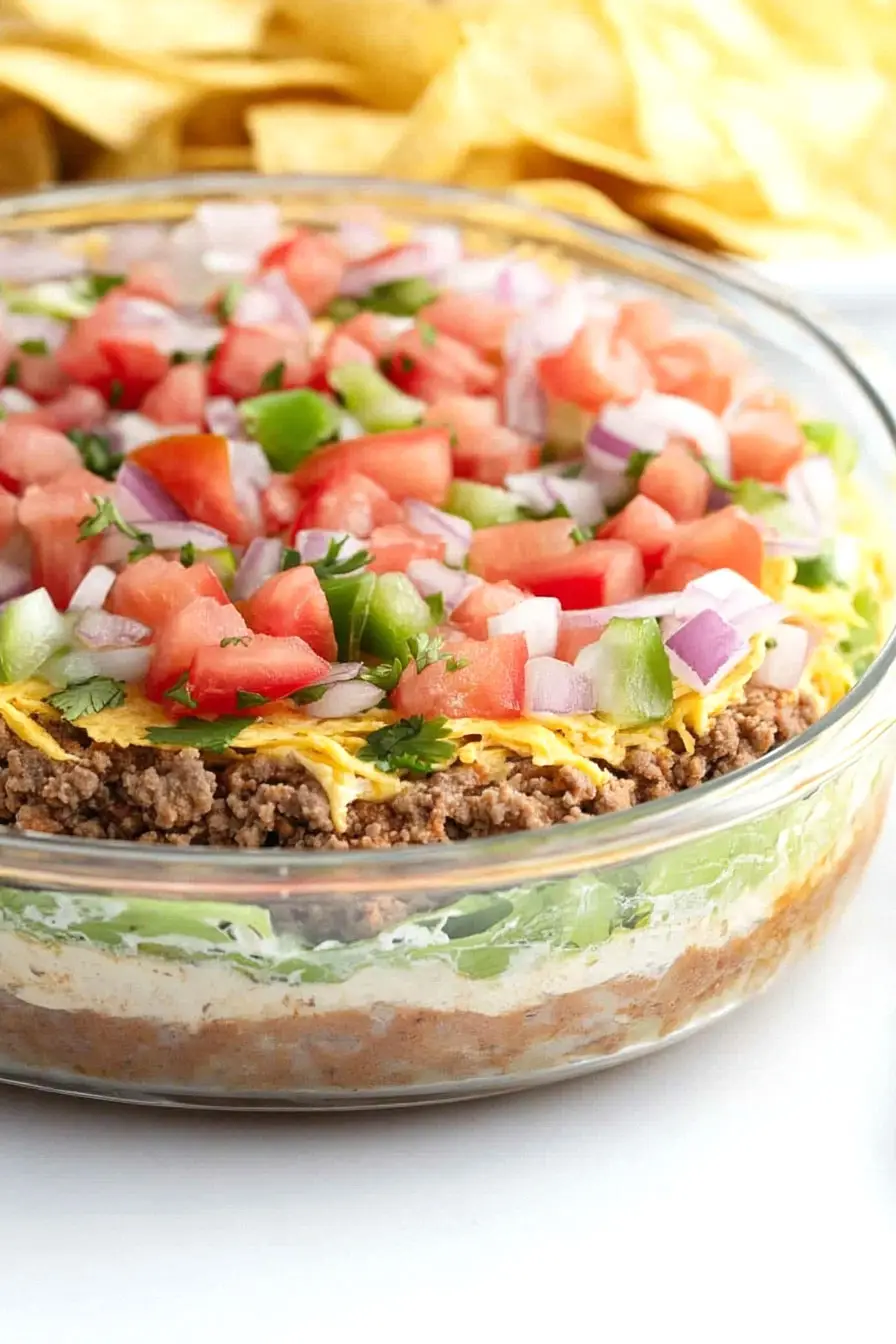
Step 6: Finish with Toppings and Refrigerate
Top your layered dip with your choice of additional toppings.
In the pictures above, toppings include diced tomatoes, diced white onion, and diced purple onion for layers six and seven.
Once all layers and toppings are in place, cover and refrigerate the dish for at least 60 minutes before serving to allow the flavors to meld together.
