Here is my favorite apple cider pulled pork recipe, with tender, slow-cooked pork shoulder that falls apart easily, and a sweet and tangy sauce made with fresh apple cider, brown sugar, and warm spices.
This pulled pork is my family’s most requested dinner during the fall months. I usually make extra so we can enjoy it on sandwiches for lunch the next day. Nothing better than leftovers that taste even better the second time around, right?

Why You’ll Love This Apple Cider Pulled Pork
- Set-it-and-forget-it convenience – Once you get everything in the slow cooker, you can walk away and let it do all the work while you tackle other things around the house.
- Sweet and savory flavor combination – The apple cider adds a subtle sweetness that pairs perfectly with the smoky spices, creating a flavor profile that’s both comforting and exciting.
- Simple pantry ingredients – You probably already have most of these spices in your kitchen, and the apple cider is easy to find at any grocery store.
- Perfect for meal prep – This recipe makes plenty of tender, flavorful pulled pork that you can use for sandwiches, tacos, bowls, or whatever sounds good throughout the week.
- Crowd-pleasing comfort food – Whether you’re feeding your family on a busy weeknight or hosting friends, this pulled pork hits all the right notes for a satisfying meal.
What Kind of Pork Should I Use?
While this recipe calls for pork tenderloins, you can actually use several different cuts of pork for pulled pork with great results. Pork shoulder or pork butt are the most traditional choices since they have more fat and connective tissue that breaks down during cooking, making them naturally tender and easy to shred. If you stick with the tenderloins as written, they’ll work perfectly fine and cook much faster than tougher cuts. Just keep in mind that tenderloins are leaner, so they won’t have quite the same rich, fatty texture as shoulder cuts, but they’ll still absorb all those apple cider flavors beautifully. Whatever cut you choose, make sure it’s at room temperature before cooking for the most even results.
Options for Substitutions
This recipe is pretty forgiving when it comes to swaps – here are some easy substitutions you can make:
- Pork tenderloins: While tenderloin works great, pork shoulder or pork butt are actually more traditional for pulled pork and will give you that classic shredded texture. You can also use a pork loin roast if that’s what you have on hand.
- Avocado oil: Any neutral cooking oil works here – vegetable oil, canola oil, or even olive oil will do the job just fine.
- Coconut sugar: Brown sugar is the classic choice and works perfectly. You can also use regular white sugar, maple syrup, or honey – just reduce the liquid slightly if using liquid sweeteners.
- Apple cider: Apple juice makes a great substitute if you can’t find cider. For a different flavor profile, try using root beer, ginger beer, or even chicken broth with a splash of apple cider vinegar.
- Smoked paprika: Regular paprika works if you don’t have the smoked variety, though you’ll miss some of that smoky flavor. You could add a tiny pinch of liquid smoke to regular paprika to get closer to the original taste.
Watch Out for These Mistakes While Cooking
The biggest mistake when making pulled pork with tenderloin is treating it like a tough cut that needs hours of cooking – pork tenderloin is lean and can become dry and stringy if overcooked, so aim for an internal temperature of 145°F and let it rest before shredding.
Another common error is skipping the searing step, which creates a flavorful crust that adds depth to your final dish, so make sure to get a good golden-brown color on all sides before adding your liquid.
Don’t rush the shredding process either – let the meat cool for about 10 minutes after cooking so it’s easier to handle, and use two forks to gently pull it apart with the grain rather than against it.
For extra flavor, reduce the leftover cooking liquid in the pan until it’s syrupy and toss it back with your shredded pork – this concentrates all those apple cider flavors and keeps the meat moist.
What to Serve With Apple Cider Pulled Pork?
This sweet and savory pulled pork is perfect piled high on soft brioche buns with a side of creamy coleslaw to balance out all those rich flavors. I love serving it with classic barbecue sides like baked beans, corn on the cob, or crispy sweet potato fries that complement the apple cider sweetness. For a lighter option, try it over a bed of mixed greens with some diced apples and a simple vinaigrette, or stuff it into warm tortillas with avocado and pickled red onions for easy tacos. Don’t forget some pickles on the side – they cut through the richness perfectly and add that tangy crunch everyone loves.
Storage Instructions
Refrigerate: This pulled pork gets even better after sitting for a day! Store it in the fridge in an airtight container for up to 4 days. The flavors really meld together nicely, making it perfect for meal prep throughout the week.
Freeze: You can freeze portions of this pulled pork in freezer-safe containers or bags for up to 3 months. I like to freeze it in meal-sized portions so I can just thaw what I need. Make sure to include some of that tasty cooking liquid to keep the meat moist.
Reheat: Warm it up gently on the stovetop over medium-low heat, stirring occasionally until heated through. You can also microwave it in 30-second intervals, stirring between each one. Add a splash of apple cider or broth if it seems a bit dry after reheating.
| Preparation Time | 10-15 minutes |
| Cooking Time | 385-490 minutes |
| Total Time | 395-505 minutes |
| Level of Difficulty | Medium |
Estimated Nutrition
Estimated nutrition for the whole recipe (without optional ingredients):
- Calories: 1700-2000
- Protein: 175-200 g
- Fat: 50-60 g
- Carbohydrates: 60-75 g
Ingredients
For the pork:
- 2 pork tenderloins (about 2.5 lb total)
- 1 cup apple cider (adds a subtle sweetness and tenderizes the meat)
- 1 small yellow onion (diced into 1/2-inch pieces)
- 3 cloves garlic (freshly minced for best flavor)
- 2 tbsp avocado oil
For the seasoning:
- 2 tsp smoked paprika
- 3 tbsp brown sugar (or coconut sugar)
- 2 tsp salt
- 1 tsp black pepper (freshly ground preferred for more flavor)
- 2 tsp chili powder
Step 1: Prepare and Sear the Pork
- 2 pork tenderloins (about 2.5 lb total)
- 2 tbsp avocado oil
Set your Instant Pot to the sauté function.
Cut each pork tenderloin into chunks approximately 4 inches long.
Add the avocado oil to the pot.
Once hot, add the pork pieces and brown them on all sides by sautéing for about 2 minutes per side.
Remove the browned pork and set aside on a plate.
Step 2: Sauté the Aromatics
- 1 small yellow onion, diced
- 3 cloves garlic, minced
Add the diced onion to the hot Instant Pot and sauté for 2-3 minutes until softened.
Stir in the minced garlic and cook for another minute until fragrant.
After the garlic becomes aromatic, turn off the Instant Pot.
Step 3: Layer Ingredients and Cook Under Pressure
- browned pork chunks from Step 1
- sautéed onions and garlic from Step 2
- 1 cup apple cider
- 3 tbsp coconut sugar or brown sugar
- 2 tsp salt
- 1 tsp black pepper
- 2 tsp chili powder
- 2 tsp smoked paprika
Return the browned pork from Step 1 to the Instant Pot, placing it on top of the onion and garlic.
Sprinkle in the salt, black pepper, chili powder, smoked paprika, and coconut sugar or brown sugar, then pour the apple cider over everything.
Secure the Instant Pot lid, seal the valve, and manually cook for 25 minutes.
Once the cooking time is complete, let the pressure naturally release for 10 minutes before performing a quick release for the remaining pressure.
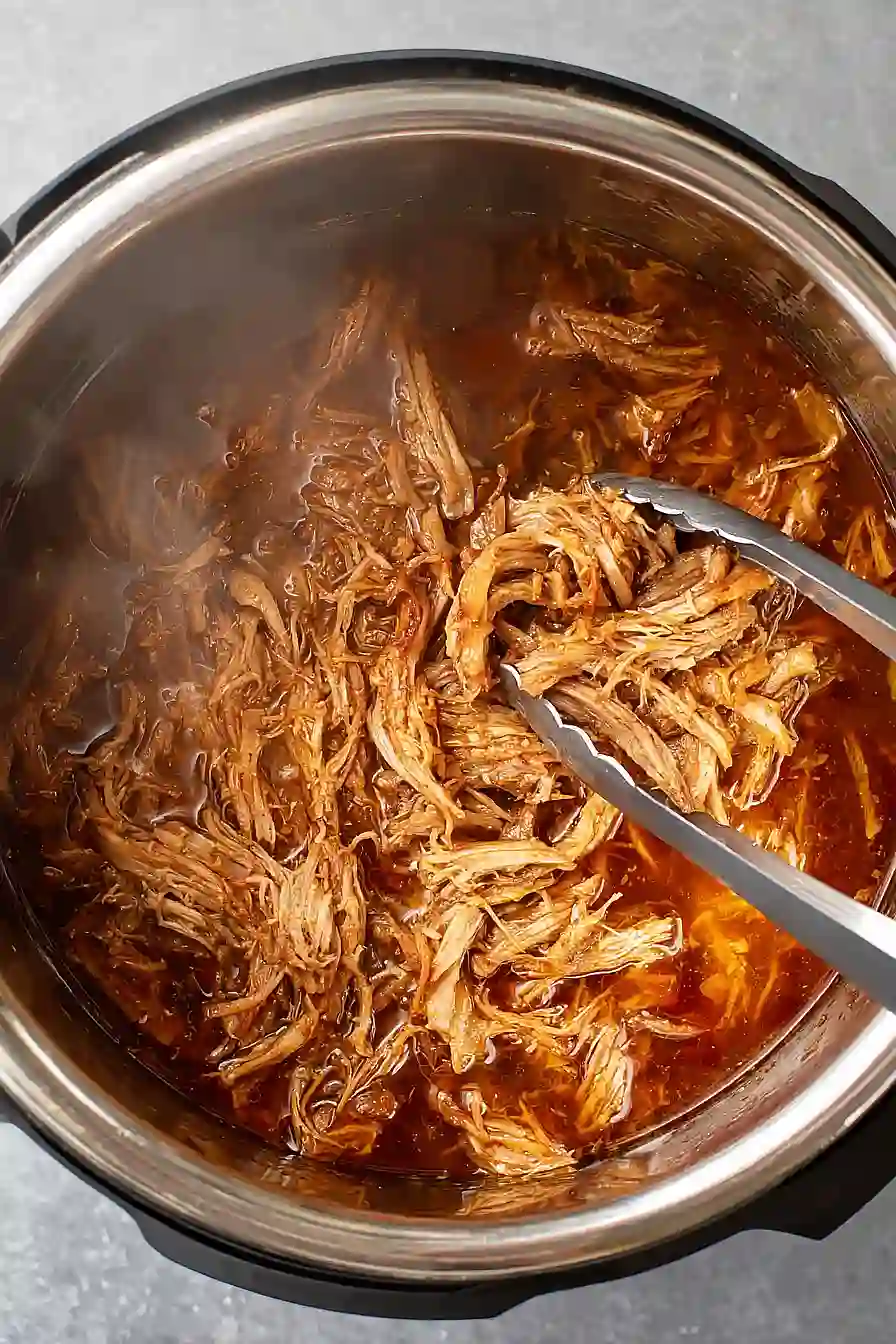
Step 4: Rest, Shred, and Serve
Turn off the Instant Pot and remove the lid.
Allow the pork to rest in the pot for 10 minutes to retain its juices.
Using two forks, shred the pork directly in the pot and mix it well with the juices.
You can taste and adjust seasoning if needed.
I like to mix everything well at this point so the meat soaks up all those delicious flavors.
Enjoy your pulled pork!
