Summer desserts don’t get much easier than this. I love making treats that look fancy but require zero baking skills. Graham crackers icebox cake is one of those recipes that saves me every time I need a crowd-pleasing dessert without turning on the oven.
The best part? You probably have most of the ingredients sitting in your pantry right now. I throw this together the night before a barbecue or family gathering, and by the time we’re ready for dessert, it’s perfectly set and ready to slice. No mixing bowls full of complicated ingredients or worrying about whether it’ll turn out right.
My kids think I’m some kind of dessert wizard when I pull this out of the fridge. Little do they know it took me about fifteen minutes to assemble. Sometimes the simplest recipes are the ones that get requested again and again.

Why You’ll Love This Graham Cracker Icebox Cake
- No-bake dessert – You don’t need to turn on the oven for this one! Just layer and chill, making it perfect for hot summer days or when you want dessert without the fuss.
- Simple ingredients – With just four basic ingredients that you can find at any grocery store, this cake couldn’t be easier to make.
- Lighter option – Using sugar-free pudding, skim milk, and fat-free cool-whip makes this a guilt-free treat that still tastes indulgent.
- Make-ahead friendly – This dessert actually gets better as it sits in the fridge, so you can prepare it hours or even a day before you need it.
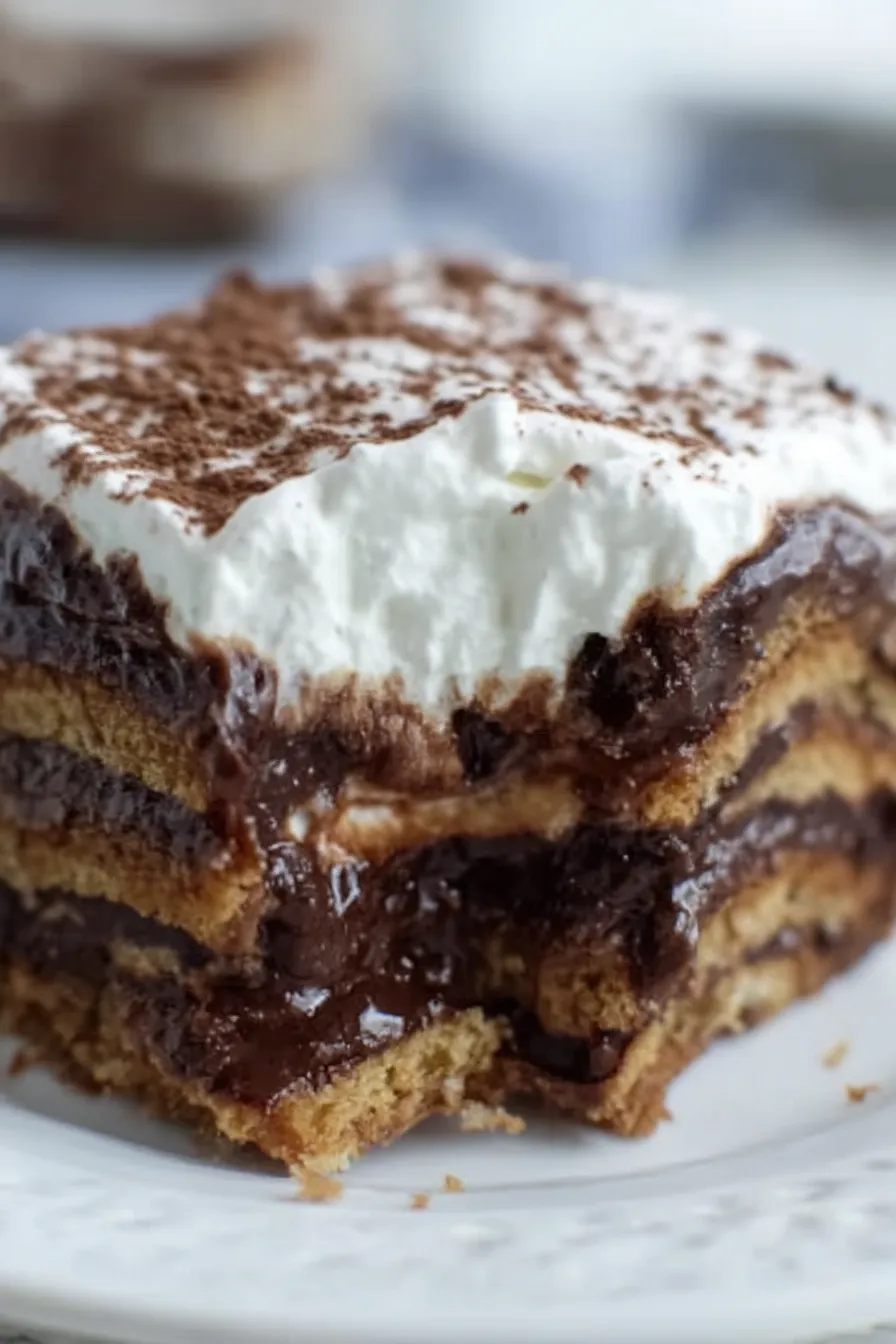
- Kid-approved – The combination of chocolate pudding and graham crackers creates a dessert that tastes like childhood in every bite, making it a hit with both kids and adults.
What Kind of Graham Crackers Should I Use?
Any standard graham crackers will work perfectly for this icebox cake, whether you go with the classic honey graham crackers or the cinnamon variety. The regular rectangular crackers are ideal since they layer nicely and fit well in most pans. If you want to mix things up, chocolate graham crackers can add an extra layer of chocolate flavor that pairs beautifully with the pudding. Just make sure your crackers are fresh and crisp when you start – stale crackers won’t soften properly as the cake sets, and you’ll miss out on that perfect tender texture that makes icebox cake so good.

Options for Substitutions
This simple icebox cake is pretty forgiving when it comes to swaps:
- Sugar-free chocolate pudding mix: Regular chocolate pudding mix works just fine if you don’t need the sugar-free version. You can also try vanilla, butterscotch, or banana pudding for a different flavor twist.
- Skim milk: Any milk you have on hand will work – whole milk, 2%, or even almond milk. Just keep in mind that richer milk will make a creamier pudding.
- Graham crackers: Feel free to use chocolate graham crackers, vanilla wafers, or even ladyfinger cookies. Each will give your cake a slightly different taste and texture.
- Fat-free cool whip: Regular cool whip or freshly whipped heavy cream both work great. If using heavy cream, whip 2 cups with 2 tablespoons of powdered sugar until soft peaks form.
Watch Out for These Mistakes While Making
The biggest mistake with icebox cake is not letting it chill long enough – your graham crackers need at least 4 hours (preferably overnight) to soften properly and transform from crunchy cookies into cake-like layers.
Another common error is making your pudding too thin, which can cause the layers to slide around and create a messy dessert, so make sure to follow the pudding mix directions exactly and let it set until it’s thick enough to spread easily.
When layering, resist the urge to press down on the graham crackers as this can cause them to break and create uneven layers – just place them gently and let the moisture from the pudding do the work.
Finally, cover your cake tightly with plastic wrap to prevent it from drying out in the fridge, and remember that this dessert actually gets better after a day or two as the flavors meld together.
What to Serve With Graham Cracker Icebox Cake?
This no-bake cake is pretty perfect on its own, but I love serving it with fresh berries like strawberries or raspberries to add a nice pop of color and freshness. A cup of coffee or cold milk makes a great pairing since the graham crackers and chocolate flavors go so well with both. If you want to make it feel more special, try adding a small scoop of vanilla ice cream on the side or a drizzle of chocolate syrup on top. Since it’s such a rich dessert, keeping the sides simple really lets the cake shine.
Storage Instructions
Chill: This icebox cake actually gets better as it sits! Keep it covered in the refrigerator for up to 5 days. The graham crackers will soften and become cake-like as they absorb moisture from the pudding and cool whip, which is exactly what you want.
Make Ahead: I always make this dessert at least 4 hours ahead, but overnight is even better. The longer it chills, the more the flavors meld together and the graham crackers transform into soft, cake-like layers. It’s perfect for parties since you can make it the day before.
Serve: Cut into squares straight from the fridge and serve cold. No need to bring it to room temperature – this dessert is meant to be enjoyed chilled. Cover any leftovers tightly with plastic wrap to prevent it from drying out.
| Preparation Time | 15-25 minutes |
| Cooking Time | 0 minutes |
| Total Time | 480 minutes |
| Level of Difficulty | Easy |
Estimated Nutrition
Estimated nutrition for the whole recipe (without optional ingredients):
- Calories: 900-1100
- Protein: 24-32 g
- Fat: 8-14 g
- Carbohydrates: 190-220 g
Ingredients
For the chocolate pudding layers:
- 2 boxes sugar-free chocolate instant pudding mix
- 4 cups skim milk
For the base and layers:
- 1 box honey graham crackers
For the topping:
- 1 container fat-free whipped topping
Step 1: Prepare the Chocolate Pudding
- 2 boxes sugar-free chocolate instant pudding mix
- 4 cups skim milk
In a large bowl, whisk together the 2 boxes of sugar-free chocolate instant pudding mix with the 4 cups of skim milk.
Continue whisking until the mixture starts to become soft-set, which should take about 3-5 minutes.
Step 2: Set Up the Baking Dish and Initial Layer
- prepared chocolate pudding from Step 1
- 1 box honey graham crackers
Line a 9×13-inch dish with parchment paper, leaving overhang on both sides to make it easier to lift out the dessert later.
Spread about 2 tablespoons of the prepared chocolate pudding (from Step 1) on the bottom of the dish to help keep the graham crackers in place.
Arrange a single layer of honey graham crackers over the pudding, covering the entire bottom of the dish.
Step 3: Assemble the Chocolate Graham Layers
- prepared chocolate pudding from Step 1
- honey graham crackers from Step 2
Repeat layering the graham crackers and chocolate pudding: add enough pudding over the crackers each time just to cover them (not too thick), then another layer of graham crackers.
Continue alternating layers, finishing with a final layer of chocolate pudding on top.
I like to break the graham crackers as needed to fit neatly in the dish—this ensures even layers.
Step 4: Top with Whipped Topping and Finish
- 1 container fat-free whipped topping
- honey graham crackers (for crumbling, optional)
Spread the entire container of fat-free whipped topping evenly over the final layer of chocolate pudding.
For added texture and presentation, sprinkle a few extra graham cracker crumbles or a dusting of cocoa powder over the whipped topping if you like.
Step 5: Chill and Serve
Place the assembled dessert in the refrigerator and let it chill for at least 8 hours to allow the layers to set and the flavors to meld.
When ready to serve, use the parchment paper overhang to lift the dessert out of the dish and cut into slices.
I find that letting it chill overnight makes for the best texture and flavor.
