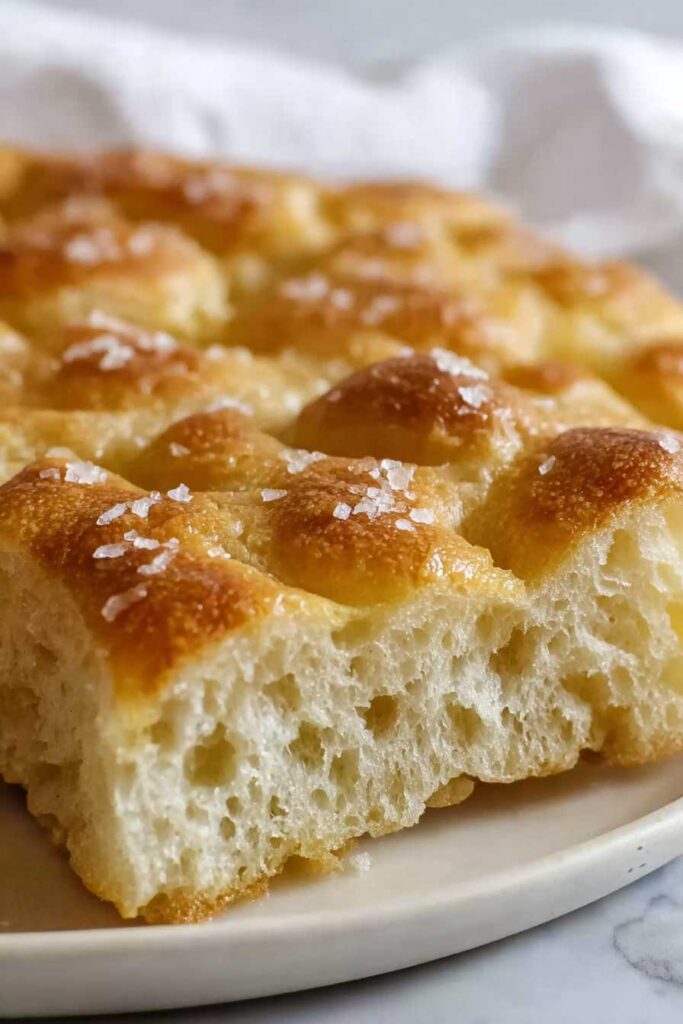
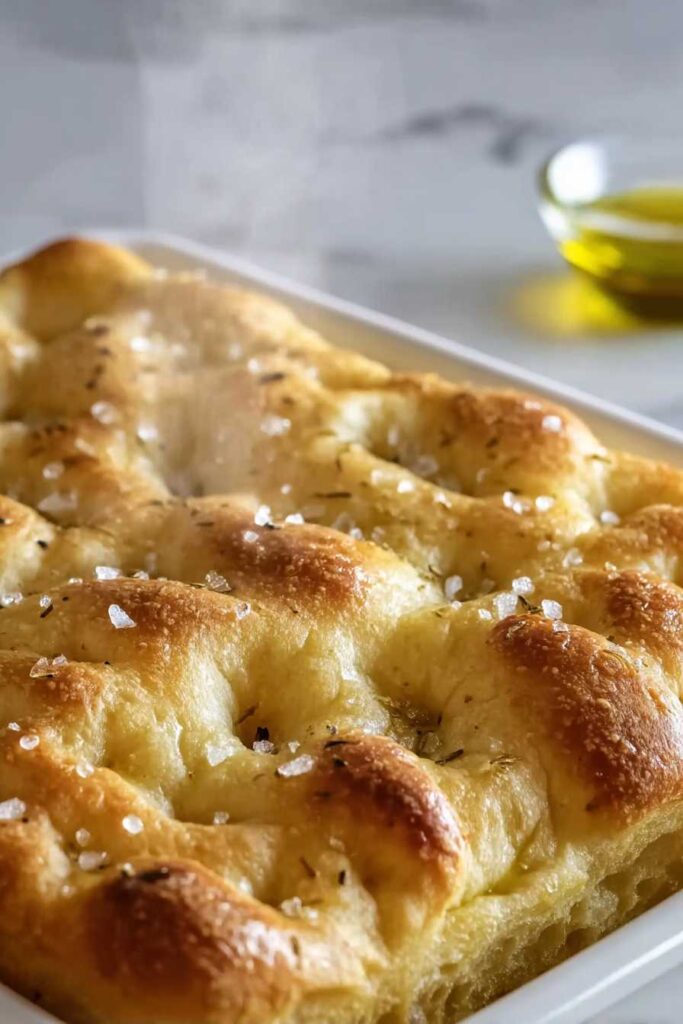
Here’s my go-to sourdough discard focaccia recipe, with a soft, pillowy texture, a crispy golden crust, and just the right amount of olive oil and sea salt on top. It’s the perfect way to use up that extra sourdough starter sitting in your fridge.
This focaccia has become my weekly bread ritual, and I often make a double batch because it disappears so quickly in our house. There’s something special about warm focaccia straight from the oven, isn’t there?
Why You’ll Love This Focaccia Bread
- Zero waste baking – This recipe helps you use up that extra sourdough discard that usually goes to waste, making it both eco-friendly and practical for regular sourdough bakers.
- No special skills needed – Unlike traditional sourdough bread, this focaccia doesn’t require complex folding techniques or long fermentation times – it’s straightforward mixing and baking.
- Quick turnaround – Ready in just 70-90 minutes, this is much faster than traditional sourdough recipes that can take days to complete.
- Basic pantry ingredients – Besides the sourdough discard, you’ll only need common ingredients like flour, yeast, and olive oil that you probably already have in your kitchen.
- Customizable topping options – You can keep it simple with just sea salt, or add your favorite toppings like herbs, cherry tomatoes, or olives to make it your own.
What Kind of Sourdough Starter Should I Use?
The beauty of this recipe is that it’s perfect for using up that excess sourdough starter you’d normally toss out during feeding. Your starter doesn’t need to be at its peak activity since we’re adding commercial yeast to do the heavy lifting – it’s mainly here for flavor. You can use starter that’s been sitting in the fridge for a few days or even a week, as long as it doesn’t show any signs of mold. If your starter is really liquid-y (like pancake batter), you might want to reduce the water in the recipe slightly, while if it’s thicker (like cookie dough), you can keep the water amount as written. The most important thing is that your starter should be unfed and at room temperature when you’re ready to bake.
Options for Substitutions
Let’s talk about what you can (and can’t) swap in this focaccia recipe:
- Sourdough discard: This is pretty important for the flavor, but if you don’t have enough discard, you can use unfed starter. If you don’t have any starter at all, you’ll need to adjust the recipe – add an extra 120g each of flour and water, and increase the yeast to 2.5 teaspoons.
- Instant yeast: You can use active dry yeast instead – just proof it in the warm water first for about 5-10 minutes until it’s bubbly. If using fresh yeast, use about 24 grams.
- Bread flour: All-purpose flour can work here, though your bread won’t be quite as chewy. Avoid whole wheat flour as it will make the focaccia too dense.
- Olive oil: While olive oil gives the best flavor, you can use another neutral oil like vegetable or canola oil. Just keep in mind you’ll lose some of that classic focaccia taste.
- Flaky sea salt: Regular kosher salt works fine for the topping, though it won’t give you that same nice crunch. You could also try other toppings like dried herbs, garlic, or olives.
Watch Out for These Mistakes While Baking
The temperature of your water matters more than you might think – if it’s too hot (over 110°F) it will kill the yeast, while too cold water won’t activate it properly, so using a kitchen thermometer to get that perfect 100°F is worth the extra step.
When it comes to the dough’s texture, resist the urge to add more flour even if it seems sticky at first – focaccia dough should be wet and tacky, and adding too much flour will result in a dense, tough bread instead of the light, airy texture we’re after.
A common mistake is not dimpling the dough deeply enough before baking – those characteristic focaccia dimples aren’t just for looks, they create pockets for the olive oil to pool and help create that crispy, golden crust, so don’t be shy when pressing your fingers into the dough.
For the best rise and flavor development, be patient with the proofing time – rushing this step by placing the dough in a very warm spot might make it rise faster, but you’ll miss out on the complex flavors that develop during a slower fermentation at room temperature.

What to Serve With Focaccia?
This Italian flatbread is perfect for soaking up all kinds of delicious sauces and dips! Try serving it alongside a bowl of marinara sauce or good quality olive oil mixed with balsamic vinegar and herbs for dipping. It makes an excellent side for pasta dishes and hearty soups, or you can use it as the base for amazing sandwiches – just slice it horizontally and fill with your favorite meats, cheeses, and veggies. For a simple appetizer spread, serve chunks of warm focaccia with a platter of Italian meats, cheeses, marinated vegetables, and olives. You can even turn it into a quick pizza by topping it with sauce, cheese, and your favorite toppings before warming it in the oven.
Storage Instructions
Keep Fresh: Your focaccia will stay good at room temperature for about 2 days when wrapped well in plastic wrap or stored in an airtight container. The crust might soften a bit, but that’s totally normal. If you’re planning to keep it longer, pop it in the fridge where it’ll last up to 5 days.
Freeze: This bread freezes really well! Cut it into portions, wrap them tightly in plastic wrap, then place in a freezer bag. It’ll keep for up to 3 months in the freezer. This is super handy when you want to make a bigger batch to have on hand.
Revive: To bring back that fresh-baked taste, pop your focaccia in a 350°F oven for about 5-10 minutes until it’s warm and the crust crisps up again. If it’s frozen, let it thaw at room temperature first. You’ll be amazed at how close it tastes to freshly baked!
| Preparation Time | 15-30 minutes |
| Cooking Time | 25-30 minutes |
| Total Time | 70-90 minutes |
| Level of Difficulty | Medium |
Estimated Nutrition
Estimated nutrition for the whole recipe (without optional ingredients):
- Calories: 2800-3000
- Protein: 60-70 g
- Fat: 320-340 g
- Carbohydrates: 350-370 g
Ingredients
For the dough:
- 1 cup plus 2 tbsp warm water
- 1.5 tsp salt
- 1 cup sourdough starter (discard or active, for best rise)
- 3 1/2 cups bread flour (I always use King Arthur all-purpose flour for consistent results)
- 2 tsp instant yeast
For preparing the pan and topping:
- flaky sea salt (such as Maldon, for texture and presentation)
- 6 tbsp olive oil (good quality extra virgin, for flavor)
Step 1: Mix the Dough
Begin by adding sourdough discard and warm water into a large bowl.
Sprinkle instant yeast on top of the water.
You’ll notice the yeast starting to activate as it gives off a distinct smell and forms clumps.
Add salt and bread flour to the mixture, and stir everything together until a dough begins to form.
Cover the bowl with a kitchen towel and let it sit in a warm place for 15 minutes to allow the initial rise.
Step 2: Perform Stretch and Folds
After the initial 15-minute rise, remove the towel.
Wet your hand to prevent sticking and perform the first set of stretch and folds.
To do this, reach down to the bottom of the dough, pull it up, and fold it over the top.
Turn the bowl a quarter turn and repeat until you’ve completed a full rotation.
Cover the dough again and let it rest for 15 minutes.
Repeat this process twice more, with each rest lasting 15 minutes.
After the third set, cover and allow the dough to rise for another 30 minutes or until it doubles in size.
Step 3: Prepare the Pan
While the dough is on its final rise, pour 50 grams of olive oil into the bottom of a non-stick, metal 9 by 13 inch baking pan, ensuring the entire surface is covered.
If you prefer, you can add a little more oil to enhance the flavor and texture of the crust.
Step 4: Proof the Dough in the Pan
Once the dough has doubled in size, transfer it to the prepared pan.
Gently spread it to fill the entire base of the pan.
Cover with a kitchen towel and allow it to rise for about an hour, during which time it should noticeably puff up.
Step 5: Dimple and Bake
Preheat your oven to 450ºF.
After the dough has doubled in size again, pour 30 grams of olive oil over the top.
Use your fingers to gently dimple the dough without deflating it entirely, as you want to maintain its airy texture.
Sprinkle with flaky sea salt or any other desired toppings.
Bake in the preheated oven for 25 minutes until golden brown.
Step 6: Cool and Enjoy
Once baked, let the focaccia cool completely on a wire rack.
Once cooled, slice and serve your delicious homemade focaccia.
Enjoy the delightful texture and flavor!

Great recipe! Can you add inclusions? If so, what would you suggest?
why did the recipe change? I’ve made it a few times and it came out great! now it’s doesn’t offer metric measurements
Right! I use this recipe often and weigh everything.