Finding a good sticky toffee pudding recipe can be tricky, especially when you realize you’re fresh out of dates or just plain don’t like them. Maybe you forgot to pick them up at the store, or perhaps you’re cooking for someone who isn’t a fan of their texture or taste, and suddenly your dessert plans seem totally derailed.
That’s exactly why I created this sticky toffee pudding without dates that delivers all the same rich, caramel-y goodness you’re craving. It uses simple pantry ingredients you probably already have, comes together easily, and honestly, no one will even notice the dates are missing.
Why You’ll Love This Sticky Toffee Pudding
- No dates required – This version skips the dates entirely, making it perfect if you’re not a fan of them or simply don’t have any on hand.
- Quick and easy – Ready in under 45 minutes, this dessert comes together much faster than traditional sticky toffee pudding recipes.
- Simple pantry ingredients – You probably already have everything you need in your kitchen—no special trips to the store for unusual ingredients.
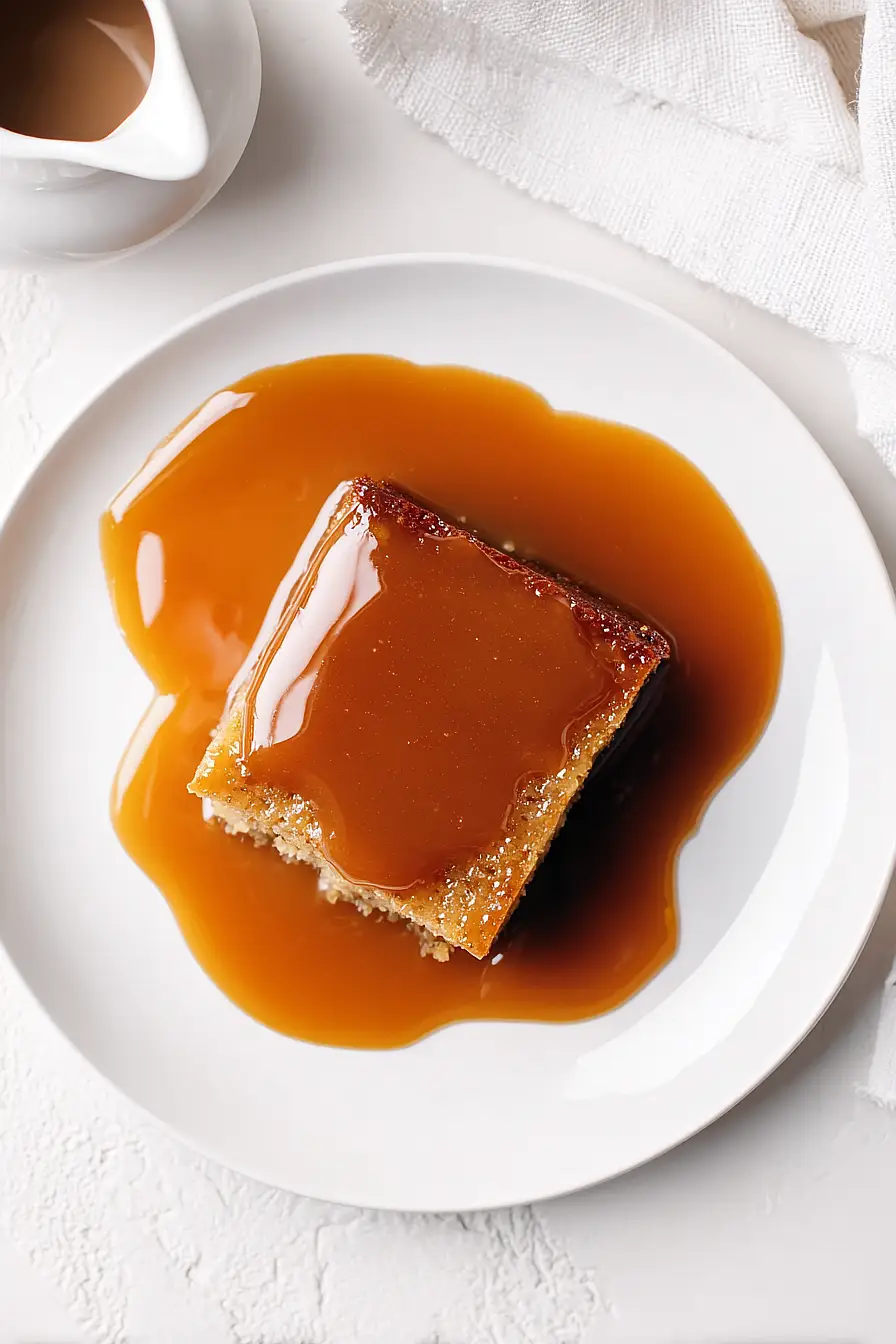
- Rich toffee sauce – The homemade toffee sauce made with butter, cream, and brown sugar is what makes this dessert truly special and indulgent.
What Kind of Brown Sugar Should I Use?
For this sticky toffee pudding, you can use either light or dark brown sugar depending on how deep you want the flavor to be. Light brown sugar will give you a milder, more caramel-like sweetness, while dark brown sugar brings a richer, more molasses-forward taste that really amps up that toffee flavor. If you only have one type in your pantry, don’t stress – either will work just fine and you’ll still end up with a delicious pudding. Just make sure your brown sugar is soft and not rock-hard, as clumpy sugar can be tough to mix in smoothly with the other ingredients.

Options for Substitutions
This date-free version of sticky toffee pudding is already pretty adaptable, so here are some swaps you can make:
- Plain flour: You can use all-purpose flour if that’s what you have – they’re basically the same thing. For a gluten-free version, try a 1:1 gluten-free baking flour blend.
- Soft brown sugar: Light brown sugar works perfectly here. In a pinch, you can make your own by mixing white sugar with a tablespoon of molasses per cup of sugar.
- Double cream: Heavy cream or whipping cream will work just fine for the toffee sauce. If you only have single cream, you can use it but the sauce will be slightly thinner.
- Milk: Whole milk is best, but you can use semi-skimmed or even a dairy-free alternative like oat milk or almond milk without much difference.
- Butter: While butter gives the best flavor for both the pudding and sauce, you can use margarine or a plant-based butter substitute if needed. Just stick with butter for the toffee sauce if possible – it really makes a difference there.
Watch Out for These Mistakes While Baking
The biggest mistake when making sticky toffee pudding is overmixing the batter once you add the flour, which can lead to a tough, dense pudding instead of a light and tender one – mix just until the ingredients are combined and you still see a few small lumps.
Another common error is not greasing your baking dish well enough, so make sure to butter every corner generously or line it with parchment paper to avoid a sticky situation when trying to serve.
When making the toffee sauce, watch the heat carefully and stir constantly once you add the cream to the butter and sugar mixture, as it can bubble up quickly and burn if left unattended – low to medium heat is your friend here.
Finally, don’t skip letting the pudding cool for about 10 minutes before pouring the sauce over it, as this brief rest helps the cake set slightly so it absorbs the sauce better without turning mushy.

What to Serve With Sticky Toffee Pudding?
Sticky toffee pudding is already pretty rich and sweet on its own, so I like to serve it with a big scoop of vanilla ice cream that melts right into the warm toffee sauce. You could also go with some lightly sweetened whipped cream or a dollop of crème fraîche if you want something a bit tangier to balance out all that sweetness. A strong cup of coffee or tea on the side is perfect for cutting through the richness, and honestly, that’s all you really need to make this dessert feel complete.
Storage Instructions
Store: Keep your sticky toffee pudding covered with foil or plastic wrap in the fridge for up to 4 days. The sauce can be stored separately in an airtight container, which actually makes it easier to reheat everything later without drying out the cake.
Freeze: This pudding freezes really well for up to 3 months. Wrap individual portions tightly in plastic wrap, then pop them in a freezer bag. I like to freeze the sauce separately in a small container so you can warm it up fresh when you’re ready to serve.
Reheat: Warm the pudding in the microwave for about 30-45 seconds, or cover with foil and heat in a 350°F oven for 10-15 minutes. Heat the toffee sauce gently on the stove or in the microwave, stirring occasionally until it’s smooth and pourable again.
| Preparation Time | 10-15 minutes |
| Cooking Time | 25-30 minutes |
| Total Time | 35-45 minutes |
| Level of Difficulty | Easy |
Estimated Nutrition
Estimated nutrition for the whole recipe (without optional ingredients):
- Calories: 2650-2850
- Protein: 28-34 g
- Fat: 180-200 g
- Carbohydrates: 260-280 g
Ingredients
For the pudding:
- 2 tsp vanilla extract (for best flavor, a good quality extract makes a difference)
- 6 tbsp butter (melted and cooled slightly)
- 1/2 cup milk
- 1/2 cup soft brown sugar
- 2 eggs (room temperature, about 70°F)
- 1 pinch salt
- 1 1/2 tsp baking powder
- 1 1/2 cups plain flour (King Arthur all-purpose flour works perfectly)
For the toffee sauce:
- 1/2 cup soft brown sugar
- 5 tbsp butter (I prefer Kerrygold unsalted butter for its creamy taste)
- 2/3 cup heavy cream (adds richness to the sauce)
Step 1: Prepare the Dry Ingredients
- 1 1/2 cups plain flour
- 1 1/2 tsp baking powder
- 1 pinch salt
- 1/2 cup soft brown sugar
Preheat the oven to 180°C (160°C fan).
In a large mixing bowl, combine the plain flour, baking powder, a pinch of salt, and 1/2 cup soft brown sugar.
Mix thoroughly to ensure the ingredients are well distributed.
Step 2: Mix the Wet Ingredients
- 2 eggs (room temperature)
- 1/2 cup milk
- 2 tsp vanilla extract
- 6 tbsp melted butter (cooled slightly)
In a separate bowl, whisk together the eggs, milk, vanilla extract, and melted butter until the mixture becomes frothy on top.
I find that using room temperature ingredients helps the batter come together smoothly.
Step 3: Combine and Bake the Pudding
- wet mixture from Step 2
- dry mixture from Step 1
Pour the wet ingredients from Step 2 into the bowl with the dry ingredients from Step 1.
Mix until the batter is well combined and no dry spots remain.
Grease a 20cm x 20cm baking dish and pour in the mixture.
Bake in the preheated oven for about 25 minutes, checking for doneness after 20 minutes.
Baking time may vary depending on your baking dish size.
Step 4: Make the Sticky Toffee Sauce
- 1/2 cup soft brown sugar
- 2/3 cup heavy cream
- 5 tbsp butter
While the pudding is baking, add 1/2 cup soft brown sugar, 2/3 cup heavy cream, and 5 tbsp butter to a saucepan.
Heat gently, stirring constantly until the butter is melted and the sauce thickens to your desired color.
Remove from heat and let the sauce stand for a few minutes to thicken further.
For an extra touch, I like to use Kerrygold butter for its rich flavor.
Step 5: Serve the Pudding with Sauce
To serve, slice the warm pudding and drizzle generously with the sticky toffee sauce.
For a special treat, you can add a scoop of vanilla ice cream alongside.
