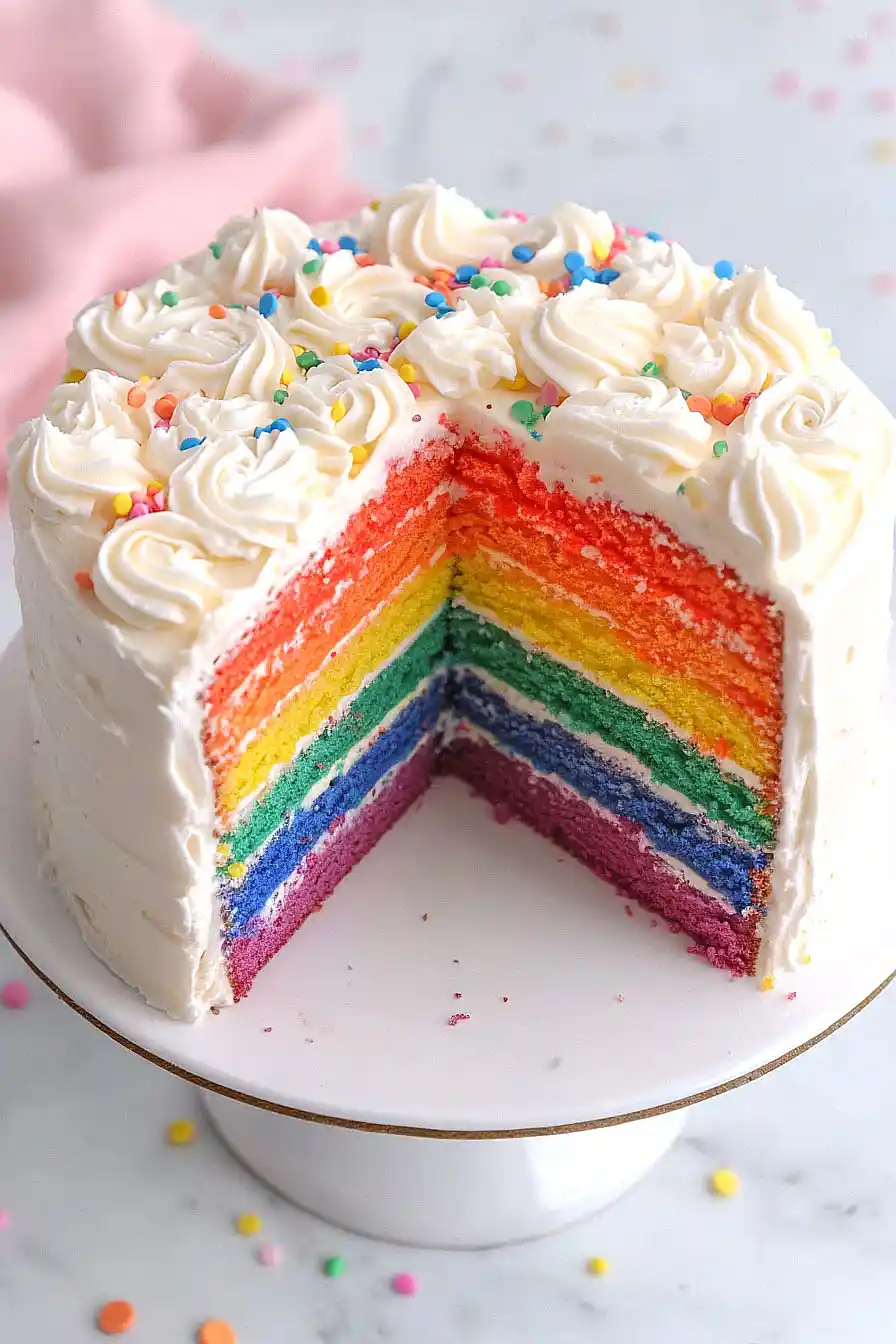
When my daughter asked for a rainbow cake for her birthday, I panicked a bit. Growing up, cake decorating in our house meant opening a can of store-bought frosting and calling it a day. My first few attempts at colorful cakes looked more like muddy messes than anything else.
But here’s the thing about rainbow buttercream – it’s actually not as tricky as it seems. You don’t need fancy tools or years of experience. Just a few simple steps, the right frosting consistency, and a basic understanding of how colors work together. Trust me, if I can figure this out while my kids “help” by eating half the sprinkles, you definitely can too.
Why You’ll Love This Rainbow Cake
- Show-stopping appearance – The beautiful rainbow layers create an exciting reveal when you cut into the cake, making it perfect for birthdays and special celebrations.
- Classic vanilla flavor – While the colors are fun and festive, the cake itself is a tried-and-true vanilla recipe that everyone loves, with a rich buttercream frosting.
- Make-ahead friendly – You can bake the layers a day in advance and store them wrapped in the fridge, making party prep more manageable.
- Customizable colors – You can adjust the gel food coloring amounts to create your own unique color combinations, or stick with just two or three favorite colors.
What Kind of Butter Should I Use?
For this rainbow cake, you’ll want to stick with unsalted butter since it gives you better control over the saltiness of your final product. Make sure your butter is truly at room temperature – this means letting it sit out for about an hour before baking, where you can easily press your finger into it but it’s not so soft that it’s melting. European-style butter like Plugrá or Kerrygold can give you an extra-rich result due to their higher butterfat content, but regular supermarket butter like Land O’Lakes works perfectly fine too. Just remember to take it out of the fridge well before you start baking, as cold butter won’t cream properly with sugar and can lead to a dense cake.
Options for Substitutions
Let’s talk about what you can swap in this fun rainbow cake recipe:
- Buttermilk: No buttermilk? Mix 1 1/2 cups regular milk with 1 1/2 tablespoons of lemon juice or white vinegar. Let it sit for 5 minutes before using.
- Gel food coloring: While gel colors give the best results, you can use liquid food coloring – just know you’ll need to use more drops to get bright colors. Natural food dyes work too, but the colors will be more muted.
- Caster sugar: Regular granulated sugar works fine here. If you only have granulated, pulse it in a food processor for 30 seconds to make it finer.
- Plain flour: Cake flour makes an even softer cake – use 4 cups of cake flour instead. If using self-raising flour, skip the raising agent.
- Vanilla essence: Any clear extract works here – try almond, butter, or even princess emulsion for a different flavor twist.
- Sprinkles: Any decorative toppings work – try rainbow jimmies, nonpareils, or even colored sugar. Just avoid chocolate sprinkles as they might melt into the buttercream.
Watch Out for These Mistakes While Baking
The biggest challenge when making a rainbow cake is achieving consistent, vibrant colors without affecting the cake’s texture – use gel food coloring instead of liquid ones, as they won’t throw off your wet-to-dry ingredient ratio and provide more intense colors. A common mistake is overmixing the batter after adding the food coloring, which can lead to a tough, dense cake – stop mixing as soon as the color is evenly distributed. Temperature matters more than you might think – room temperature ingredients (especially eggs, butter, and buttermilk) will blend more smoothly and create a more even crumb, so plan ahead and take them out of the fridge at least an hour before baking. When it comes to stacking and frosting, don’t rush the process – make sure each layer is completely cool before adding buttercream, and do a crumb coat first, chilling the cake for 15-20 minutes before applying the final layer of frosting to avoid colorful crumbs mixing into your white buttercream.

What to Serve With Rainbow Cake?
This cheerful rainbow cake is perfect for parties and celebrations, and there are lots of fun ways to serve it! A scoop of vanilla ice cream on the side keeps things simple while adding a cool, creamy contrast to the sweet cake. For drinks, I like to serve this with cold milk for the kids or a cup of coffee or tea for the adults – the hot beverages help balance out the sweetness. If you’re hosting a birthday party, you might want to add some fresh berries on the side to bring a touch of natural color that matches the cake’s rainbow theme.
Storage Instructions
Counter Storage: Your rainbow buttercream cake can sit at room temperature for up to 2 days when stored under a cake dome or in an airtight container. This works great if you’re planning to serve it within 48 hours and want to keep that buttercream nice and soft.
Refrigerate: Pop your cake in the fridge in an airtight container, and it’ll stay fresh for up to 5 days. Just remember to take it out about 30 minutes before serving so the buttercream can soften to the right consistency – nobody likes hard buttercream!
Freeze: If you need to store your cake longer, you can freeze it! Wrap individual slices or the whole cake well in plastic wrap and aluminum foil, then freeze for up to 3 months. When you’re ready to enjoy it, thaw overnight in the fridge, then let it come to room temperature before serving.
Make Ahead: Want to prep in advance? You can bake the cake layers up to 2 days ahead and wrap them well in plastic wrap. Store them in the fridge until you’re ready to frost. The buttercream can also be made 1-2 days ahead and stored in the fridge – just let it come to room temperature and give it a quick whip before using.
| Preparation Time | 30-45 minutes |
| Cooking Time | 50-60 minutes |
| Total Time | 80-105 minutes |
| Level of Difficulty | Medium |
Estimated Nutrition
Estimated nutrition for the whole recipe (without optional ingredients):
- Calories: 7200-7600
- Protein: 80-90 g
- Fat: 380-400 g
- Carbohydrates: 900-950 g
Ingredients
For the cake:
- 2.25 cups granulated sugar (for fine texture)
- 1.5 tbsp vanilla extract (I use Nielsen-Massey brand)
- 4 large eggs
- 1.25 cups unsalted butter (softened to room temperature)
- 2 egg whites
- 1.5 cups buttermilk
- 1 tsp salt
- 3.5 tsp baking powder
- 3.75 cups all-purpose flour
For the gel coloring:
- 0.25 tsp green gel food coloring
- 0.25 tsp blue gel food coloring
- 0.25 tsp yellow gel food coloring
- 0.5 tsp red gel food coloring
- 0.5 tsp purple gel food coloring
- 0.25 tsp orange gel food coloring
For the buttercream frosting:
- 2 tsp vanilla extract
- 2.5 cups unsalted butter (softened, about 70°F)
- 2 tbsp milk (whole or 2% works well)
- 5 cups powdered sugar (sifted for a smooth frosting)
For the garnish:
- colorful sprinkles (Wilton brand for vibrant colors)
Step 1: Prepare Baking Pans and Oven
Begin by preheating your oven to 350°F (175°C).
Lightly butter the bottom of six 8-inch cake pans and place an 8-inch round of parchment paper on the bottom of each.
If you do not have enough pans, you will need to bake the layers in multiple rounds.
Step 2: Mix Dry and Wet Ingredients
In a large bowl, whisk together the flour, salt, and baking powder, then set aside.
In a separate bowl with a spout, whisk together the eggs, egg whites, and vanilla, then set aside.
Cream butter and sugar together in another mixing bowl using a mixer with a paddle attachment on medium speed for 9 to 10 minutes until the mixture becomes white and fluffy.
Step 3: Combine Ingredients for Cake Batter
With the mixer running on low, stream in the whisked eggs and vanilla into the creamed butter and sugar.
Stop the mixer to scrape down the bowl with a rubber spatula, then mix one more time to ensure that everything is well combined.
Alternate adding the dry mixture and buttermilk, starting and ending with the dry ingredients.
Ensure the batter is well mixed by scraping down the sides and bottom of the bowl.
Step 4: Prepare and Bake Cake Layers
Distribute the batter evenly into six medium-sized bowls, approximately 1 1/2 cups (280g) per bowl.
Add a different gel color to each bowl for yellow, blue, green, purple, orange, and red batters.
Pour each colored batter into its own prepared cake pan and use a small offset spatula to spread evenly.
Bake in batches of three pans for 17 minutes or until the tops spring back slightly when touched.
Let cool in the pans for 5 minutes before transferring the layers to a wire rack to cool completely.
Step 5: Prepare Buttercream Frosting
In a mixing bowl with a paddle attachment or a large bowl with a hand mixer, beat the butter on medium speed for about 2 minutes until smooth.
Add powdered sugar and mix on low until combined, then increase the speed to medium-high for 3 to 4 minutes until fluffy.
Add milk and vanilla, then mix on low until combined and increase the speed to medium to achieve a fluffy consistency.
Step 6: Assemble and Frost the Cake
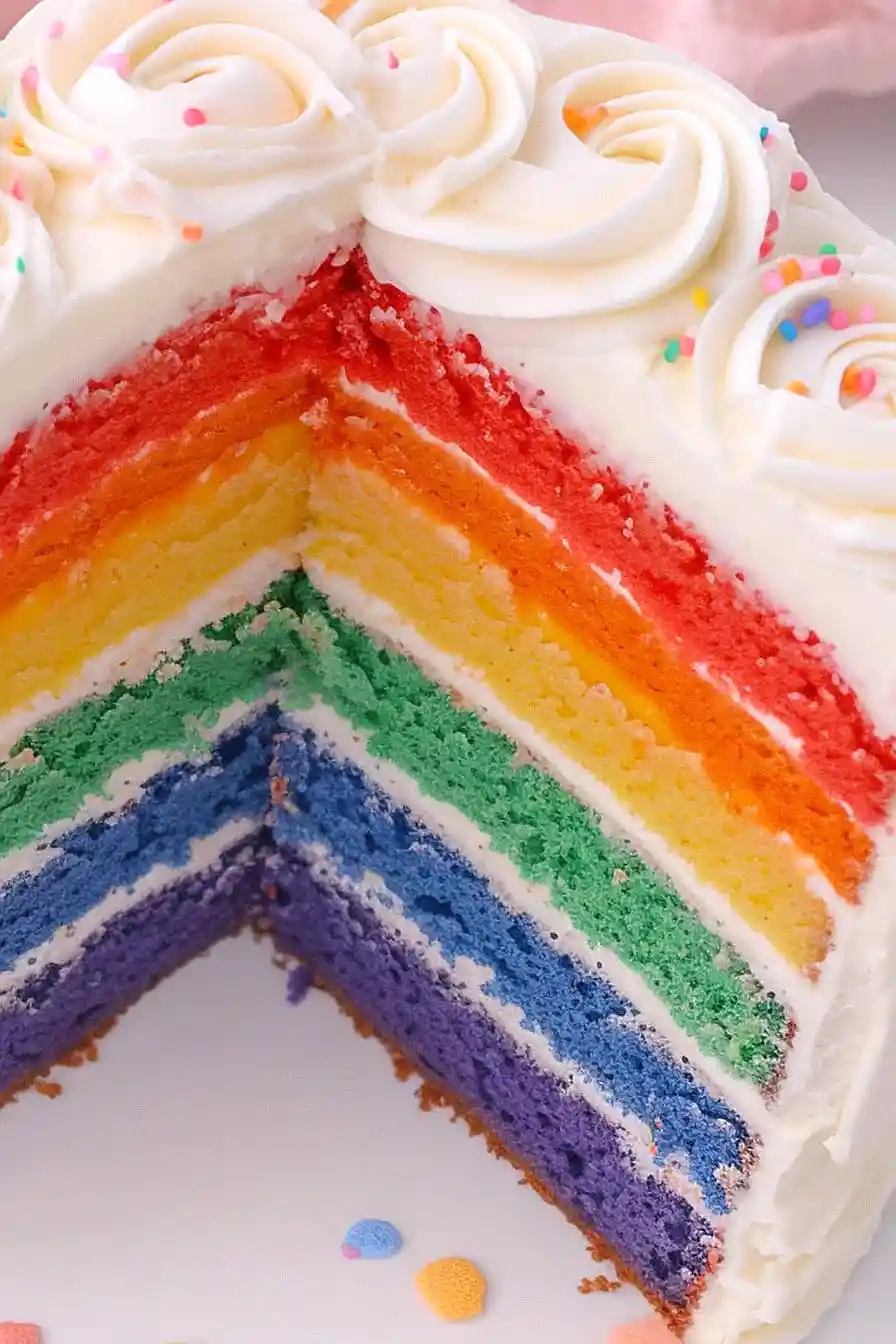
Start by placing the purple cake layer on a large plate or cardboard cake round.
Spread about 1/2 cup of frosting over the layer using an offset spatula, then add the blue layer and repeat with more frosting.
Follow this pattern with the green, yellow, and orange layers, topping with the red layer upside down.
Spread a thin layer of frosting over the entire cake to create a crumb coat.
Chill the cake in the freezer for 10 to 15 minutes or in the fridge for 20 to 30 minutes.
Step 7: Final Decoration
After chilling, apply a thicker layer of frosting over the cake and smooth the sides and top.
Decorate with rainbow sprinkles along the bottom border.
Use a piping bag with a star tip to add buttercream rosettes to the top edge, and sprinkle with more rainbow sprinkles.
Chill the cake in the freezer for 20-30 minutes before slicing with a hot knife for clean cuts.
Step 8: Storage and Serving
Store the finished cake in the fridge until ready to serve.
Bring it to room temperature before cutting to facilitate easier slicing.
For leftovers, flash freeze the slices for 10-15 minutes, then wrap each one in plastic wrap for storage.
