Chili has always been my go-to comfort food, especially on a rainy Portland evening. But when my doctor suggested I watch my sodium intake, I thought my chili days were over. Turns out, cutting back on salt doesn’t mean you have to sacrifice flavor. You just need to be a bit more creative with your spices and ingredients.
That’s why I developed this low sodium beef chili recipe. Instead of relying on salt, I layer in tons of flavor with things like smoked paprika, cocoa powder, and fresh lime juice. The secret is building flavor through technique – browning the beef properly, letting the spices bloom, and giving everything time to simmer together. No one at my dinner table even noticed the missing salt.
Want something hearty and satisfying without all the sodium? This chili delivers. Need to meal prep for the week? It freezes great. Honestly, this has become my family’s new favorite, and I don’t miss the salty version one bit.
Why You’ll Love This Low Sodium Beef Chili
- Heart-healthy and low sodium – This chili keeps the salt in check without sacrificing any flavor, making it perfect if you’re watching your sodium intake or cooking for someone who needs to.
- Packed with flavor – The combination of cocoa powder, balsamic vinegar, and fresh lime juice creates layers of rich, complex taste that you won’t believe is low sodium.
- Loaded with vegetables – With three different bell peppers, celery, and onions, you’re getting plenty of nutrients and fiber in every bowl.
- Perfect for meal prep – This chili tastes even better the next day and freezes beautifully, so you can make a big batch and enjoy it all week long.
- Lean and satisfying – Using lean ground beef and beans gives you plenty of protein to keep you full without the extra fat.
What Kind of Ground Beef Should I Use?
For this chili, I went with 93% lean ground beef, which gives you a nice balance between flavor and keeping things on the healthier side. If you prefer a richer taste and don’t mind a bit more fat, 85% lean will work great too – just be sure to drain off any excess grease after browning. Ground turkey or chicken are solid alternatives if you want to switch things up, though they’ll give you a slightly different flavor profile. The key is to brown your meat well before adding the other ingredients, as that caramelization adds a ton of depth to your chili.
Options for Substitutions
This low sodium chili is pretty forgiving when it comes to swaps:
- Ground beef: You can use ground turkey, ground chicken, or even plant-based crumbles if you prefer. Just note that leaner meats might need a splash of olive oil in the pan to prevent sticking.
- Bell peppers: Any color combination works here – use what you have on hand or what’s on sale. You can even use all of one color if that’s what you’ve got.
- Beans: Feel free to mix and match any beans you like – pinto, navy, or cannellini beans all work great. Just stick with no-salt-added varieties to keep the sodium low.
- Cocoa powder: If you don’t have cocoa powder, you can leave it out. It adds depth, but the chili will still taste good without it. Some people use a small piece of dark chocolate instead.
- Balsamic vinegar: Red wine vinegar or apple cider vinegar can step in here. You’re just looking for that bit of acidity to brighten things up.
- Fresh cilantro: If cilantro isn’t your thing (some people really dislike it), try fresh parsley instead or just skip it altogether.
- Lime juice: Lemon juice works in a pinch, though lime does give it that authentic chili flavor.
Watch Out for These Mistakes While Cooking
The biggest mistake when making low-sodium chili is rushing the cooking process – that full hour of simmering is what allows all the spices and flavors to develop properly, so resist the urge to crank up the heat or shorten the time.
Another common error is adding the lime juice too early, which can make the chili taste bitter and dull the bright, fresh flavor you want at the end, so always wait until the very last step to squeeze it in.
To avoid a watery chili, don’t add the optional broth unless your chili looks too thick after the hour of cooking, and if you do need it, add just a cup at a time.
One more tip: make sure to break up the ground beef into small crumbles while browning it in step 1, as large chunks won’t absorb the flavors as well and can make your chili feel more like beef stew.
What to Serve With Beef Chili?
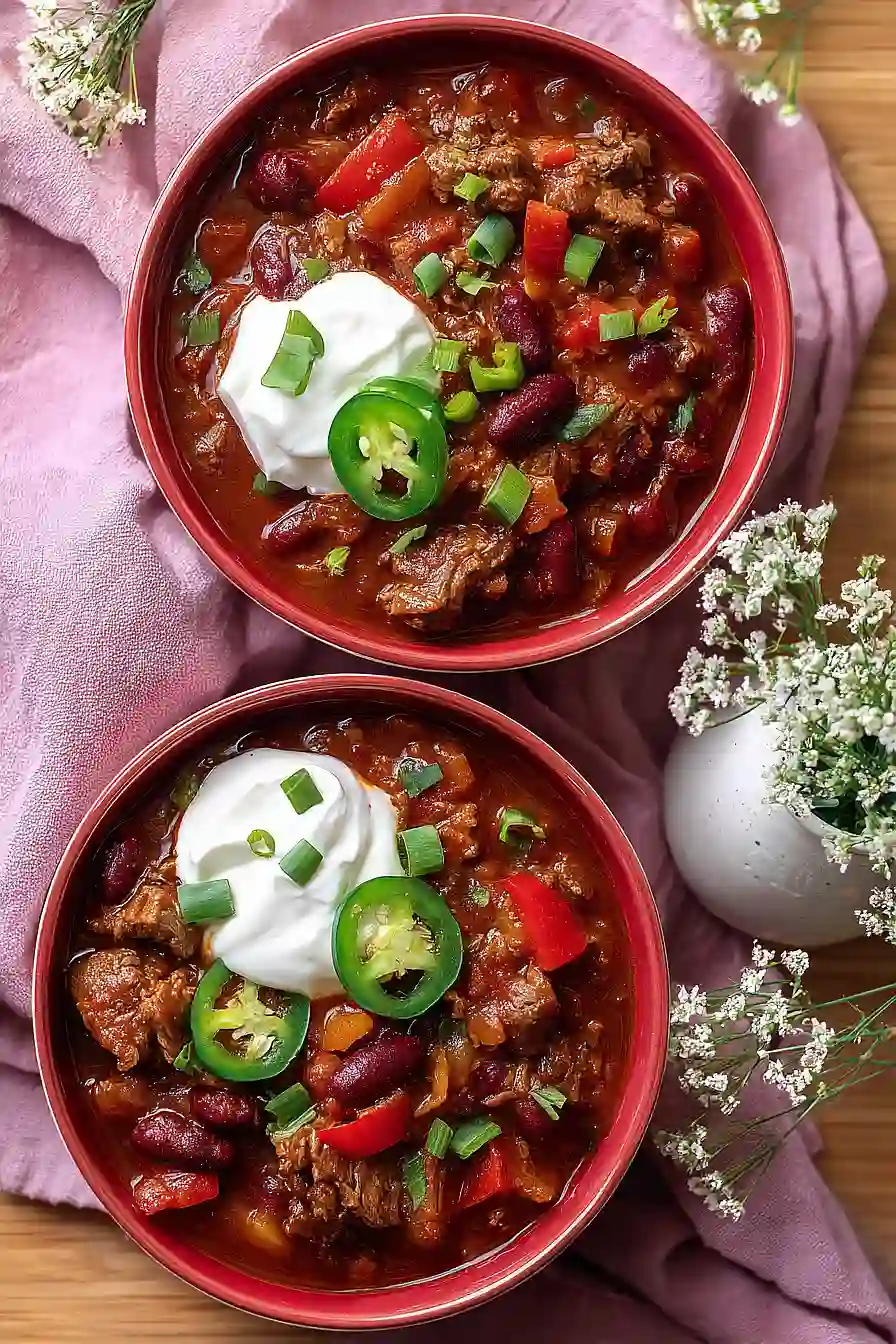
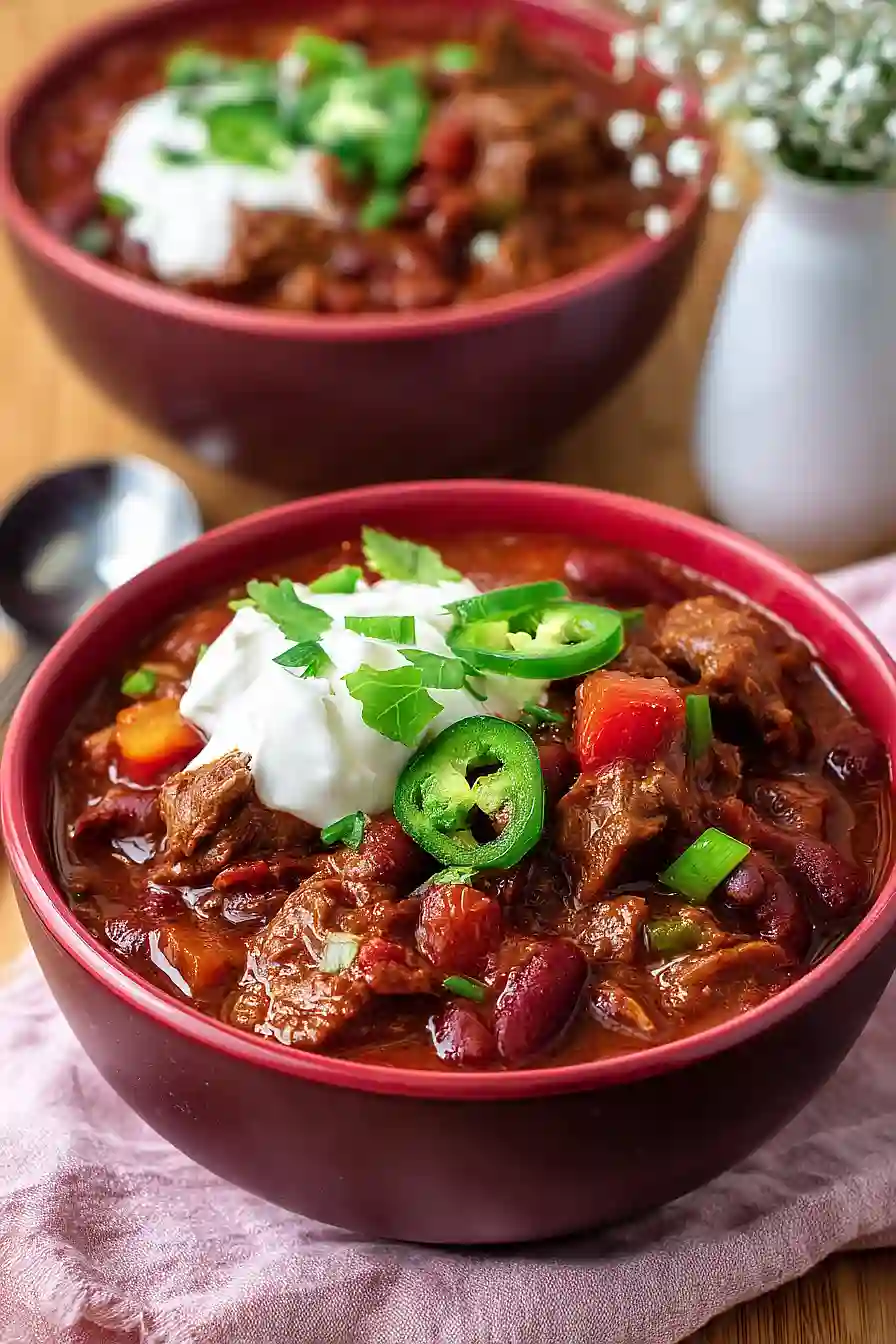
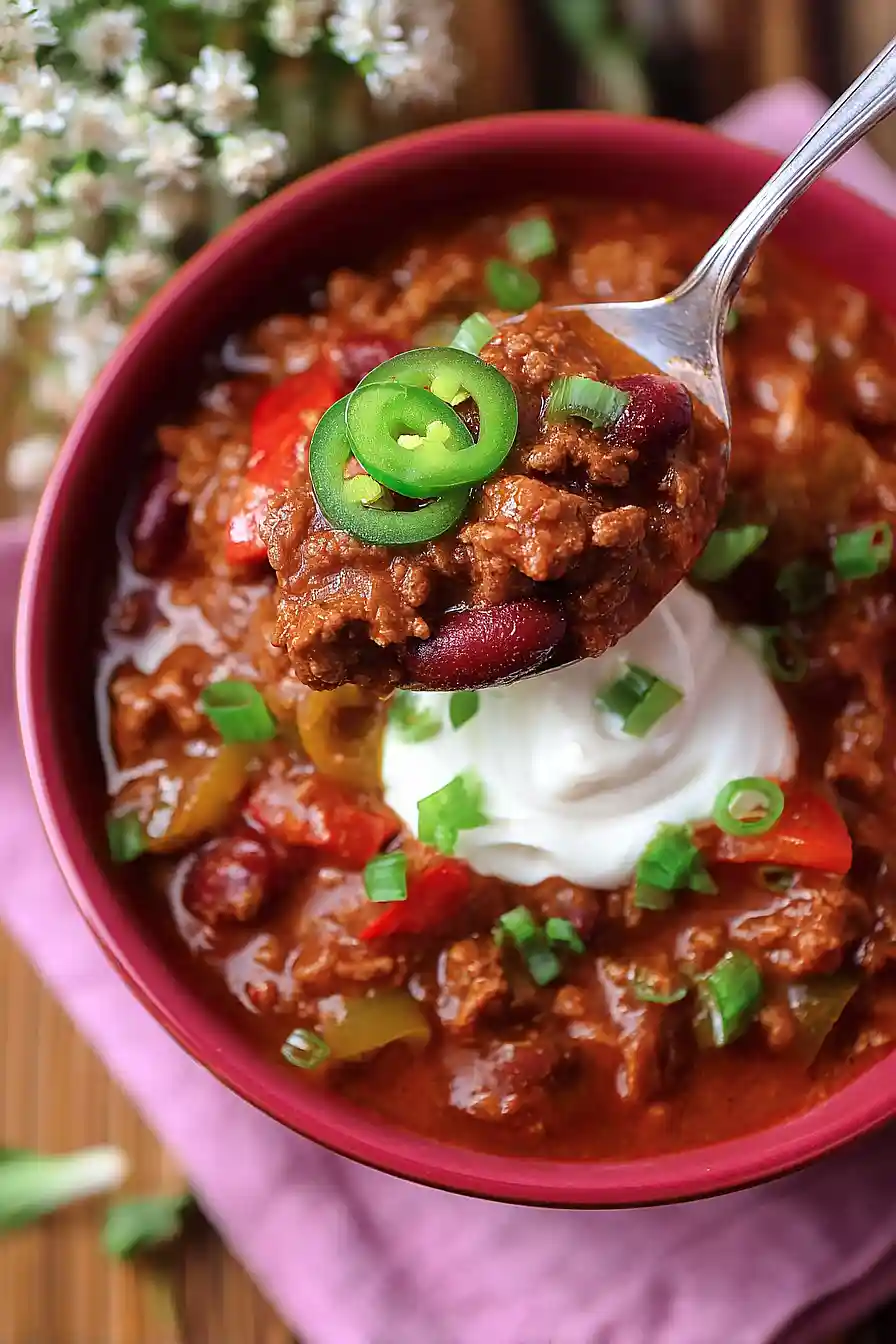
This hearty chili is perfect with a big pan of cornbread or some warm flour tortillas on the side for scooping. I love setting up a toppings bar with shredded cheese, diced avocado, sour cream, sliced jalapeños, and extra cilantro so everyone can customize their bowl. If you want to make it more filling, serve it over a bed of rice or baked potatoes, which soak up all those rich flavors. A simple side of tortilla chips with guacamole or a crisp coleslaw also makes a great pairing to balance out the warmth of the chili.
Storage Instructions
Store: This chili actually tastes even better the next day after all the flavors have had time to hang out together. Keep it in an airtight container in the fridge for up to 5 days. It’s perfect for easy weeknight dinners or lunch throughout the week.
Freeze: Chili is one of those recipes that’s made for freezing! Let it cool completely, then portion it into freezer-safe containers or bags and freeze for up to 3 months. I like to freeze individual servings so I can grab just what I need for a quick meal.
Reheat: Warm it up on the stovetop over medium-low heat, stirring occasionally until heated through. You can also microwave individual portions for 2-3 minutes, stirring halfway through. If it seems too thick after storing, just add a splash of broth or water to loosen it up.
| Preparation Time | 20-30 minutes |
| Cooking Time | 60-70 minutes |
| Total Time | 80-100 minutes |
| Level of Difficulty | Medium |
| Servings | 8 servings |
Estimated Nutrition
Estimated nutrition for the whole recipe (without optional ingredients):
- Calories: 1550-1750
- Protein: 105-120 g
- Fat: 28-35 g
- Carbohydrates: 210-230 g
Ingredients
For the chilli:
- 28 oz diced tomatoes (no salt added, I use San Marzano)
- 28 oz beans (no salt added, kidney or pinto)
- 6 oz tomato paste (no salt added)
- 1 lb lean ground beef (93/7 blend preferred)
- 1 tsp smoked paprika
- 1 tsp oregano
- 1 large onion (diced into 1/2-inch pieces)
- 3 bell peppers (any color, diced into 3/4-inch pieces)
- 1.5 tbsp balsamic vinegar
- 1 tbsp cocoa powder (adds depth and richness to the chili)
- 2 cups beef broth (no salt added, homemade if possible)
- 2 tbsp chili powder (freshly ground preferred for more flavor)
- 2 limes (juice and zest)
- 3 stalks celery (diced into 1/4-inch pieces)
- 2 tbsp brown sugar
- 1 tbsp ground cumin
For the garnish:
- 1/4 cup fresh cilantro (chopped just before serving)
For Toppings (optional):
- sour cream (optional, adds richness and creaminess)
- cilantro (optional, brightens the finished dish)
- jalapenos (optional, adds heat and fresh pepper flavor)
Step 1: Prepare the Mise en Place
- 1 large onion
- 3 stalks celery
- 3 bell peppers
- 2 limes
- 1/4 cup fresh cilantro
- 1 tsp smoked paprika
- 1 tsp oregano
- 2 tbsp chili powder
- 1 tbsp ground cumin
- 1 tbsp cocoa powder
- 2 tbsp brown sugar
Dice the onion into 1/2-inch pieces, celery into 1/4-inch pieces, and bell peppers into 3/4-inch pieces.
Zest the limes and juice them into a small bowl.
Chop the fresh cilantro just before you need it.
Measure out all spices (smoked paprika, oregano, chili powder, ground cumin, cocoa powder, and brown sugar) into a small bowl so they’re ready to add quickly.
This prep work ensures smooth cooking without interruptions.
Step 2: Brown the Ground Beef
- 1 lb lean ground beef
Heat a large pot or Dutch oven over medium-high heat.
Add the ground beef and cook for 8-10 minutes, breaking it into small pieces with a spoon as it cooks, until the meat is browned and has released its juices.
Once cooked through, transfer the beef to a clean plate, leaving about 1 tablespoon of the fat in the pot—this fat carries flavor and will help build your chili’s foundation.
Step 3: Sauté the Aromatics and Build Flavor
- 1 large onion
- 3 stalks celery
- 1.5 tbsp balsamic vinegar
- 3 bell peppers
In the same pot with the beef fat, add the diced onion and celery and sauté over medium heat for 7-8 minutes, stirring occasionally, until they begin to soften and the onion becomes translucent.
Then add the balsamic vinegar and diced bell peppers, cooking for an additional 3 minutes to lightly soften the peppers and allow the vinegar to reduce slightly.
I like using balsamic here because it adds a subtle sweetness and acidity that balances the richness of the beef beautifully.
Step 4: Layer in Spices and Tomato Base
- spice mixture from Step 1
- 6 oz tomato paste
- 28 oz diced tomatoes
- 2 cups beef broth
Add the spice mixture from Step 1 to the pot and stir constantly for about 1 minute—this blooms the spices and releases their aromatic oils, dramatically deepening the flavor.
Then stir in the tomato paste and cook for 2-3 minutes, allowing it to caramelize slightly against the pot.
Finally, add the diced tomatoes with their juices and the beef broth, stirring well to combine everything.
Step 5: Simmer and Meld Flavors
- browned beef from Step 2
- 28 oz beans
Return the browned beef from Step 2 to the pot along with the beans, stirring to combine.
Bring the mixture to a simmer, then reduce the heat to medium-low, cover with a lid, and let it cook gently for 1 hour.
The long, slow simmer allows all the flavors to meld together and the chili to thicken naturally.
I find that the flavors continue developing even as it cooks, so don’t rush this step—it’s where the magic happens.
Step 6: Finish with Brightness and Serve
- 2 limes
- 1/4 cup fresh cilantro
- sour cream
- cilantro
- jalapenos
After the 1-hour simmer, taste the chili and adjust seasonings as needed.
Stir in the lime juice and zest from Step 1, which adds a bright, fresh note that cuts through the richness of the beef and cocoa.
Fold in the chopped cilantro just before serving.
Ladle the chili into bowls and serve hot with optional toppings like sour cream, additional cilantro, or sliced jalapeños on the side, allowing guests to customize their bowls.

Perfect Low Sodium Beef Chili
Ingredients
For the chilli:
- 28 oz diced tomatoes (no salt added, I use San Marzano)
- 28 oz beans (no salt added, kidney or pinto)
- 6 oz tomato paste (no salt added)
- 1 lb lean ground beef (93/7 blend preferred)
- 1 tsp smoked paprika
- 1 tsp oregano
- 1 large onion (diced into 1/2-inch pieces)
- 3 bell peppers (any color, diced into 3/4-inch pieces)
- 1.5 tbsp balsamic vinegar
- 1 tbsp cocoa powder (adds depth and richness to the chili)
- 2 cups beef broth (no salt added, homemade if possible)
- 2 tbsp chili powder (freshly ground preferred for more flavor)
- 2 limes (juice and zest)
- 3 stalks celery (diced into 1/4-inch pieces)
- 2 tbsp brown sugar
- 1 tbsp ground cumin
For the garnish:
- 1/4 cup fresh cilantro (chopped just before serving)
For Toppings (optional):
- sour cream (optional, adds richness and creaminess)
- cilantro (optional, brightens the finished dish)
- jalapenos (optional, adds heat and fresh pepper flavor)
Instructions
- Dice the onion into 1/2-inch pieces, celery into 1/4-inch pieces, and bell peppers into 3/4-inch pieces. Zest the limes and juice them into a small bowl. Chop the fresh cilantro just before you need it. Measure out all spices (smoked paprika, oregano, chili powder, ground cumin, cocoa powder, and brown sugar) into a small bowl so they're ready to add quickly. This prep work ensures smooth cooking without interruptions.
- Heat a large pot or Dutch oven over medium-high heat. Add the ground beef and cook for 8-10 minutes, breaking it into small pieces with a spoon as it cooks, until the meat is browned and has released its juices. Once cooked through, transfer the beef to a clean plate, leaving about 1 tablespoon of the fat in the pot—this fat carries flavor and will help build your chili's foundation.
- In the same pot with the beef fat, add the diced onion and celery and sauté over medium heat for 7-8 minutes, stirring occasionally, until they begin to soften and the onion becomes translucent. Then add the balsamic vinegar and diced bell peppers, cooking for an additional 3 minutes to lightly soften the peppers and allow the vinegar to reduce slightly. I like using balsamic here because it adds a subtle sweetness and acidity that balances the richness of the beef beautifully.
- Add the spice mixture from Step 1 to the pot and stir constantly for about 1 minute—this blooms the spices and releases their aromatic oils, dramatically deepening the flavor. Then stir in the tomato paste and cook for 2-3 minutes, allowing it to caramelize slightly against the pot. Finally, add the diced tomatoes with their juices and the beef broth, stirring well to combine everything.
- Return the browned beef from Step 2 to the pot along with the beans, stirring to combine. Bring the mixture to a simmer, then reduce the heat to medium-low, cover with a lid, and let it cook gently for 1 hour. The long, slow simmer allows all the flavors to meld together and the chili to thicken naturally. I find that the flavors continue developing even as it cooks, so don't rush this step—it's where the magic happens.
- After the 1-hour simmer, taste the chili and adjust seasonings as needed. Stir in the lime juice and zest from Step 1, which adds a bright, fresh note that cuts through the richness of the beef and cocoa. Fold in the chopped cilantro just before serving. Ladle the chili into bowls and serve hot with optional toppings like sour cream, additional cilantro, or sliced jalapeños on the side, allowing guests to customize their bowls.
