Finding the perfect dessert that balances sweet and tart flavors can be tricky, especially when you want something that feels special but doesn’t require hours in the kitchen. Most fruit cakes either turn out too heavy or the fruit gets lost in all the batter, and let’s be honest – nobody has time for complicated recipes during busy weeknights.
This sour cherry cake hits the sweet spot perfectly: it’s got just the right amount of tang from the cherries, comes together in under an hour, and works great whether you’re serving it for dessert or enjoying a slice with your morning coffee.
Why You’ll Love This Sour Cherry Cake
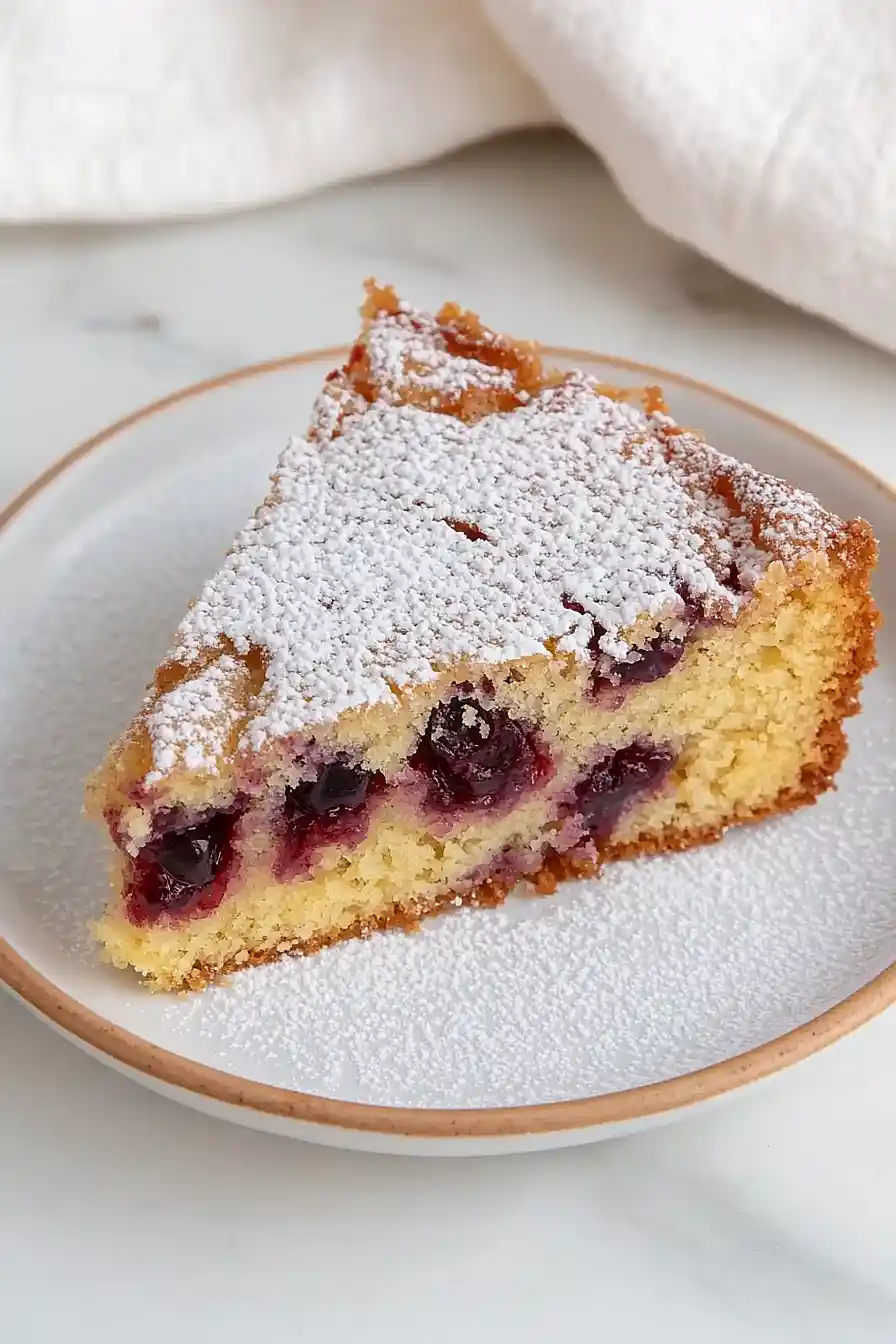
- Perfect balance of sweet and tart – The sour cherries create a delightful contrast with the tender, buttery cake, giving you that perfect bite every time.
- Simple pantry ingredients – You probably have most of these basics on hand already – just butter, sugar, eggs, flour, and the star ingredient: sour cherries.
- Quick and easy baking – This cake comes together in about an hour, making it perfect for when you want something homemade without spending all day in the kitchen.
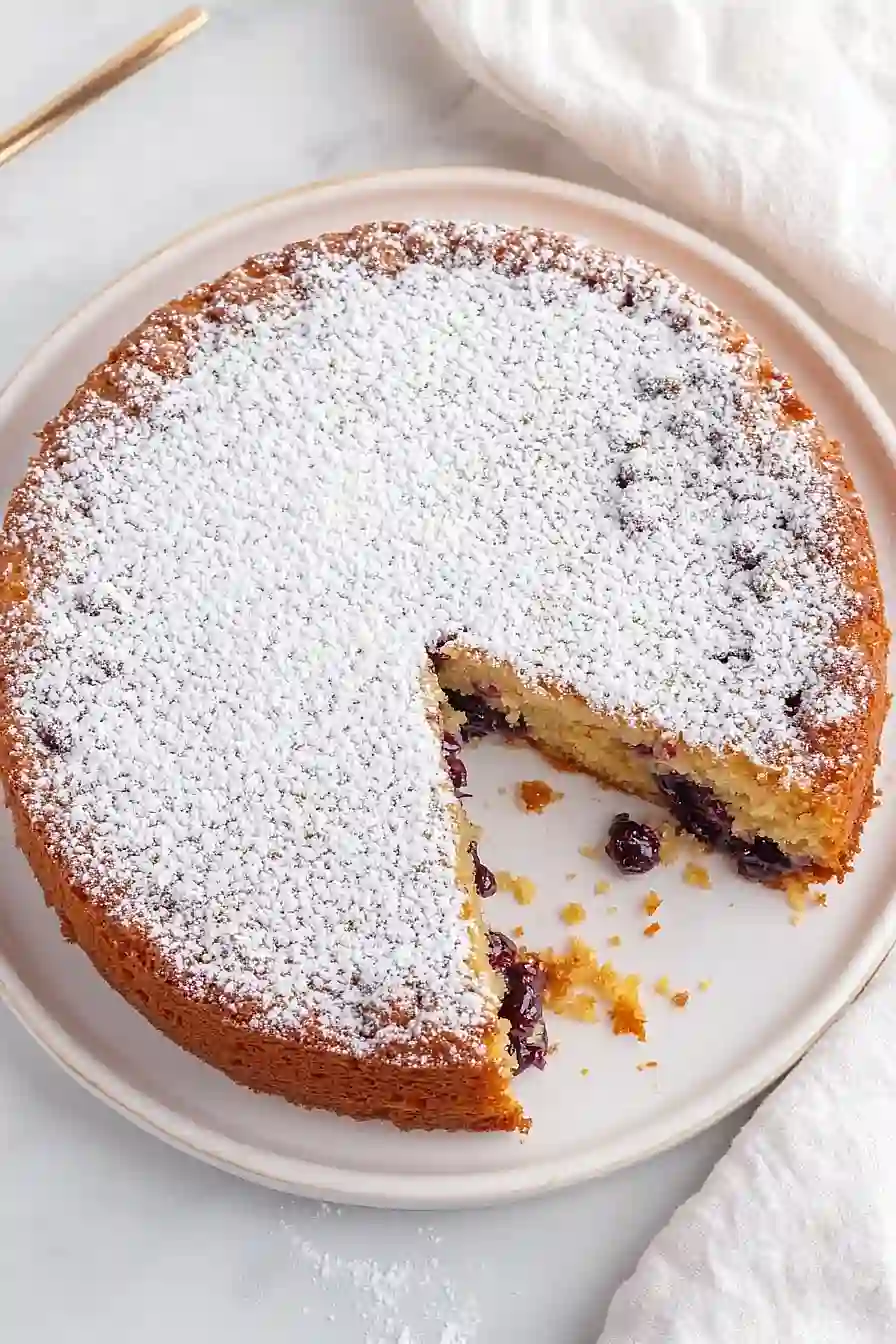
- Great for any occasion – Whether it’s a casual family dessert or something special for guests, this cake works beautifully dusted with powdered sugar.
- Uses convenient jarred cherries – No need to pit fresh cherries – just drain a jar and you’re ready to bake, making this recipe accessible year-round.
What Kind of Sour Cherries Should I Use?
You can use either jarred sour cherries or fresh ones for this cake, though jarred cherries are often more convenient and available year-round. If you’re using jarred cherries, make sure to drain them well since excess liquid can make your cake soggy – the recipe calls for about 350 grams of drained cherries from a 750-gram jar. Fresh sour cherries work great too, but you’ll need to pit them first, which can be a bit time-consuming. Either way, give your cherries a gentle pat with paper towels before folding them into the batter to remove any extra moisture.

Options for Substitutions
This classic cake recipe is pretty forgiving when it comes to making a few swaps:
- Sour cherries: If you can’t find sour cherries, fresh or frozen sweet cherries work great – just add a tablespoon of lemon juice to balance the sweetness. You can also try blueberries, raspberries, or even diced apples for a different twist.
- Unsalted butter: Salted butter is fine to use – just skip the pinch of salt in the recipe. You can also substitute with vegetable oil (use about 1/2 cup) for a slightly more tender cake.
- Lemon zest: No fresh lemon? Try orange zest instead, or add 1/2 teaspoon of vanilla extract for a different but lovely flavor. In a pinch, 1/4 teaspoon of lemon extract works too.
- All-purpose flour: You can use cake flour for a more tender crumb (use 1 3/4 cups instead), or substitute up to half with almond flour for a nuttier flavor and slightly denser texture.
- Milk: Any milk works here – whole, 2%, or even buttermilk (which will add a nice tang). Non-dairy alternatives like almond or oat milk work just fine too.
Watch Out for These Mistakes While Baking
The biggest mistake when making sour cherry cake is not draining your cherries thoroughly enough, which can make your batter too wet and result in a dense, soggy cake – pat those cherries dry with paper towels and let them sit for a few minutes after draining.
Another common error is adding cold ingredients to your butter and sugar mixture, so make sure your eggs and milk are at room temperature to prevent the batter from curdling and ensure a smooth, even texture.
Don’t forget to toss your drained cherries in a tablespoon of flour before folding them into the batter, as this helps prevent them from sinking to the bottom during baking.
Finally, resist the urge to open the oven door too early – wait until at least 45 minutes have passed before checking, and use a toothpick inserted in the center to test for doneness rather than relying on timing alone.
What to Serve With Sour Cherry Cake?
This cake is perfect on its own with a cup of coffee or tea, but a dollop of whipped cream or vanilla ice cream really complements the tart cherries beautifully. I love serving it alongside a strong espresso or black tea since the slight bitterness balances out the sweet and sour flavors in the cake. For a more indulgent treat, try it with a scoop of vanilla or almond ice cream, which melts slightly and creates a lovely contrast with the warm cake. You could also serve it with fresh berries or a light dusting of extra powdered sugar if you want to keep things simple but elegant.
Storage Instructions
Keep Fresh: This sour cherry cake stays moist and delicious when covered tightly with plastic wrap or stored in an airtight container at room temperature for up to 3 days. The cherries help keep it nice and tender, so it actually gets even better after a day or two!
Refrigerate: If you want to keep your cake longer, pop it in the fridge where it’ll stay good for up to a week. Just wrap it well or use a cake keeper to prevent it from drying out. Let it come to room temperature before serving for the best flavor and texture.
Freeze: You can freeze slices of this cake for up to 3 months – perfect for when you want a sweet treat later! Wrap individual pieces in plastic wrap, then place them in a freezer bag. Thaw at room temperature for about an hour before enjoying.
| Preparation Time | 15-20 minutes |
| Cooking Time | 40-50 minutes |
| Total Time | 55-70 minutes |
| Level of Difficulty | Medium |
Estimated Nutrition
Estimated nutrition for the whole recipe (without optional ingredients):
- Calories: 2200-2500
- Protein: 32-36 g
- Fat: 100-115 g
- Carbohydrates: 320-350 g
Ingredients
For the cake batter:
- 3 large eggs (room temperature)
- 1 1/2 cups all-purpose flour
- 1 tbsp baking powder (ensure it’s fresh for good rise)
- 350 gr drained sour cherries
- 3/4 cup granulated sugar
- Pinch of salt (I use Morton Fine Sea Salt)
- 4 tbsp milk
- 1 1/4 sticks unsalted butter (room temperature, about 70°F)
- 1/2 tsp lemon zest (finely zested for best flavor)
For the topping:
- Powdered sugar, for dusting
Step 1: Prepare the Pan and Oven
Preheat your oven to 350°F (175°C).
Spray or grease the inside of an 11-inch (28 cm) springform pan to prevent sticking.
Set the pan aside for the batter.
Step 2: Cream Butter, Sugar, and Lemon
- 1 1/4 sticks unsalted butter (room temperature) (125 gr)
- 3/4 cup granulated sugar (125 gr)
- 1/2 tsp lemon zest or 4 drops lemon oil
In a large mixing bowl, beat the room temperature butter, granulated sugar, and lemon zest or lemon oil with an electric mixer until the mixture is light, pale, and fluffy.
This should take about 5 minutes.
Make sure to occasionally scrape down the sides and under the beaters to ensure everything is well-mixed.
Step 3: Incorporate Eggs
- 3 large eggs (room temperature)
Reduce the mixer speed to low.
Add the eggs one at a time, beating well after each addition until all are incorporated.
The mixture should stay fluffy and smooth throughout.
Step 4: Combine Dry Ingredients and Finish Batter
- 1 1/2 cups all-purpose flour (200 gr)
- pinch of salt
- 1 tbsp baking powder
- 4 tbsp milk
In a separate bowl or cup, whisk together the flour, salt, and baking powder.
Gradually add these dry ingredients to the butter, sugar, and egg mixture, mixing gently.
If the batter seems too dry, alternate with splashes of milk as you mix.
The finished batter should be a bit stiff, but not overly so; you can add more milk if needed.
I personally find adding the milk progressively helps achieve just the right consistency.
Step 5: Fold in Cherries and Fill Pan
- 350 gr drained sour cherries (from a 750 gr jar)
- batter from Step 4
Carefully stir the drained sour cherries into the batter so they are evenly distributed.
Spread the finished batter evenly into the prepared springform pan.
Step 6: Bake the Cake
- batter with cherries from Step 5
Place the pan into the preheated oven and bake for 40 minutes.
Check doneness by inserting a toothpick into the center; if it comes out clean, the cake is done.
If not, bake for an additional 5 minutes and check again.
The cake shouldn’t require more than 50 minutes total.
Step 7: Cool and Finish the Cake
- powdered sugar, for dusting
Allow the cake to cool in the pan on a rack for a while.
Run a knife around the edge to loosen, then remove the pan’s edge and let the cake cool completely.
Before serving, dust the cooled cake generously and evenly with powdered sugar using a sieve or sifter.
I always enjoy a little extra powdered sugar for a lovely snowy finish!
