If you ask me, ice cream bar cakes are a genius way to beat the heat.
This no-bake dessert takes your favorite ice cream bars and turns them into a cool, layered treat that’s perfect for summer parties. Creamy ice cream layers combine with chocolate coating and cookie crumbs to create something that’s both nostalgic and new.
It’s built with store-bought ice cream bars, which means less time in the kitchen and more time enjoying your day. A quick drizzle of chocolate sauce and a sprinkle of crushed cookies give it that special homemade touch.
It’s a crowd-pleasing dessert that’s cold, sweet, and just right for those hot summer days when you don’t want to turn on the oven.
Why You’ll Love This Ice Cream Bar Cake
- No-bake dessert – Perfect for hot summer days when you don’t want to turn on the oven – just assemble and freeze!
- Make-ahead friendly – You can prepare this cake up to 3 days before serving, making it ideal for parties and gatherings when you want to plan ahead.
- Kid-friendly preparation – Little ones can help crush cookies and layer ingredients, making this a fun family activity in the kitchen.
- Simple ingredients – Using ready-made ice cream bars and cookies means you don’t need any special baking skills or hard-to-find ingredients to create this impressive dessert.
- Crowd-pleasing treat – The combination of cookies, ice cream, and fresh strawberries makes this cake a hit at summer parties, birthdays, or any special occasion.
What Kind of Ice Cream Bars Should I Use?
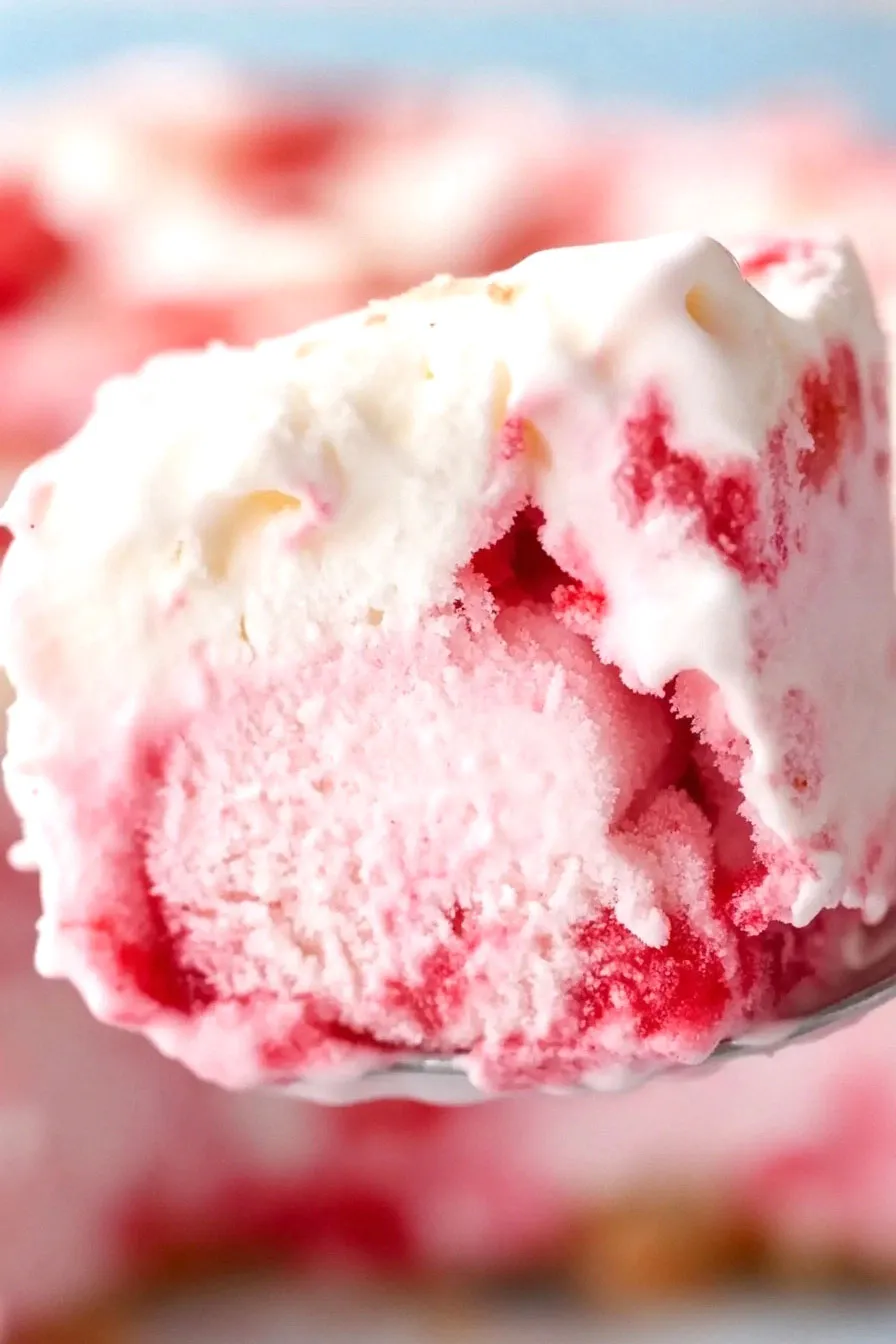
Good old strawberry shortcake ice cream bars are the star of this dessert, and while the classic Good Humor bars are what most people think of, any brand will work just fine. You’ll find these nostalgic treats in most grocery store freezer sections, usually sold in multipacks – they’re the ones with the strawberry ice cream center, vanilla coating, and those signature pink cookie crumbs on the outside. If you can’t find strawberry shortcake bars, you could substitute with similar crumb-coated ice cream bars like Nestle Crunch bars or even vanilla ice cream bars rolled in cookie crumbs. Just make sure to let them soften slightly before using them in the recipe, which makes them easier to cut and layer into your cake.
Options for Substitutions
This cool and creamy dessert can be customized with several easy swaps:
- Golden sandwich cookies: Any sandwich cookie works great here – try chocolate sandwich cookies, vanilla wafers, or even graham crackers. Just make sure to crush them into fine crumbs for the best crust texture.
- Strawberry shortcake ice cream bars: Feel free to use any ice cream bar variety you like! Good Day Bars, Chocolate Eclair bars, or even Klondike bars would work well. Just keep the total amount about the same.
- Strawberry ice cream: You can match your ice cream flavor to whatever ice cream bars you choose – vanilla, chocolate, or any other flavor works great. Just make sure it’s softened before spreading.
- Whipped topping: Regular whipped cream works perfectly here too. If using fresh whipped cream, add 2 tablespoons of powdered sugar while whipping to help it stay stable.
- Fresh strawberries: Switch these up based on your ice cream flavor choice – try raspberries, blueberries, or even sliced bananas. For chocolate versions, chocolate shavings work great too.
Watch Out for These Mistakes While Making
The biggest challenge when making an ice cream bar cake is managing temperature – working too slowly can lead to a melted mess, so have all your ingredients ready and work quickly when layering the components. The timing of softening your ice cream is crucial – you want it just soft enough to spread (about 15-20 minutes at room temperature), but not so soft that it turns soupy and makes your cookie crust soggy. To prevent the cookie crust from becoming too hard and difficult to cut, avoid pressing it too firmly into the pan – a gentle pack with the back of a measuring cup is all you need. For the smoothest results, let the cake freeze for at least 6 hours between layers, and always use a knife dipped in hot water when cutting the finished cake to get clean, beautiful slices.
What to Serve With Ice Cream Bar Cake?
This cool and creamy dessert is pretty perfect on its own, but there are some fun ways to make it even more special! Hot fudge or strawberry sauce drizzled over each slice adds an extra touch of sweetness and creates that nice hot-and-cold contrast that makes ice cream desserts so good. I like to put out some extra toppings like rainbow sprinkles, chopped nuts, or extra whipped cream so everyone can customize their slice. For drinks, a cold glass of milk or a cup of hot coffee makes a great partner to balance out all that sweetness.
Storage Instructions
Keep Frozen: This ice cream bar cake needs to stay in the freezer to maintain its shape and texture. Place it in an airtight container or wrap it well with plastic wrap and aluminum foil. It’ll keep nicely for up to 2 weeks in your freezer, though I doubt it’ll last that long!
Make Ahead: This dessert is perfect for making ahead of time! You can prepare it up to 3 days before your event. Just keep it covered in the freezer until you’re ready to serve. The cookie crust actually gets better as it sits, becoming more integrated with the ice cream layers.
Serve: When it’s time to dig in, let the cake sit at room temperature for about 5-10 minutes to soften slightly – this makes it easier to slice. If you have leftovers, pop them back in the freezer right away to prevent melting.
| Preparation Time | 20-30 minutes |
| Cooking Time | 0-5 minutes |
| Total Time | 120-150 minutes |
| Level of Difficulty | Easy |
Estimated Nutrition
Estimated nutrition for the whole recipe (without optional ingredients):
- Calories: 2500-2700
- Protein: 25-30 g
- Fat: 120-140 g
- Carbohydrates: 350-380 g
Ingredients
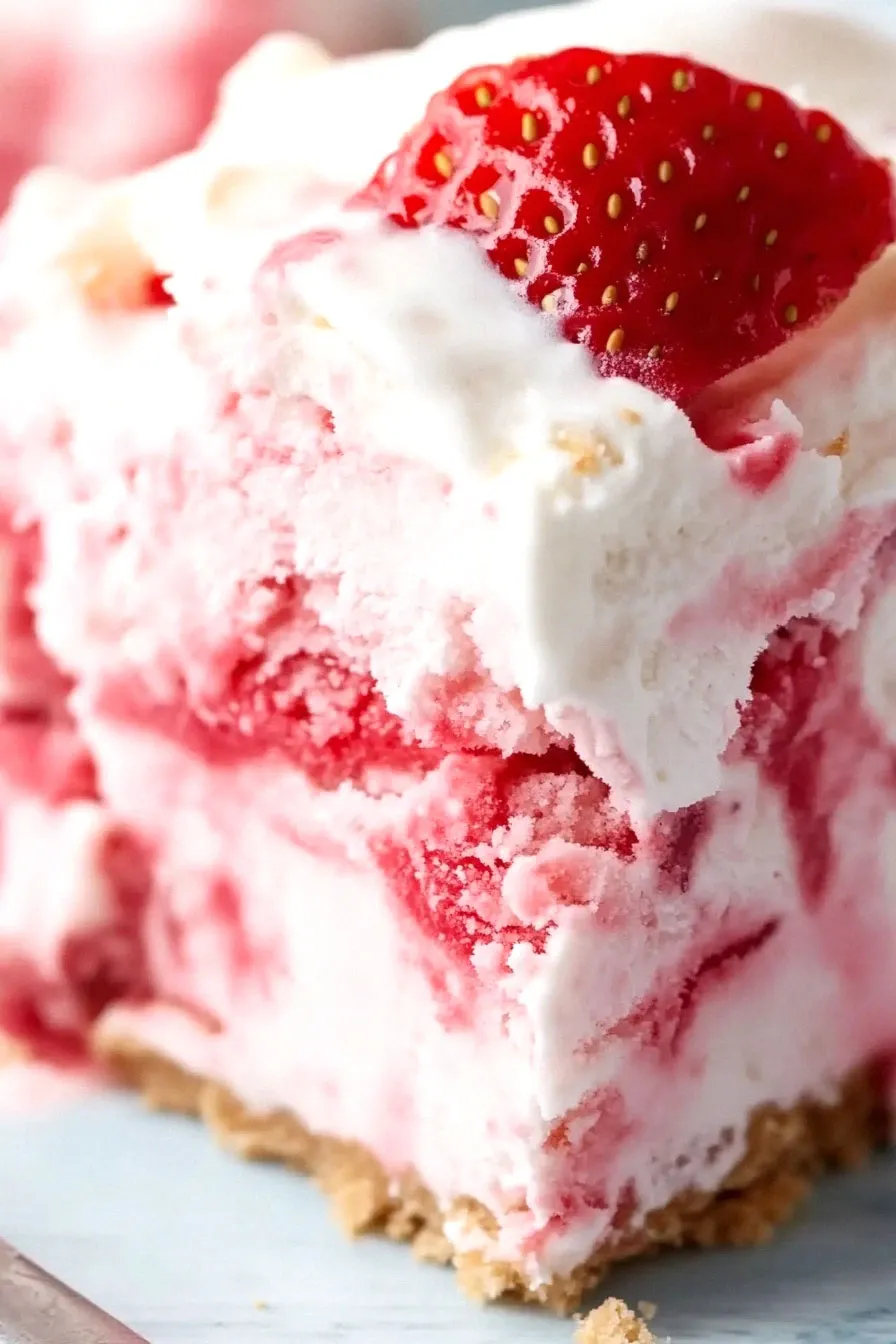
For the crust:
- 30 golden sandwich cookies, crushed (I use Pepperidge Farm Chessmen for a buttery flavor)
For the cake:
- 12 strawberry shortcake ice cream bars
- 4 cups strawberry ice cream (softened for easier spreading)
- 1/4 cup chopped strawberries (freshly chopped for best results)
For the topping:
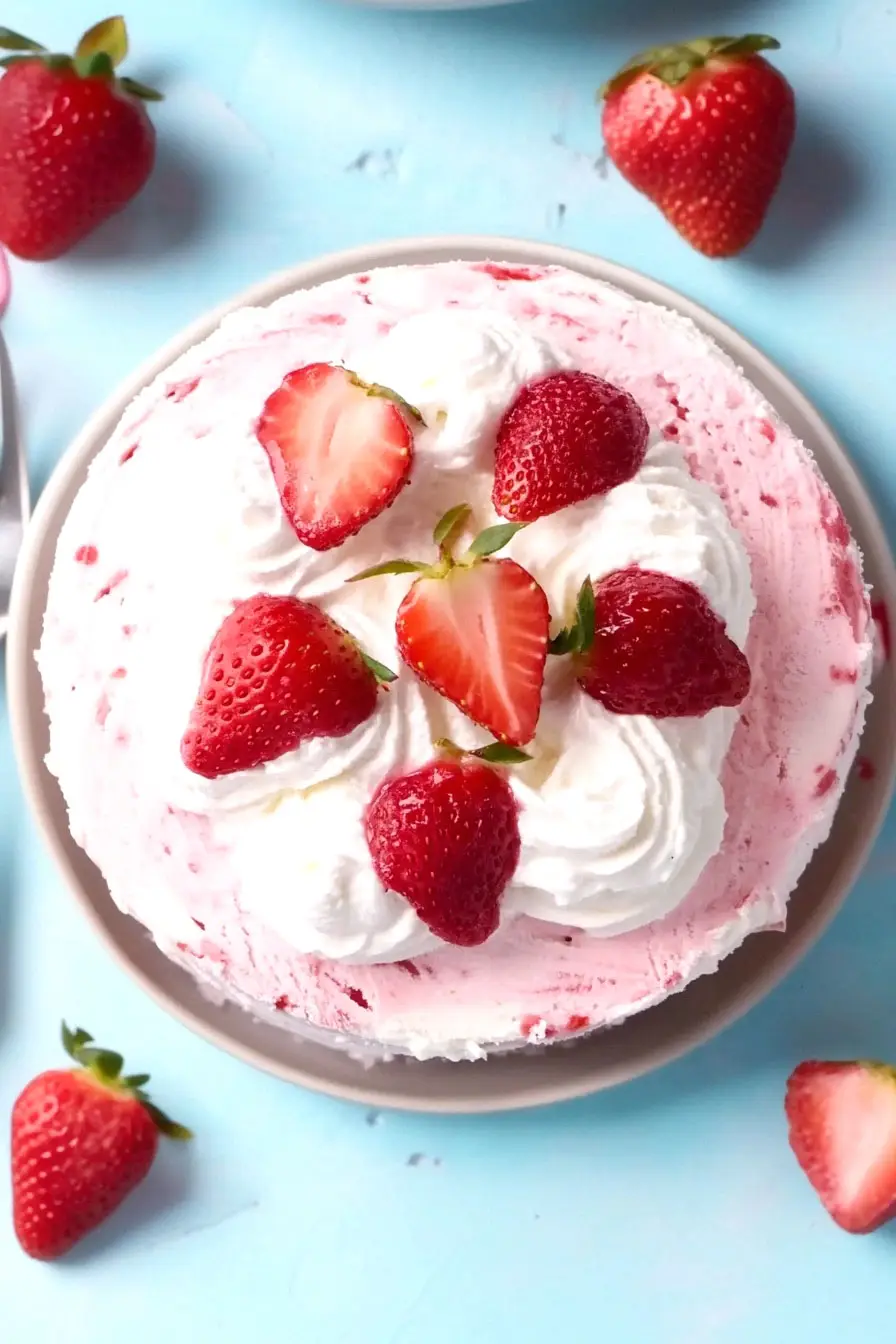
- 5 whole strawberries
- 1 cup whipped topping (like Cool Whip, thawed)
Step 1: Prepare the Springform Pan
Begin by lining a 9-inch springform pan with parchment paper.
Place the prepared pan in the freezer to chill for at least 30 minutes or overnight if desired.
This helps create a firm base for your cake.
Step 2: Create the Oreo Crust
Once the pan is chilled, fill the bottom center with 1 cup of ground Oreos.
Pat down the Oreo crumbs firmly to create a stable bottom layer.
Ensure the crust is evenly distributed for a consistent base.
Step 3: Arrange the Shortcake Bars
Remove the popsicle sticks from each shortcake bar and cut each in half widthwise.
Carefully place the pieces around the edge of the chilled pan, pressing them gently against the sides to form a supporting edge for the ice cream layers.
Step 4: Add the Ice Cream and Strawberries
Spoon 2 cups of strawberry ice cream onto the Oreo crust, spreading it evenly across the base.
Scatter a layer of fresh strawberries on top of the ice cream for added flavor and texture.
Proceed by covering the strawberries with the remaining strawberry ice cream, smoothing it over to create a uniform top layer.
Step 5: Freeze to Set
Place the assembled cake back into the freezer for up to 2 hours, allowing it to set properly.
This will help firm up all the layers, making it easier to remove from the pan and ensuring it holds its shape when served.
Step 6: Decorate and Serve
Once set, remove the ice cream cake from the springform pan carefully.
Top the cake with a generous amount of whipped cream and garnish with whole strawberries for a visually appealing and delicious finish.
Serve immediately to enjoy the delightful combination of flavors and textures.
