Getting dinner on the table during busy weeknights can feel like an impossible task. Between helping with homework, catching up on emails, and trying to keep the house in order, the last thing anyone wants to do is spend hours cooking a complicated meal.
That’s why this rice cooker bibimbap has become my weeknight savior – it’s quick and filling, uses simple ingredients you probably already have, and lets your rice cooker do most of the work while you tackle other things. Plus, it’s the kind of meal where everyone can customize their bowl exactly how they like it.
Why You’ll Love This Rice Cooker Bibimbap
- One-pot convenience – Your rice cooker does most of the work, making this Korean favorite so much easier than the traditional version – no multiple pans to wash!
- Customizable ingredients – You can swap in whatever vegetables you have on hand, or leave out the meat for a vegetarian version. It’s perfect for using up leftover veggies in your fridge.
- Balanced meal – With protein from the beef and egg, vegetables for nutrients, and rice for energy, you’re getting a complete, nutritious meal in one bowl.
- Make-ahead friendly – You can prep all the toppings in advance and just cook the rice when you’re ready to eat, making this perfect for busy weeknight dinners.
- Restaurant-style results – The rice gets slightly crispy at the bottom while the toppings stay fresh and colorful – just like what you’d get at a Korean restaurant, but made right at home.
What Kind of Rice Should I Use?
Short-grain white rice is the traditional choice for bibimbap, and there’s good reason for that. This type of rice contains more starch than its long-grain cousins, which helps create that sticky texture that’s perfect for holding all your toppings together. While medium-grain rice can work in a pinch, avoid using long-grain varieties like jasmine or basmati – they’re too fluffy and won’t give you that classic bibimbap experience. For best results, look for Korean or Japanese short-grain rice at your local Asian market or grocery store. Remember to rinse your rice several times until the water runs clear, and don’t skip the soaking step – it helps the grains cook more evenly and creates that perfect sticky-yet-tender texture.
Options for Substitutions
This rice cooker bibimbap is pretty adaptable – here’s what you can swap if needed:
- Short-grain white rice: While short-grain rice gives the best texture, medium-grain rice will work too. Long-grain rice isn’t ideal here as it won’t stick together properly.
- Beef: You can use ground beef, pork, chicken, or even tofu for a vegetarian version. If using tofu, press it first and crumble or cube it before cooking.
- Shiitake mushrooms: Button mushrooms, cremini, or oyster mushrooms all work well here. If using dried shiitake, soak them in warm water for 30 minutes first.
- Gochujang: This Korean red pepper paste is key for authentic flavor, but in a pinch, mix sriracha with a bit of miso paste. The taste won’t be exactly the same, but you’ll get similar heat and umami notes.
- Vegetables: Feel free to swap the carrots, bean sprouts, or spinach with any quick-cooking veggies like zucchini, cucumber, or bell peppers. Just make sure to cut them thin so they cook quickly.
- Oyster sauce: For a vegetarian version, use mushroom sauce. You can also just add an extra teaspoon of soy sauce mixed with a pinch of sugar.
Watch Out for These Mistakes While Cooking
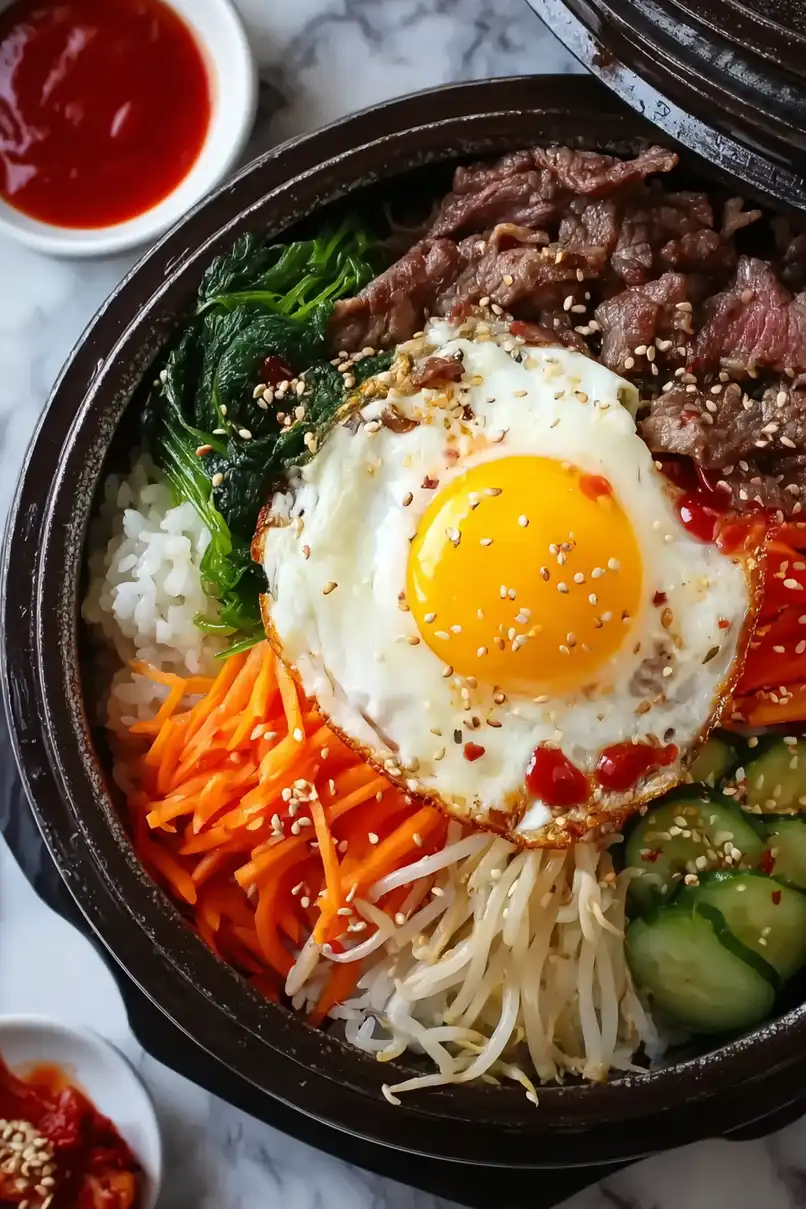
The biggest mistake when making rice cooker bibimbap is adding all ingredients at once – instead, layer them properly starting with rice at the bottom, followed by meat and vegetables arranged in sections on top. Another common error is overcrowding your rice cooker, which prevents the ingredients from cooking evenly and developing that coveted crispy bottom layer – make sure to leave some space between your vegetable sections and don’t pile them too high. The timing of your vegetables is crucial too – add firmer vegetables like carrots first, followed by softer ones like mushrooms and spinach, which need less cooking time to maintain their texture and nutrients. For the best results, let the rice develop a golden crust at the bottom by keeping your rice cooker on the “warm” setting for an extra 10-15 minutes after it’s done cooking, and don’t forget to drizzle sesame oil around the edges of the pot to help create that signature crispy texture.

What to Serve With Bibimbap?
Since bibimbap is already a complete meal with protein, veggies, and rice, you’ll want to keep the sides simple and complementary. A bowl of kimchi is the perfect traditional pairing – its tangy crunch and spicy kick really rounds out the meal. Some light Korean side dishes (banchan) like pickled cucumbers or marinated bean sprouts make great additions without overwhelming the main dish. For soup lovers, a small bowl of doenjang-guk (soybean paste soup) or a simple seaweed soup works really well on the side, especially during colder months.
Storage Instructions
Keep Fresh: If you have leftover bibimbap components, store them separately in airtight containers in the fridge. The cooked rice, marinated beef, and prepared vegetables will stay good for up to 3 days. It’s best to keep the fresh vegetables, like bean sprouts and spinach, separate from the cooked ingredients to maintain their crunch.
Prep Ahead: You can prep most components of this rice cooker bibimbap in advance! Marinate the beef and prep the vegetables the night before, storing them separately in the fridge. The sauce can also be mixed ahead and kept in an airtight container for up to a week. Just cook the rice and fry the egg fresh when you’re ready to eat.
Warm Up: To enjoy leftover bibimbap, heat the rice and cooked ingredients separately in the microwave until just warm. Add fresh vegetables and a newly fried egg on top. Give everything a good mix with some extra sesame oil and gochujang for that perfect bowl of comfort food.
| Preparation Time | 25-30 minutes |
| Cooking Time | 30-40 minutes |
| Total Time | 55-70 minutes |
| Level of Difficulty | Medium |
Estimated Nutrition
Estimated nutrition for the whole recipe (without optional ingredients):
- Calories: 700-800
- Protein: 40-50 g
- Fat: 30-35 g
- Carbohydrates: 80-90 g
Ingredients
For the beef marinade:
- 1 tsp oyster sauce
- 2 cloves garlic, minced (freshly minced for best flavor)
- 1 tsp honey
- 1/2 lb beef, sliced (against the grain for tenderness)
- 4 tsp soy sauce (I use Kikkoman low-sodium soy sauce)
For the rice and vegetables:
- 50 grams carrot, julienned
- 1 handful bean sprouts
- 1 handful spinach leaves
- 1/4 tsp ground black pepper
- 1 cup short-grain white rice, soaked (rinsed until water runs clear)
- 3/4 cup water
- 3 shiitake mushrooms, sliced
For the sauce and topping:
- 1 tbsp water (optional, for thinning sauce)
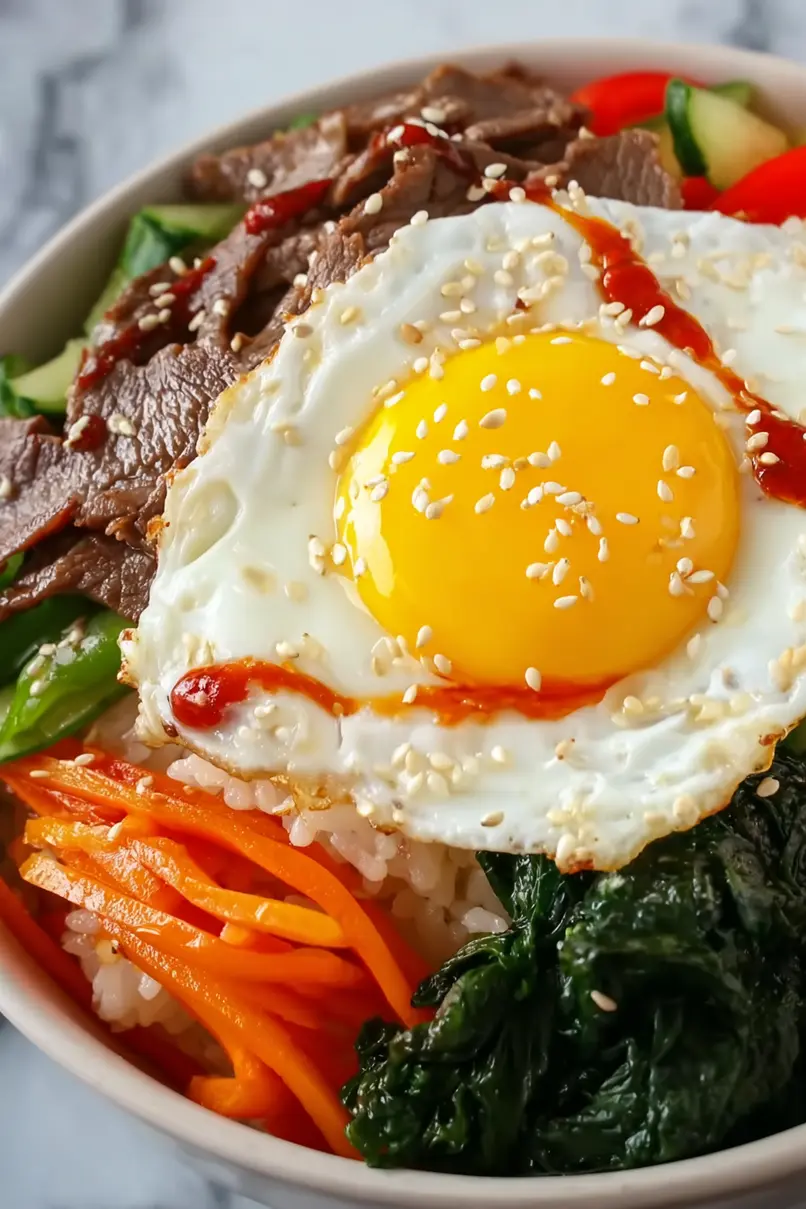
- 1 fried egg (sunny-side up is traditional)
- 1 to 2 tbsp sesame oil (use a high-quality toasted sesame oil)
- 1 tbsp gochujang
- 1 tsp soybean paste (optional, adds depth of flavor)
- 1 tbsp toasted sesame seeds (lightly crushed for more aroma)
Step 1: Prep the Ingredients
If using dried shiitake mushrooms, begin by soaking them in water for an hour prior to cooking.
Once ready to slice, gently squeeze out the excess water.
At the same time, soak short-grain rice in water for the time it takes to prepare the beef and chop the vegetables, approximately 15 minutes.
Step 2: Marinate the Beef
Mince the garlic cloves and add them to a bowl.
Mix in soy sauce, honey, and oyster sauce until well combined.
Add thinly sliced beef to the marinade and let it sit for around 10 minutes, just enough time to prepare the other ingredients.
Step 3: Prepare the Vegetables
While the beef is marinating, peel and slice the carrots into julienne cuts (thin and long slices) and slice the mushrooms.
Prepare any additional vegetables as desired.
Step 4: Cook the Rice
Once the rice has soaked, wash it in a strainer or the same bowl until the water runs clear.
Ensure you strain all the water completely to maintain the correct water-to-rice ratio.
In the pot with rice, add 3/4 cup of fresh water, the sliced carrots, and mushrooms.
Stir to combine, then add the marinated beef and sprinkle with black pepper.
Place the pot in a rice cooker and press the cook button.
If you’re using a stovetop, follow your rice package’s instructions instead.
Step 5: Prepare Bibimbap Sauce (Optional)
To make the bibimbap sauce, you can use gochujang paste as is.
However, to thin the sauce and add depth, blend in some water and soybean paste.
Set the sauce aside for serving.
Step 6: Finish and Serve
When the rice is done cooking, carefully open the lid to avoid steam burns.
Quickly add the spinach and bean sprouts on top, then close the lid and let them steam for about 2 minutes.
Open the lid and mix everything together thoroughly.
For an extra touch, fry sunny-side-up eggs in a pan and place them atop the rice.
Garnish the dish with a teaspoon of sesame oil, bibimbap sauce, and sesame seeds.
Mix your sauce into the rice and enjoy your delicious bibimbap!
