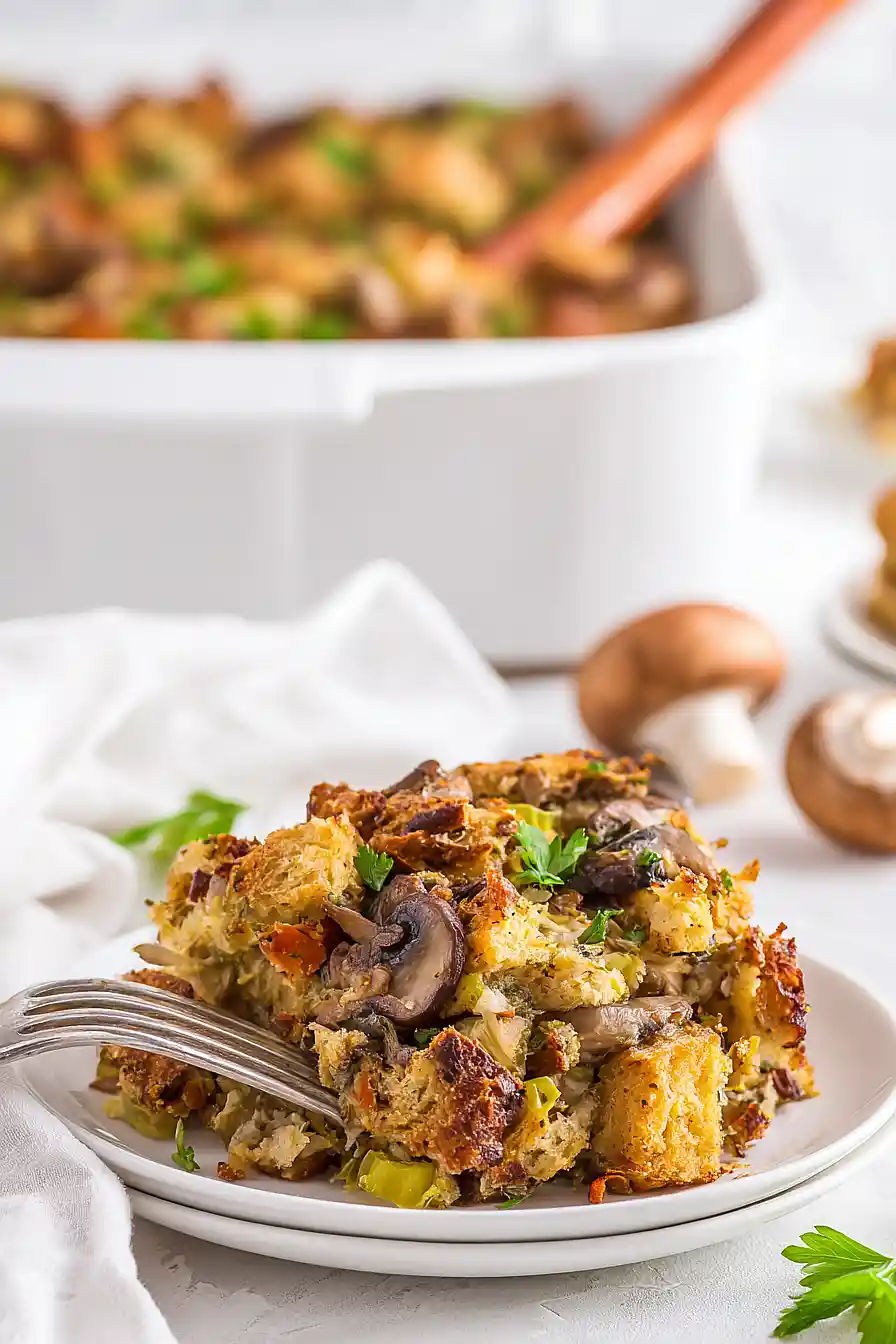
Thanksgiving dinner is always about the turkey, but let’s be real – the stuffing is what I’m most excited about. There’s something so comforting about that perfect mix of bread, herbs, and vegetables all baked together. But sometimes I want all those great stuffing flavors without having to worry about cooking it inside a bird or taking up precious oven space on the big day.
That’s where this vegetable stuffing casserole comes in. It’s got all the cozy, familiar tastes of traditional stuffing, but I can make it ahead of time and just pop it in the oven when I’m ready. Plus, I can load it up with whatever vegetables I have on hand – carrots, celery, mushrooms, you name it. It makes the whole dish more filling and honestly, a little healthier too.
Want something that tastes like the holidays but works for a regular Tuesday night? This is it. Looking for a make-ahead side dish that feeds a crowd? Same answer. I’ve even served this as a main dish with a simple salad, and nobody complained.

Why You’ll Love This Vegetable Stuffing Casserole
- Vegetarian-friendly – This stuffing is packed with vegetables and uses vegetable broth, making it perfect for vegetarians or anyone looking to add more plant-based dishes to their table.
- Make-ahead friendly – You can prep this casserole ahead of time and bake it when you’re ready, which is a lifesaver during busy holiday cooking or meal prep days.
- Rich, savory flavors – The combination of mushrooms, herbs, and that optional balsamic vinegar creates a deep, satisfying taste that rivals any traditional stuffing.
- Customizable ingredients – You can use your favorite bread and broth, plus adjust the vegetables based on what you have on hand or prefer.
- Perfect side dish – This casserole pairs beautifully with roasted meats, holiday meals, or even works as a hearty main dish for lighter dinners.
What Kind of Bread Should I Use?
The bread you choose is really the foundation of your stuffing, so it’s worth picking a good one. Rustic sourdough or whole grain bread works perfectly because they have enough structure to hold up to all that broth without turning to mush. Day-old bread is actually ideal since it’s a bit dried out and will soak up the liquid better than fresh bread. If you only have fresh bread on hand, you can cube it and let it sit out for a few hours, or even toast the cubes lightly in the oven for about 10 minutes. Avoid soft sandwich breads since they’ll get too soggy and won’t give you that nice texture contrast you want in stuffing.

Options for Substitutions
This stuffing recipe is pretty forgiving when it comes to swaps, so here are some easy substitutions you can make:
- Sourdough or whole grain bread: Any sturdy bread works great here – try French bread, challah, or even day-old sandwich bread. Just make sure it’s not too soft or it’ll get mushy. If your bread is fresh, toast the cubes lightly before using.
- Shallots: Regular yellow or white onions are perfect substitutes. Use about 1 medium onion for every 3 shallots called for in the recipe.
- Cremini mushrooms: White button mushrooms work just as well, or you can mix things up with shiitake or portobello mushrooms. Just chop them to a similar size.
- Vegetable broth: Chicken broth is a great substitute if you’re not keeping it vegetarian. You can also use mushroom broth for extra earthy flavor.
- Poultry seasoning: Don’t have poultry seasoning? Make your own by mixing ½ teaspoon each of sage, thyme, and rosemary, plus ¼ teaspoon marjoram if you have it.
- Fresh parsley: Dried parsley works in a pinch – use about 1 tablespoon instead of ¼ cup fresh. You can also try fresh sage or thyme for a different flavor profile.
Watch Out for These Mistakes While Baking
The biggest mistake when making vegetable stuffing casserole is not properly drying out your bread cubes first – fresh bread will create a mushy texture, so either use day-old bread or toast your cubes in the oven for 10-15 minutes until they’re lightly golden and crispy. Don’t rush the vegetable cooking process either, as properly sautéing each ingredient until softened and lightly caramelized builds the flavor foundation of your entire dish. Watch your liquid ratio carefully by adding the broth gradually – you want the bread to be moist but not swimming, and remember that different breads absorb liquid differently. For the best texture, let the assembled casserole rest for 15-20 minutes before baking so the bread can absorb the flavors, and cover with foil for the first half of baking to prevent the top from browning too quickly while the inside cooks through.
What to Serve With Vegetable Stuffing Casserole?
This hearty stuffing casserole pairs beautifully with all your favorite holiday sides – think roasted Brussels sprouts, green bean casserole, or a simple arugula salad with cranberries and pecans. Since it’s packed with vegetables and has such rich, savory flavors from the mushrooms and herbs, it also works great as a main dish alongside some roasted root vegetables like sweet potatoes or butternut squash. For a lighter touch, serve it with a crisp white wine or sparkling cider, and don’t forget some cranberry sauce on the side for that perfect sweet and tart contrast. If you want to make it even more filling, add some roasted turkey or a simple protein like grilled chicken on the side.
Storage Instructions
Refrigerate: This vegetable stuffing casserole keeps really well in the fridge for up to 4 days. Just cover it tightly with foil or transfer leftovers to an airtight container. I actually think it tastes even better the next day when all those flavors have had time to meld together!
Freeze: You can freeze this casserole for up to 3 months, which makes it perfect for holiday meal prep. Let it cool completely first, then wrap it well in plastic wrap and foil, or cut it into portions and store in freezer-safe containers.
Warm Up: To enjoy your leftover stuffing, cover it with foil and warm it in a 350°F oven for about 20-25 minutes until heated through. If it’s frozen, thaw it overnight in the fridge first. You can also microwave individual portions, but the oven method keeps that nice crispy top better.
| Preparation Time | 20-30 minutes |
| Cooking Time | 60-75 minutes |
| Total Time | 80-105 minutes |
| Level of Difficulty | Medium |
Estimated Nutrition
Estimated nutrition for the whole recipe (without optional ingredients):
- Calories: 1800-2100
- Protein: 48-58 g
- Fat: 60-75 g
- Carbohydrates: 260-300 g
Ingredients
For the bread base:
- 1 loaf rustic bread (16-18 oz), cubed
For the vegetable mixture:
- 3 tbsp olive oil
- 1 1/2 cups chopped celery (about 4 stalks)
- 12-16 oz cremini mushrooms, finely chopped (stems removed)
- 1 tbsp balsamic vinegar (optional, adds depth)
- 3 tsp poultry seasoning (I use McCormick Gourmet)
- 2-4 garlic cloves, minced
- 1 tsp salt
- 1 1/2 cups diced carrots (about 2 medium)
- 1 1/2 cups minced shallots (about 3 large)
For combining and baking:
- 2 large eggs
- 1/2 tsp salt
- 3 cups low-sodium vegetable broth (I use Pacific Foods)
- 1/4 cup fresh parsley, chopped
- 2 tbsp olive oil
Step 1: Toast the Bread Cubes
- 1 loaf rustic sourdough or whole grain bread (16–18 oz), cubed into 1/2-inch pieces (10 cups)
Preheat the oven to 325℉.
Spread the cubed bread evenly onto a baking sheet.
Bake in the oven until the bread is mostly dried out and crisp, about 30 minutes, tossing halfway through to ensure even toasting.
Once toasted, set the bread aside to cool and increase the oven temperature to 400℉.
I always make sure the bread is really dry—this helps it soak up more of the flavorful broth later.
Step 2: Cook the Aromatic Vegetables
- 3 tbsp olive oil
- 1 1/2 cups minced shallots or onion (about 3 large shallots or 1 onion)
- 1 1/2 cups diced carrots (about 2 medium)
- 1 1/2 cups chopped celery (about 4 stalks)
While the bread is toasting, heat 3 tablespoons of olive oil in a large skillet over medium heat.
Add the minced shallots or onion, diced carrots, and chopped celery.
Cook, stirring occasionally, until the vegetables have started to soften, about 3 minutes.
Step 3: Sauté the Mushrooms and Seasonings
- 12–16 oz cremini or white button mushrooms, finely chopped with stems removed
- 2 to 4 garlic cloves, finely minced
- 1 tsp salt
- 3 tsp poultry seasoning
Add the finely chopped mushrooms to the vegetables in the skillet.
Continue cooking until the mushrooms have released all their liquid and begin to brown, about 5 to 8 minutes.
Stir in the finely minced garlic, 1 teaspoon of salt, and poultry seasoning.
Cook for another minute to let the spices bloom.
Step 4: Deglaze and Simmer with Broth
- 1 tbsp balsamic vinegar (optional)
- 2 cups low-sodium vegetable broth (or other preferred broth), divided from the total amount
Pour in the balsamic vinegar (if using) and scrape up any brown bits stuck to the bottom of the pan.
Add 2 cups of the low-sodium vegetable broth to the skillet and bring to a simmer.
Continue cooking for a few minutes until all the vegetables are soft and well combined.
Step 5: Mix the Stuffing Ingredients
- toasted bread cubes (from Step 1)
- vegetable and broth mixture (from Step 4)
- 2 large eggs
- 1 cup low-sodium vegetable broth (remaining from the total 3 cups)
- 1/4 cup fresh flat-leaf parsley, chopped
- 1/2 tsp salt
Place the toasted bread cubes (from Step 1) in a large mixing bowl.
Pour the hot vegetable and broth mixture (from Step 4) over the bread.
In a separate small bowl, whisk together the eggs and the remaining 1 cup of vegetable broth.
Pour this egg and broth mixture over the bread and vegetables.
Add the chopped parsley, remaining 1/2 teaspoon of salt, and pepper to taste.
Mix everything very well, ensuring that all the bread is coated and soaking up the broth.
I like to let the mixture sit for a couple of minutes—it ensures the bread stays moist throughout.
Step 6: Bake the Stuffing
- 1 tbsp olive oil (for greasing)
- stuffing mixture (from Step 5)
- 1 tbsp olive oil (for drizzling)
Grease a 9-by-13-inch casserole dish or baking pan with 1 tablespoon of olive oil.
Transfer the stuffing mixture (from Step 5) into the prepared pan.
Drizzle the remaining 1 tablespoon of olive oil over the top.
Bake at 400℉ until the stuffing is set and the top is crunchy and golden brown, about 30 to 35 minutes.
Step 7: Serve and Store
Serve the stuffing warm straight from the oven.
Alternatively, let it cool completely, then cover and store in the refrigerator for up to 3 days.
To reheat, bake covered at 350℉ until warmed through.
For extra freshness, I like to sprinkle a bit more fresh parsley on top just before serving.
