Growing up, our Super Bowl parties always had the same snacks – chips, wings, and a basic bean dip. It wasn’t until college that my roommate introduced me to seven layer dip, and I wondered how I’d lived without it for so long.
But this year, I wanted to make something that would really get people talking at our watch party. That’s when I remembered seeing a photo of a seven layer dip shaped like a football field. It’s the same easy layers we all love, just arranged in a way that makes everyone say “wow” when they walk in. The best part? You don’t need any special skills – just a rectangular dish and some basic ingredients.

Why You’ll Love This Seven Layer Dip
- Perfect party food – This crowd-pleasing dip is ideal for game day gatherings or any party – it’s always the first thing to disappear from the snack table!
- Quick assembly – You can put this impressive-looking dip together in just 15-25 minutes, with zero cooking required.
- Make-ahead friendly – You can prepare this dip several hours before your event and keep it refrigerated until party time.
- Customizable layers – Each layer can be adjusted to your taste – make it spicier, add more cheese, or swap in your favorite toppings.
- Simple ingredients – Everything you need can be found at your regular grocery store, and many items might already be in your pantry.
What Kind of Refried Beans Should I Use?
When it comes to refried beans, you’ve got several options at the grocery store that will work great in this party dip. Traditional refried pinto beans are the most common choice and give that classic Mexican restaurant flavor, but you could also use refried black beans for a slightly different taste. If you’re watching your fat intake, look for the “fat-free” versions – they’re still creamy and flavorful. Just make sure to give your beans a good stir before spreading them, as they can get a bit dense in the can. And here’s a pro tip: warming the beans slightly before spreading makes them much easier to work with and creates a smoother base layer for your dip.

Options for Substitutions
This fun party dip is pretty adaptable – here are some easy swaps you can try:
- Refried beans: You can use black beans (mashed) or pinto beans (mashed) instead. If using whole beans, just blend them with a bit of their liquid until smooth.
- Sour cream: Greek yogurt makes a great substitute – it’s tangier and has more protein. You can also use Mexican crema if you can find it.
- Cheddar cheese: Feel free to use Monterey Jack, Mexican cheese blend, or pepper jack for extra kick. Just make sure it’s freshly grated for best melting.
- Avocados: If you can’t find ripe avocados, you can use store-bought guacamole. Just skip the garlic and lemon juice since most prepared guacamole already includes these.
- Red bell pepper: Any color bell pepper works fine, or swap in chopped tomatoes, jalapeños, or green onions.
- Black olives: These are optional – you can leave them out or replace with chopped green onions or jalapeños if you want more kick.
- Taco seasoning: Make your own by mixing chili powder, cumin, paprika, and garlic powder, or use fajita seasoning as an alternative.
Watch Out for These Mistakes While Making
The biggest challenge when creating this football field-themed dip is preventing the layers from mixing together – to avoid this, make sure each layer is spread evenly and chilled for 15-20 minutes before adding the next one, especially the refried beans and guacamole layers.
Watery layers can ruin the presentation and make your “field” look messy, so be sure to drain any excess liquid from your salsa and pat the olives dry before adding them, while also adding a touch of lemon juice to your guacamole to prevent browning.
Temperature control is crucial – letting the dip sit out too long at room temperature can make the sour cream and cheese layers become too soft and slide around, so keep it chilled until about 15 minutes before serving.
When creating the football field design, avoid pressing too hard with your decorating tools as this can cause the layers to mix – instead, gently place your toppings and use a light touch when adding the “yard lines” with sour cream.
What to Serve With Seven Layer Dip?
This fun football-themed dip needs the right lineup of dippers to make it a game day champion! Tortilla chips are the obvious MVP – go for the sturdy, restaurant-style ones that won’t break when scooping up all those tasty layers. I like to put out a mix of regular corn chips, blue corn chips, and even some wheat tortilla chips to give guests options. For a fresher take, set out some crisp veggie sticks like carrots, celery, and bell peppers, which work great for guests who might be watching their carbs. You can also warm up some flour tortillas and cut them into triangles for a softer scooping option.
Storage Instructions
Keep Fresh: This seven layer dip can hang out in the fridge for up to 2 days when covered tightly with plastic wrap. The avocado layer might darken a bit, but the lemon juice helps slow this down. For the best presentation and taste, try to enjoy this dip the same day you make it.
Make Ahead: Want to prep ahead? You can make most layers a day in advance – just keep the avocado layer for last. Store the pre-made layers covered in the fridge, then add the fresh avocado mixture right before serving. This helps keep everything looking fresh and party-ready!
Leftovers: If you’ve got leftovers, press plastic wrap directly onto the surface of the dip before putting the lid on your container. This helps prevent the avocado from browning and keeps everything fresh. Just remember that the texture of some ingredients might change slightly after being refrigerated.
| Preparation Time | 10-15 minutes |
| Cooking Time | 5-10 minutes |
| Total Time | 15-25 minutes |
| Level of Difficulty | Easy |
Estimated Nutrition
Estimated nutrition for the whole recipe (without optional ingredients):
- Calories: 1800-2100
- Protein: 50-60 g
- Fat: 120-130 g
- Carbohydrates: 150-160 g
Ingredients
For the bean base:
- 1 can refried beans (I use Rosarita Traditional Refried Beans)
For the sour cream mixture:
- 1/2 packet taco spice mix (ensures a balanced flavor without overpowering)
- 1 cup sour cream
For the salsa and cheese layers:
- 1/4 cup salsa (your favorite medium-heat salsa works best)
- 1 cup grated cheddar cheese (sharp cheddar provides best flavor)
For the fresh toppings:
- 1/4 cup sliced black olives
- 1/2 cup chopped red bell pepper (diced into small, uniform pieces for better distribution)
For the guacamole:
- 1/2 tsp lemon juice (freshly squeezed for brighter flavor)
- 1/4 cup sour cream
- 1 crushed garlic clove
- 2 mashed avocados (ripe hass avocados for creaminess)
- 1/4 tsp cayenne pepper
- salt to taste
Step 1: Layer the Dip Base
Begin by evenly spreading refried beans in the bottom of a small dish to create the first layer of your dip.
Step 2: Prepare and Add the Sour Cream Mixture
In a bowl, stir together 1 cup of Daisy Squeeze with 1/2 packet of taco seasoning.
Mix well until fully combined.
Spread this seasoned sour cream mixture over the layer of refried beans in the dish.
Step 3: Add Salsa and Cheese
Spread a generous layer of salsa over the seasoned sour cream layer.
Following the salsa, evenly sprinkle shredded cheddar cheese to cover the surface.
Step 4: Add Final Toppings
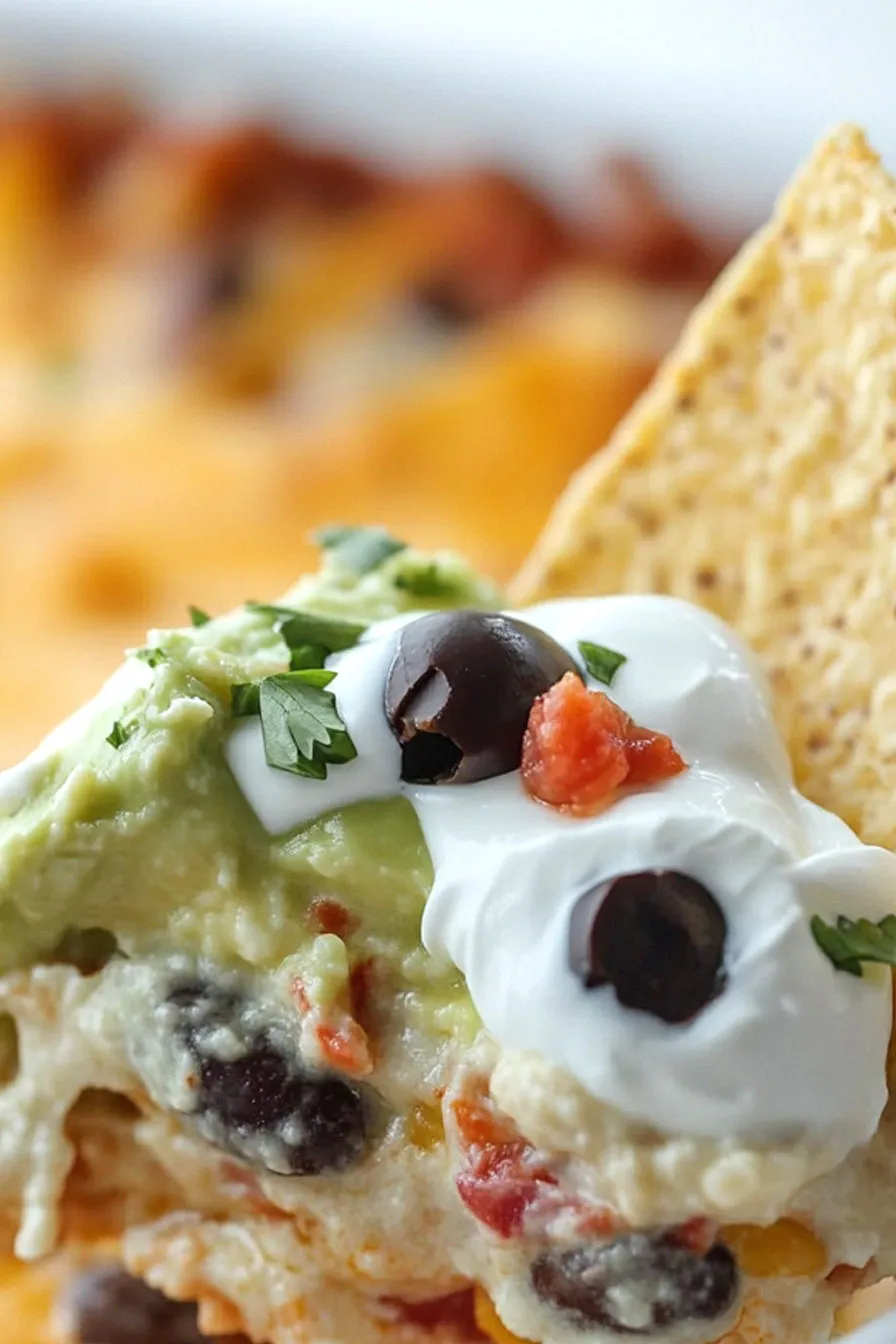
Next, sprinkle sliced black olives and diced red bell pepper evenly over the cheese layer.
These will add flavor and texture to the dip.
Step 5: Make and Layer the Guacamole
In a separate bowl, make the guacamole by stirring together mashed avocados, 1/4 cup of Daisy Squeeze, lemon juice, crushed garlic, cayenne pepper, and salt to taste.
Once the guacamole is smooth and well-mixed, spread it over the top of the dip layers.
For a finishing touch, decorate with a swirl or dollops of Daisy Squeeze Sour Cream.
Step 6: Create the Tortilla Goal Post
Cut a simple goal post shape from a sheet of paper to use as a template.
Place this template on a tortilla, and use a knife to carefully cut out the goal post shape.
Lightly spray both sides of the tortilla goal post with cooking spray and place it on a cookie sheet.
Bake in a preheated oven at 350°F (175°C) for 5-10 minutes until it is crispy and golden.
