Here’s my take on a roasted garlic and beet hummus that brings together two simple ingredients to create something really special. The roasted garlic adds warmth and depth, while the beets give it a pretty pink color that makes it stand out on any table.
This hummus has become my go-to recipe for casual get-togethers and weekly meal prep. I usually make a double batch because it disappears so quickly – especially when my kids discover it in the fridge with a fresh bag of pita chips. Anyone else’s kids become snack ninjas when there’s hummus around?
Why You’ll Love This Beet Hummus
- Make-ahead friendly – You can prepare this hummus up to 5 days in advance, making it perfect for meal prep or party planning. The flavors actually get better as they meld together in the fridge!
- Nutrient-rich ingredients – This isn’t your basic beige hummus – it’s packed with antioxidant-rich beets, protein-filled chickpeas, and heart-healthy olive oil for a dip that’s as good for you as it tastes.
- Perfect for entertaining – The natural pink color from the beets makes this hummus a showstopper at parties, while the roasted garlic adds a depth of flavor that will have your guests asking for the recipe.
- Customizable heat level – With optional crushed red pepper, you can make this hummus as mild or spicy as you like, letting you adjust the kick to your preference.
What Kind of Beets Should I Use?
For this hummus recipe, you’ll want to look for fresh, firm red beets about the size of a tennis ball. While you can use golden or chioggia beets, the classic red variety will give your hummus that beautiful pink color that makes it so eye-catching. Raw beets from your grocery store’s produce section are your best bet, though pre-cooked beets can work in a pinch – just avoid the pickled ones, as they’ll throw off the flavor balance. When selecting your beets, pick ones that feel heavy for their size and have smooth skin without any deep bruises or cuts. If the beets come with greens attached, that’s usually a good sign of freshness, though you won’t need the greens for this recipe.
Options for Substitutions
This colorful hummus recipe is pretty flexible and you can try these swaps if needed:
- Chickpeas: While chickpeas are the traditional base for hummus and give it that classic taste, you could use white beans (like cannellini) for a different spin. The texture might be slightly different but still creamy and good!
- Tahini: Tahini is pretty important for authentic hummus flavor, but if you’re in a pinch, you can use unsweetened sunflower seed butter or cashew butter. Just know the taste will be different.
- Beets: Fresh beets are best, but you can use pre-cooked beets from the store. If you want to skip beets altogether, try roasted red peppers for a different but equally tasty dip.
- Feta cheese: For a dairy-free version, skip the feta or try a dairy-free feta alternative. You could also use crumbled firm tofu seasoned with a bit of lemon and salt.
- Pumpkin seeds: Any seeds or nuts work great here – try sunflower seeds, pine nuts, or chopped walnuts for the topping.
- Lemon juice: Fresh is best, but bottled lemon juice works too. You could even try lime juice for a different citrus kick.
Watch Out for These Mistakes While Making
The biggest challenge when making beet hummus is achieving the right consistency – many home cooks add too much liquid at once, resulting in a runny dip that won’t hold its shape. Instead, start with less liquid and gradually add more while blending, stopping to scrape down the sides of your food processor frequently.
Another common mistake is not removing the chickpea skins, which can make your hummus grainy instead of silky smooth – take an extra 5-10 minutes to pop them off by gently pinching each chickpea between your fingers.
When roasting your beets and garlic, resist the urge to rush the process by turning up the heat – low and slow roasting (around 375°F) brings out their natural sweetness and prevents any bitter, burnt flavors.
For the smoothest possible texture, make sure your tahini is well-stirred before measuring, and blend the hummus for a full 3-4 minutes, which allows the chickpeas to break down completely and creates that perfectly creamy consistency.
What to Serve With Beet Hummus?
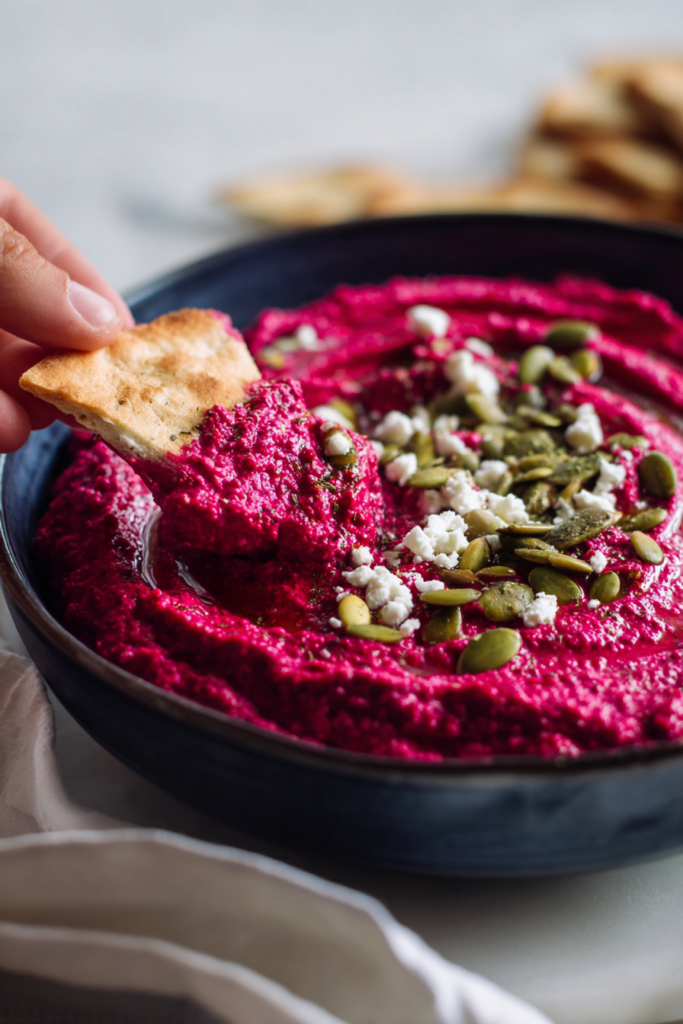
This pretty pink hummus is perfect for setting out at parties with plenty of dipping options! I like to serve it with a mix of warm pita triangles and fresh veggie sticks – think crisp cucumber, rainbow carrots, and bell peppers of all colors. For a more substantial spread, add some toasted naan bread, crispy pita chips, or even your favorite crackers to the platter. If you’re putting together a bigger mezze spread, this hummus pairs really well with other Mediterranean favorites like stuffed grape leaves, marinated olives, or grilled vegetables.
Storage Instructions
Keep Fresh: This pretty pink hummus stays good in an airtight container in the fridge for up to 5 days. I like to drizzle a thin layer of olive oil on top before storing – it helps keep the hummus from drying out and maintains its smooth texture.
Freeze: If you want to make a big batch, this hummus freezes really well! Just pop it into freezer-safe containers (leave a bit of space at the top for expansion) and it’ll keep for up to 3 months. Skip the feta and pumpkin seed toppings until you’re ready to serve.
Serve After Storage: When you’re ready to enjoy your frozen hummus, let it thaw overnight in the fridge. Give it a good stir and you might need to add a splash of olive oil or lemon juice to refresh the texture. Don’t forget to add fresh toppings like feta and pumpkin seeds just before serving!
| Preparation Time | 10-15 minutes |
| Cooking Time | 40-45 minutes |
| Total Time | 50-60 minutes |
| Level of Difficulty | Easy |
Estimated Nutrition
Estimated nutrition for the whole recipe (without optional ingredients):
- Calories: 800-900
- Protein: 25-30 g
- Fat: 50-60 g
- Carbohydrates: 60-70 g
Ingredients
For the hummus:
- 2 beets (about 2 inches diameter, roasted until tender)
- 1/4 tsp black pepper
- 1 pinch cinnamon
- 1/2 tsp cumin (freshly ground preferred for more flavor)
- 1/3 cup lemon juice (freshly squeezed)
- 1/4 tsp turmeric
- 6 garlic cloves (roasted until golden and soft)
- 1 can chickpeas (drained and rinsed)
- 1/8 tsp red pepper (or cayenne for extra heat)
- 1/4 cup olive oil (extra virgin for best flavor)
- 1/3 cup tahini (I use Barrington brand)
- 1/2 tsp salt
For the garnish:
- 3 tbsp pumpkin seeds (I use pepitas)
- 3 tbsp feta cheese (crumbled)
Step 1: Roast the Garlic and Beets
- 2 beets
- 6 garlic cloves
Preheat your oven to 400°F.
Slice the beets into 1/4-inch rounds and place them on a large sheet of aluminum foil.
Cut the top quarter off the garlic bulb to expose the cloves, then drizzle with a bit of olive oil and wrap in foil alongside the beets.
Fold the foil to seal everything together and place on a baking sheet.
Roast for 40-45 minutes until the beets are fork-tender and the garlic cloves are golden and soft.
Remove from the oven and let cool until you can handle them comfortably—the garlic will squeeze easily from its papery skin when ready.
Step 2: Combine and Blend the Hummus Base
- 6 roasted garlic cloves from Step 1
- 1 can chickpeas
- 1/3 cup tahini
- 1/3 cup lemon juice
- 1/2 tsp cumin
- 1/4 tsp turmeric
- 1 pinch cinnamon
- 1/8 tsp red pepper
- 1/2 tsp salt
- 1/4 tsp black pepper
Squeeze the roasted garlic cloves from their skins into a food processor.
Add the drained and rinsed chickpeas, tahini, lemon juice, cumin, turmeric, cinnamon, red pepper, salt, and black pepper.
Pulse everything together until the mixture is mostly smooth with just a few chickpea pieces remaining for texture.
I like to use freshly ground cumin here because it has so much more aromatic impact than pre-ground—it really brightens up the earthy beets.
Step 3: Add Beets and Stream in Olive Oil
- hummus base mixture from Step 2
- 2 roasted beets from Step 1
- 1/4 cup olive oil
Add the cooled roasted beets to the food processor with the hummus mixture.
Pulse to combine until the beets are fully incorporated and the hummus turns a vibrant pink-red color.
With the processor running on low speed, slowly drizzle in the extra virgin olive oil in a thin stream—this gradual addition creates a creamy, emulsified texture rather than a grainy one.
Continue processing for another 30 seconds after all the oil is added until the hummus reaches your desired silky consistency.
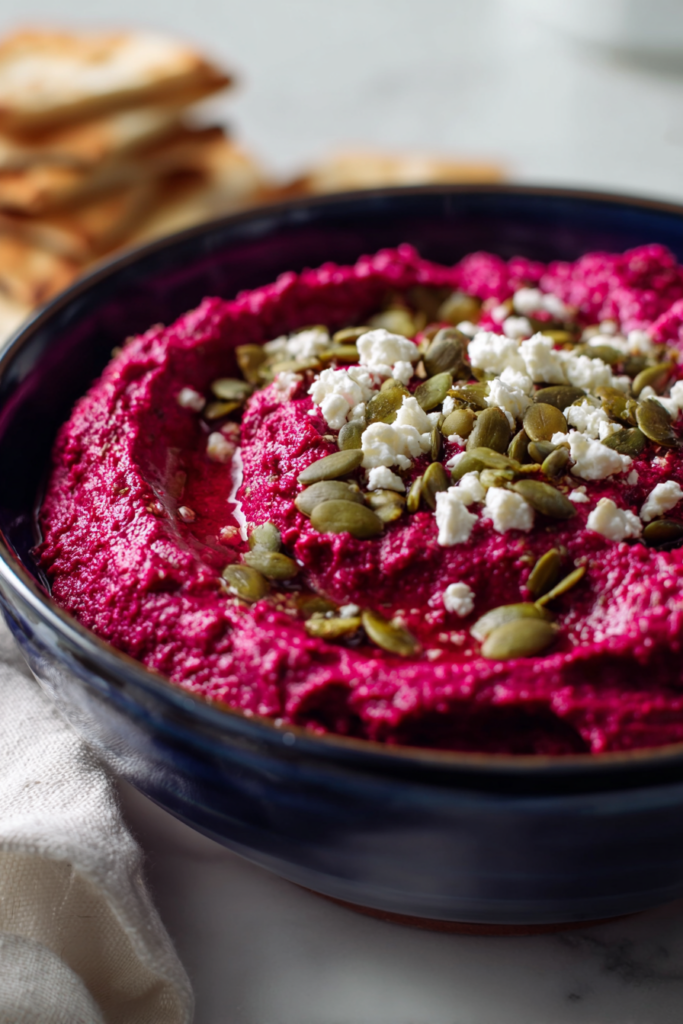
Step 4: Finish and Plate
- hummus from Step 3
- 3 tbsp feta cheese
- 3 tbsp pumpkin seeds
Transfer the hummus to a serving bowl and use the back of a spoon to create a shallow well in the center.
Drizzle a bit of extra olive oil into the well for visual appeal and richness.
Scatter the crumbled feta cheese and pumpkin seeds over the top—I love using pepitas because their slight pepperiness complements the warm spice notes perfectly.
Serve immediately with your choice of dippers like pita chips, fresh vegetables, or crackers.
