If you ask me, Brazilian coconut cake is one of those desserts that just makes everything better.
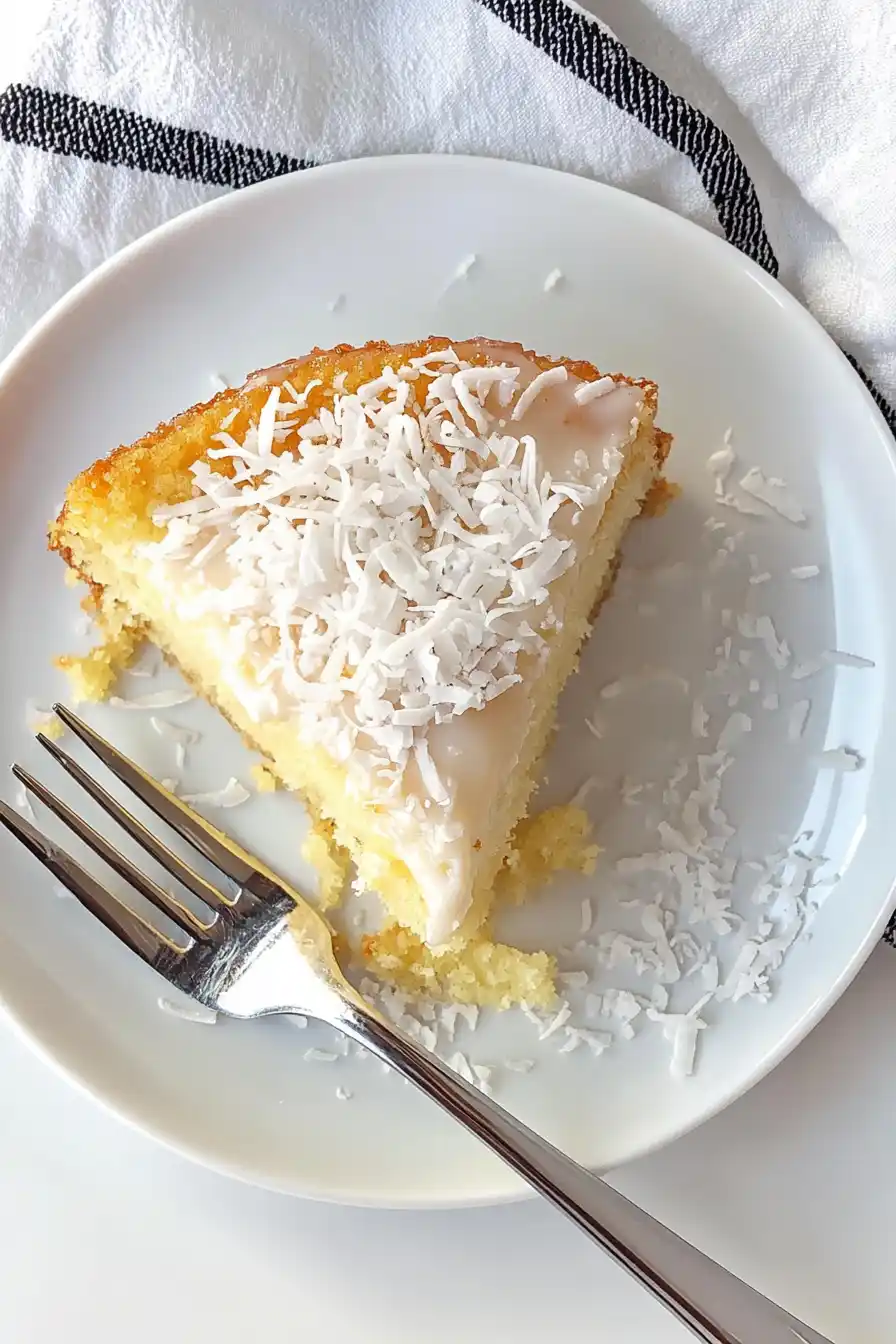
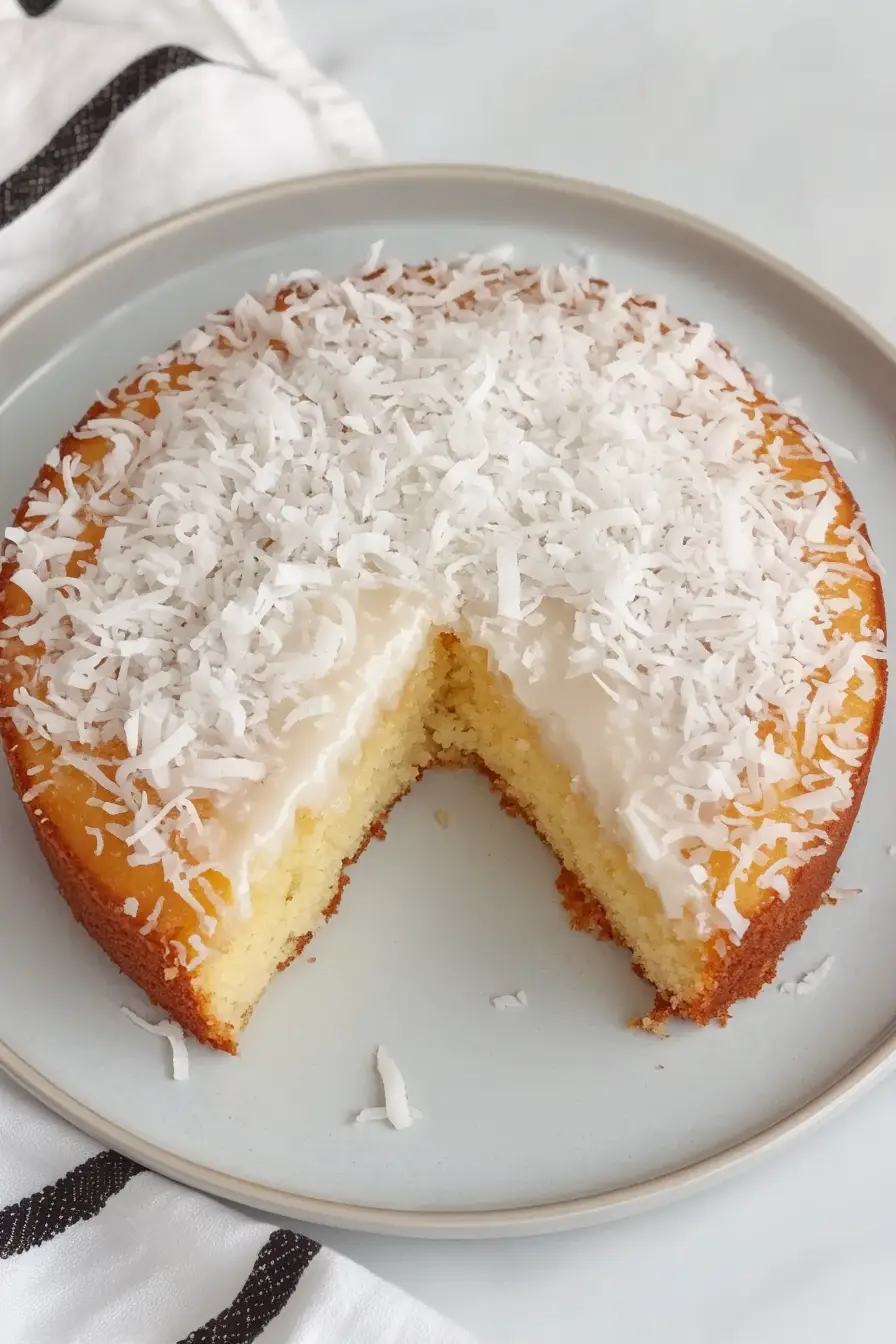
This sweet, tropical treat brings together fluffy layers of cake with plenty of real coconut flavor. The soft, moist texture comes from coconut milk in the batter, while shredded coconut adds a nice bit of chew to every bite.
It’s covered in a simple coconut frosting that’s not too sweet, and the whole thing gets a generous sprinkle of toasted coconut on top. The combination of textures and natural coconut flavor makes it really special.
It’s the kind of cake that works just as well at a casual weekend gathering as it does for birthdays and celebrations.
Why You’ll Love This Brazilian Coconut Cake
- Quick and simple – This cake comes together in under an hour, making it perfect for last-minute gatherings or weekend baking sessions.
- Rich coconut flavor – With three forms of coconut – milk, condensed milk, and shredded coconut – every bite delivers that perfect tropical taste you’re craving.
- Basic ingredients – Most of these ingredients are pantry staples, and you’ll only need to grab fresh eggs and coconut products from the store.
- Moist texture – Thanks to the combination of coconut milk and condensed milk, this cake stays wonderfully moist and tender for days (if it lasts that long!).
What Kind of Coconut Should I Use?
For this Brazilian coconut cake, you’ll find shredded coconut in a few different forms at the grocery store. The most common options are sweetened or unsweetened shredded coconut, and either type will work well for topping this cake. Sweetened shredded coconut tends to be moister and will give you a sweeter finish, while unsweetened offers a more natural coconut flavor and slightly drier texture. If you’re feeling ambitious, you could even use freshly grated coconut – just crack open a whole coconut, remove the flesh, and grate it yourself for the most authentic flavor. Just keep in mind that fresh coconut won’t be as uniformly shaped as the packaged varieties, but it’ll give your cake a wonderful homemade touch.

Options for Substitutions
This Brazilian coconut cake is pretty adaptable! Here are some helpful swaps you can try:
- Eggs: The eggs are crucial for this cake’s structure, but if you need an egg-free version, try using 1/4 cup of mashed banana or applesauce per egg. Just note that the texture won’t be quite the same.
- Coconut milk: Regular whole milk works perfectly fine in place of coconut milk, though you’ll lose some coconut flavor. You could add 1/2 teaspoon of coconut extract to make up for it.
- All-purpose flour: Cake flour can be used for an even softer texture – just add 2 extra tablespoons to compensate. For gluten-free needs, try a 1:1 gluten-free flour blend.
- Sweetened condensed milk: This is pretty important for the right texture and sweetness, but in a pinch, mix 1 cup of heavy cream with 1/3 cup sugar and simmer until reduced by half.
- Shredded coconut: You can use either sweetened or unsweetened coconut on top – or try coconut chips for extra crunch. If you’re not big on coconut, try chopped nuts instead.
Watch Out for These Mistakes While Baking
The success of this Brazilian coconut cake heavily depends on how you handle the egg whites – make sure they’re at room temperature and completely free from any traces of yolk, as even a tiny bit of fat can prevent them from reaching stiff peaks. A common error is folding the egg whites too roughly into the batter – use gentle, sweeping motions from bottom to top to maintain the air bubbles that will give your cake its light, fluffy texture. When it comes to the three-milk soaking mixture, pouring it all at once can lead to a soggy cake – instead, add it gradually and let each addition absorb before adding more, using a fork to poke small holes in the cake’s surface. For the best texture, allow the cake to chill in the refrigerator for at least 4 hours (preferably overnight) before topping with coconut, as this gives the milk mixture time to distribute evenly throughout the cake.
What to Serve With Brazilian Coconut Cake?
This sweet, tropical cake pairs wonderfully with a hot cup of Brazilian coffee or a creamy café con leche to balance out its richness. If you’re serving it for dessert, try adding a scoop of vanilla ice cream or a dollop of whipped cream on the side – the cool, creamy texture works so well with the coconut flavors. For a fruity twist, serve it alongside some fresh mango slices or passion fruit, which bring a nice tropical tang that complements the cake’s sweetness. Keep in mind that this cake is pretty rich on its own, so simple accompaniments often work best!
Storage Instructions
Keep Fresh: Since this Brazilian coconut cake has condensed milk in it, you’ll want to keep it in the refrigerator. Place it in an airtight container and it’ll stay good for up to 5 days. The coconut topping might soften a bit over time, but the cake will still taste amazing!
Freeze: You can freeze this cake for up to 2 months! Wrap individual slices or the whole cake (undecorated) in plastic wrap, then aluminum foil. Just remember to add fresh coconut topping after thawing, as frozen coconut can get a bit chewy.
Serve Later: When you’re ready to enjoy your frozen cake, thaw it overnight in the refrigerator. Let it sit at room temperature for about 30 minutes before serving – this brings out the best texture and flavor. If you’ve frozen individual slices, they’ll thaw more quickly, usually in about 2-3 hours in the fridge.
| Preparation Time | 20-30 minutes |
| Cooking Time | 25-30 minutes |
| Total Time | 45-60 minutes |
| Level of Difficulty | Medium |
Estimated Nutrition
Estimated nutrition for the whole recipe (without optional ingredients):
- Calories: 1500-1700
- Protein: 25-30 g
- Fat: 50-60 g
- Carbohydrates: 220-240 g
Ingredients
For the cake:
- 1 tsp vanilla essence (I use Nielsen-Massey vanilla)
- 4 large eggs
- 1 tsp baking powder
- 3/4 cup sugar
- 3/4 cup all-purpose flour
- 1/2 cup unsweetened coconut milk
For the glaze:
- 1/3 cup unsweetened coconut milk
- 3/4 cup sweetened condensed milk
For the topping:
- 3/4 cup shredded coconut (sweetened for extra flavor)
Step 1: Prepare the Oven and Mix Dry Ingredients
Start by preheating your oven to 350°F (175°C).
In a medium bowl, sift the flour together with the baking powder to ensure there are no lumps and the ingredients are well incorporated.
Set this bowl aside for later use.
Step 2: Separate and Beat Egg Whites
Separate the egg whites from the yolks.
Place the yolks in a small bowl and the whites in a large mixing bowl or the bowl of a stand mixer.
Using a hand mixer or stand mixer on medium-high speed, beat the egg whites until they form stiff peaks.
Step 3: Incorporate Yolks and Sugar
With the mixer on a low setting, gradually add the 4 egg yolks and sugar to the beaten egg whites.
Alternate between adding an egg yolk and a quarter of the sugar.
On the last addition, also add the vanilla extract.
Continue mixing until the sugar is dissolved and the mixture is smooth.
Step 4: Complete the Batter and Bake
Add the sifted flour and baking powder to the egg mixture a little at a time, mixing each addition until the flour is smoothly incorporated without lumps.
Finally, mix in the milk.
Pour the batter into an oiled 9×9 (or similar-sized) cake pan.
Bake the cake for 25-30 minutes, or until a toothpick inserted into the center comes out clean.
Step 5: Prepare Glaze and Soak the Cake
In a medium bowl, mix together the sweetened condensed milk and coconut milk.
Once the cake is done baking, use a skewer or toothpick to poke holes around the cake, allowing the glaze to soak into it.
Be generous with the holes for a moister cake.
Pour the milk mixture over the cake and allow it to soak for at least 10 minutes at room temperature or longer in the refrigerator for more intense soaking.
Step 6: Finish and Serve
Once fully soaked, sprinkle the cake with shredded coconut for added texture and flavor.
Slice, serve, and enjoy your beautiful, moist, and flavorful cake!
