I didn’t try beets until I was in my thirties. Growing up, they only showed up as those odd pickled circles from a can that my aunt served at holiday dinners. No one in my family knew what to do with fresh beets, so we just avoided them altogether.
Turns out, beets are actually pretty great – especially when you blend them into hummus. The earthiness of beets pairs really well with chickpeas, and that ginger adds just the right kick. Plus, the natural pink color makes this dip way more fun than regular hummus. It’s the kind of recipe that makes people ask “What’s in this?” in a good way.

Why You’ll Love This Beet Hummus
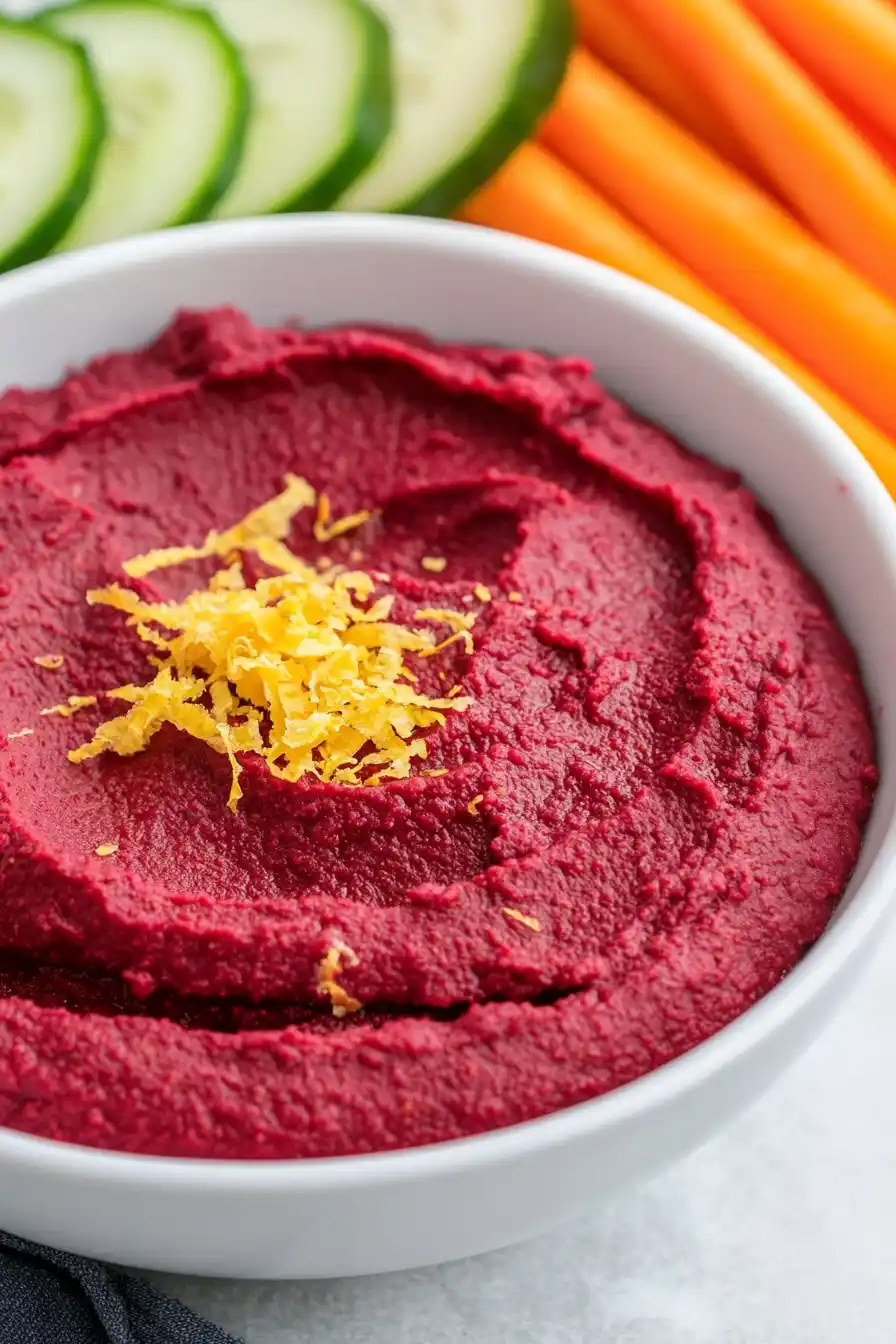
- Beautiful natural color – The deep pink hue from the roasted beets makes this hummus a show-stopping appetizer that will brighten up any snack board or party spread.
- Healthy twist on classic hummus – This recipe packs extra nutrients from beets and fresh ginger, making it a great option for anyone looking to add more vegetables to their diet.
- Make-ahead friendly – You can prepare this hummus in advance and store it in the fridge for up to 5 days, perfect for meal prep or party planning.
- Dietary-friendly – This recipe is naturally vegan, gluten-free, and packed with protein from the beans, making it suitable for various dietary needs.
What Kind of Beetroot Should I Use?
For this hummus recipe, you’ll want to look for fresh, medium-sized red beets that feel firm and heavy for their size. While you can find pre-cooked beets in the produce section, raw beets will give you the best flavor – just make sure they don’t have any soft spots or blemishes. If the beets come with their greens still attached, look for crisp, fresh-looking leaves as this is a good indicator of the beet’s freshness. You can use either regular red beets or chioggia beets (the ones with pretty striped rings), though keep in mind that chioggia beets will give you a lighter colored hummus.

Options for Substitutions
This colorful hummus recipe can be tweaked in several ways while still keeping its character. Here are some helpful swaps:
- Cannellini beans: While traditional hummus uses chickpeas, this recipe calls for white cannellini beans. You can easily swap back to chickpeas, or try navy beans or great northern beans – they’ll all work well and give a similar creamy texture.
- Fresh ginger: If you’re out of fresh ginger, you can use ground ginger in a pinch – start with 1/2 teaspoon and adjust to taste. Keep in mind that fresh ginger gives the best flavor here.
- Tahini: Tahini is pretty important for that classic hummus taste, but if you need to skip it, try using 1 tablespoon of sesame oil or 2 tablespoons of sunflower seed butter instead.
- Beetroot: Fresh beets are best, but you can use pre-cooked beets if you’re short on time. Just skip the roasting step. Avoid using pickled beets as they’ll change the flavor too much.
- Smoked paprika: Regular paprika works fine if you don’t have the smoked variety. You could also try a pinch of chipotle powder for a different smoky kick.
Watch Out for These Mistakes While Cooking
The biggest challenge when making beet hummus is getting the right consistency – many home cooks add too much liquid too quickly, resulting in a runny dip that won’t hold its shape. Start by adding just half the recommended amount of liquid ingredients (lemon juice and olive oil), then gradually add more while blending until you reach your desired texture. Another common mistake is not cooking the beets long enough – they should be fork-tender all the way through, as undercooked beets will leave you with unwanted chunks in your otherwise smooth hummus. When it comes to the ginger, avoid using too much at once – it’s easier to add more than to try fixing an overly spicy hummus, so start with half the amount and adjust to taste. For the smoothest results, make sure to peel your beets and ginger thoroughly, and blend the mixture for at least 3-4 minutes, scraping down the sides of your food processor several times during the process.
What to Serve With Beet Hummus?
This bright pink hummus is perfect for snacking and makes a great addition to any appetizer spread! The easiest way to serve it is with a variety of fresh veggies for dipping – think crisp cucumber slices, carrot sticks, bell pepper strips, and celery. For a more substantial spread, add some warm pita triangles, crispy pita chips, or your favorite crackers to the mix. This hummus also works really well spread on sandwiches or wraps instead of mayo, or you can add a generous dollop to your favorite grain bowl for extra flavor and protein.
Storage Instructions
Keep Fresh: This pretty pink hummus stays good in the fridge for up to 5 days when kept in an airtight container. I like to drizzle a thin layer of olive oil on top before storing – it helps keep the hummus from drying out and maintains its smooth texture.
Freeze: If you’ve made a big batch, you can freeze portions in freezer-safe containers for up to 3 months. Just leave a bit of space at the top of the container since the hummus might expand slightly when frozen. When you’re ready to use it, move it to the fridge the night before.
Serve: Once you take the hummus out of the fridge, let it sit at room temperature for about 15 minutes before serving. Give it a quick stir, and if it seems a bit thick, you can thin it out with a splash of olive oil or a squeeze of lemon juice to get that perfect consistency back.
| Preparation Time | 10-15 minutes |
| Cooking Time | 45-60 minutes |
| Total Time | 55-75 minutes |
| Level of Difficulty | Easy |
Estimated Nutrition
Estimated nutrition for the whole recipe (without optional ingredients):
- Calories: 600-650
- Protein: 25-30 g
- Fat: 20-25 g
- Carbohydrates: 80-90 g
Ingredients
- 2 tbsp tahini (I use Soom Foods tahini for creaminess)
- 1 cup cannellini beans (rinsed and drained)
- ground pepper
- 2 inches fresh ginger (peeled and roughly chopped)
- 1 large raw beetroot (peeled and roughly chopped)
- 1 tsp olive oil
- 2 tbsp lemon juice (freshly squeezed for best flavor)
- 1 tsp ground cumin
- kosher salt
- 1/4 tsp smoked paprika (adds depth of flavor)
- 1 garlic clove (minced)
Step 1: Preheat and Prepare the Beet for Roasting
Begin by preheating your oven to 375 degrees Fahrenheit.
Prepare a tinfoil pouch and place the beet inside it.
Drizzle with 1 teaspoon of olive oil and sprinkle with salt.
Wrap the beet tightly in the foil, ensuring no juices can escape.
Place the wrapped beet in the oven and bake for 45 minutes to 1 hour, or until tender.
Step 2: Prepare Remaining Ingredients
As the beet is nearing the end of its roasting time, gather the remaining ingredients required for your recipe and add them to a high-powered blender or food processor.
This preparation ensures everything is ready to blend once the beet is done.
Step 3: Cool and Prepare the Roasted Beet
Once the beet has finished roasting, remove it from the oven and let it cool for a few minutes.
Carefully unwrap the pouch, being cautious of the hot steam, and pour any beet juice remaining in the pouch into the blender with the other ingredients.
Step 4: Peel and Chop the Beet
After allowing the beet to cool enough to handle, gently peel off the skin with your hands.
It’s advisable to wear gloves to avoid staining your hands with beet juice.
Then, chop the beet into larger pieces and add them to the blender.
Step 5: Blend and Serve
Blend the roasted beet and other ingredients until you achieve a smooth consistency.
This vibrant mixture can be enjoyed with veggies, crackers, a salad, or any way your heart desires!
