Here’s my go-to recipe for mini New York style cheesecakes, complete with a simple graham cracker crust and that classic smooth, creamy filling that everyone loves.
These little treats are always the first to disappear at our family gatherings, and I usually make a double batch just to be safe. Perfect for parties since everyone gets their own – and let’s be honest, who doesn’t love having a whole cheesecake to themselves?

Why You’ll Love These Mini Cheesecakes
- Perfect portion control – Each mini cheesecake gives you just the right amount of dessert, making them ideal for parties or when you want to avoid the temptation of a whole cheesecake.
- Simple ingredients – You only need 8 basic ingredients that you probably already have in your kitchen – no fancy or hard-to-find items required.
- No water bath needed – Unlike traditional New York cheesecake, these mini versions don’t need the fussy water bath step, making them much easier to prepare.
- Make-ahead friendly – You can make these a day or two before your event and store them in the fridge, which makes party planning so much easier.
What Kind of Cream Cheese Should I Use?
For making cheesecakes, regular full-fat block cream cheese is the only way to go – specifically, you’ll want to use the kind that comes in a brick, not the spreadable kind that comes in a tub. The block-style cream cheese has less water content and a denser texture, which helps create that classic, rich New York cheesecake consistency. Make sure to let your cream cheese sit out for about an hour before using it, as room temperature cream cheese blends much more smoothly and helps prevent lumps in your batter. If you’re in a hurry, you can cut the cream cheese into cubes to help it soften faster, but avoid microwaving it as this can affect the texture of your cheesecake.
Options for Substitutions
While cheesecake recipes need some specific ingredients to work properly, there are still a few swaps you can try:
- Graham crackers: Don’t have graham crackers? You can use digestive biscuits, vanilla wafers, or even Oreos (with cream removed) for the crust. Just keep the proportions the same.
- Cream cheese: This is a must-have for New York style cheesecake – don’t substitute it. Make sure to use full-fat cream cheese at room temperature for the best texture and to prevent lumps.
- Vanilla essence: You can swap vanilla essence with vanilla extract (use the same amount) or vanilla bean paste (use ½ teaspoon). In a pinch, you could even skip it, though you’ll miss that classic vanilla note.
- Salted butter: Unsalted butter works fine – just add an extra tiny pinch of salt to the crust mixture. You can also use melted coconut oil for a slightly different flavor.
- White sugar: Regular granulated sugar works best here, but you can use caster sugar too. Brown sugar isn’t recommended as it will change the color and flavor too much.
Watch Out for These Mistakes While Baking
The biggest challenge when making mini cheesecakes is preventing cracks, which often happen when ingredients aren’t at room temperature – especially the cream cheese and eggs need at least 2 hours on the counter before starting. Another common mistake is overmixing the batter after adding the eggs, which incorporates too much air and leads to cracks and puffing – mix just until the ingredients are combined, no more than that. The temperature shock is your mini cheesecakes’ worst enemy, so avoid opening the oven door while baking, and once done, let them cool gradually by turning off the oven and leaving the door slightly open for about 30 minutes. For extra insurance against cracks and the perfect creamy texture, place a shallow pan of hot water on the bottom rack of your oven while baking – this creates a gentle, humid environment that cheesecakes love.

What to Serve With Mini Cheesecakes?
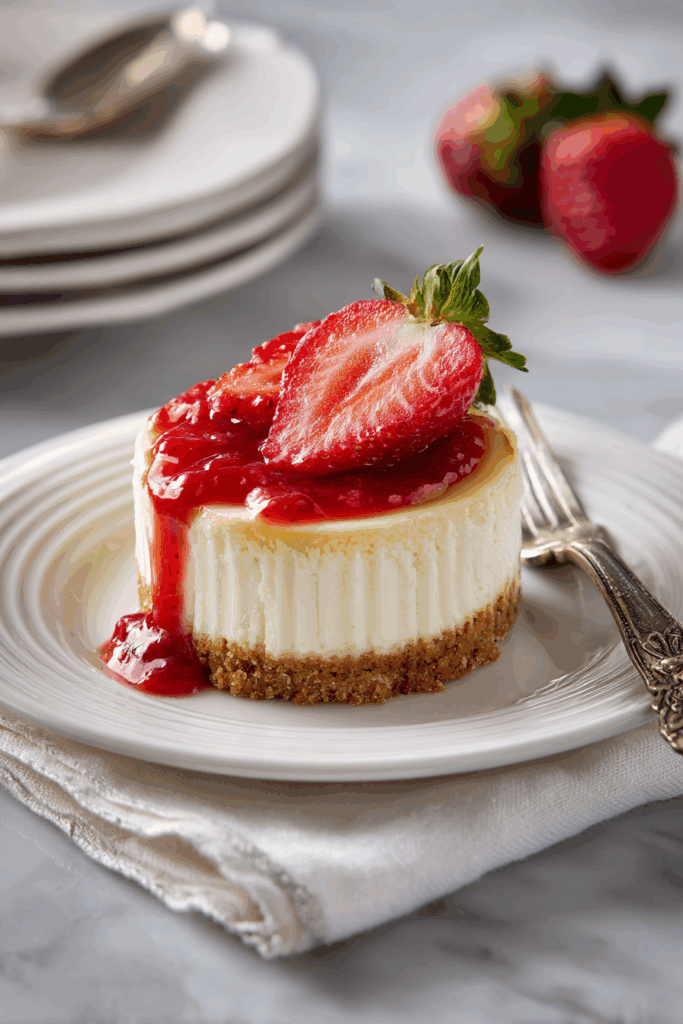
These cute little cheesecakes are perfect for dressing up with your favorite toppings! A simple berry sauce made from fresh strawberries, raspberries, or blueberries adds a nice pop of flavor and color. If you’re feeling extra indulgent, try drizzling some caramel sauce or chocolate ganache over the top – both work really well with the creamy, rich filling. For a quick and easy option, just add a dollop of whipped cream and a fresh mint leaf, or keep things classic with a spoonful of cherry pie filling. These mini treats also pair nicely with a hot cup of coffee or tea for the perfect afternoon dessert break.
Storage Instructions
Keep Cool: These mini cheesecakes stay fresh in the fridge for up to 5 days when kept in an airtight container. I like to place them in a single layer to keep their pretty tops intact. They’re actually even better the next day, as the flavors have time to develop!
Freeze: Good news – these little treats freeze really well! Once they’re completely cool, wrap each mini cheesecake individually in plastic wrap, then place them in a freezer bag or container. They’ll keep for up to 3 months in the freezer. Perfect for when you want to plan ahead for a party!
Thaw & Serve: When you’re ready to enjoy your frozen cheesecakes, just move them to the fridge the night before. Let them thaw overnight, and they’ll be perfect by dessert time. If you want to dress them up, add fresh toppings like berries or caramel sauce just before serving.
| Preparation Time | 20-30 minutes |
| Cooking Time | 30-60 minutes |
| Total Time | 3-4 hours |
| Level of Difficulty | Medium |
Estimated Nutrition
Estimated nutrition for the whole recipe (without optional ingredients):
- Calories: 1500-1650
- Protein: 20-25 g
- Fat: 90-100 g
- Carbohydrates: 130-145 g
Ingredients
For the crust:
- 2 tbsp melted salted butter (I use Tillamook butter)
- 3/4 cup graham cracker crumbs
- 1 tbsp white sugar
For the cheesecake batter:
- 16 oz full-fat cream cheese (room temperature, about 70°F for smooth batter)
- 1/2 cup white sugar
- a small pinch salt
- 1 tsp vanilla extract (I use Nielsen-Massey vanilla)
- 2 eggs (large, at room temperature)
Step 1: Preheat and Prepare
Preheat your oven to 350℉.
Line a 12-count muffin tin with parchment paper liners or any cupcake liners.
If you plan to use a water bath for baking, prepare for it by having a large baking sheet ready to accommodate the muffin tin, and boil water to use later in the recipe.
Step 2: Make the Crust
In a mixing bowl, combine your graham cracker crumbs and sugar.
Add the melted butter to this mixture and stir until it’s fully combined.
Distribute the mixture evenly among the 12 liners in the prepared muffin tin and press down with your fingers or a spoon to form a crust at the bottom of each liner.
Bake these crusts for 5 minutes in the preheated oven.
Allow them to cool slightly while you prepare the cheesecake batter.
Step 3: Prepare the Cheesecake Batter
In a large mixing bowl, place the room temperature cream cheese and sugar.
Using an electric handheld mixer, beat the mixture on high speed for 2 minutes until it becomes fluffy and smooth, scraping down the sides of the bowl with a spatula as needed.
Add the vanilla extract, room temperature eggs, and a pinch of salt.
Mix on medium speed just until fully combined, being careful not to overmix the eggs to prevent the cheesecake from cracking.
Step 4: Assemble and Smooth the Batter
Evenly distribute the cheesecake batter on top of each of the slightly warm, prepared crusts in the muffin tin.
Gently tap the pan on the counter a few times to release any large air bubbles, then use a toothpick to swirl through the batter for an even surface.
Step 5: Baking with a Water Bath (Optional)
If using a water bath, place the large baking pan in the preheated oven and position the muffin tin inside the pan.
Carefully pour boiling water into the baking pan until it reaches about halfway up the side of the muffin tin.
Bake the cheesecakes for 25-30 minutes or until the tops are rounded and the centers are no longer jiggly.
Step 6: Cool and Chill
Once baked, lift the muffin tin out of the water bath and let the cheesecakes cool for about 30 minutes at room temperature before transferring them to the refrigerator.
Allow them to chill for about 3 hours or until they are fully set.
Serve your cheesecakes with your favorite toppings, such as whipped cream or berry sauce.
Enjoy!

Have you ever made these in mini muffin pans for extra mini?
I am guessing everything is the same except the cooking time. Would you happen to have that information?