Sometimes finding the perfect dessert for special celebrations can feel like an impossible task – especially when you’re trying to accommodate guests who eat gluten-free. Between juggling dietary restrictions and wanting something that feels genuinely festive, it’s easy to get overwhelmed by all the options (or lack thereof).
That’s where these gluten-free pink champagne cupcakes come to the rescue: they’re just as bubbly and fun as traditional versions, simple enough for any home baker to master, and so good that no one will even guess they’re gluten-free.

Why You’ll Love These Pink Champagne Cupcakes
- Gluten-free friendly – These cupcakes are specially crafted with gluten-free flour blend and almond flour, making them perfect for anyone with gluten sensitivities or celiac disease.
- Quick preparation – With just 35-42 minutes from start to finish, you can whip up these fancy-looking cupcakes in less time than it takes to watch your favorite TV show.
- Special occasion worthy – The addition of real champagne and pretty pink color makes these cupcakes perfect for bridal showers, New Year’s celebrations, or any time you want to add a touch of elegance to your dessert table.
- Customizable recipe – You can adjust the pink color to your liking or skip it entirely, and the champagne essence is optional – making these cupcakes adaptable to your preferences while still tasting amazing.
What Kind of Gluten-Free Flour Should I Use?
For these cupcakes, you’ll want to use a good quality all-purpose gluten-free flour blend that already contains rice flour, potato starch, and tapioca starch. Cup-for-cup or measure-for-measure blends work best here since they’re designed to replace regular flour without any extra adjustments. Some reliable brands include Bob’s Red Mill 1-to-1, King Arthur Measure for Measure, or Cup4Cup – all of these will give you great results in these cupcakes. Just make sure whatever blend you choose already contains xanthan gum, and if it doesn’t, you’ll need to add the amount listed in the recipe to help with texture and binding. Remember to stir or whisk your flour blend well before measuring, as gluten-free flours can settle and compact in storage.
Options for Substitutions
Let’s talk about ways to switch things up in these fancy cupcakes while keeping them gluten-free:
- Gluten-free flour blend: You can use any store-bought gluten-free flour blend that includes rice flour as its base. Just make sure it contains xanthan gum – if it doesn’t, add an extra 1/4 teaspoon to the recipe.
- Almond flour: If you have a nut allergy, replace almond flour with more gluten-free flour blend, or try coconut flour (but reduce to 2 tablespoons as it’s more absorbent).
- Champagne: Any sparkling wine works here! Prosecco or cava are great options. For alcohol-free versions, use sparkling white grape juice or sparkling apple cider, but reduce sugar by 2 tablespoons as these are sweeter.
- Vegetable oil: Feel free to use melted coconut oil, canola oil, or even melted butter in equal amounts.
- Food dye: Instead of artificial food coloring, try natural alternatives like beetroot powder or strawberry powder – start with 1/2 teaspoon and adjust for desired color.
- Xanthan gum: If you can’t find xanthan gum, guar gum works as a 1:1 replacement. Don’t skip this ingredient – it’s key for proper texture in gluten-free baking!
Watch Out for These Mistakes While Baking
The biggest challenge when making gluten-free cupcakes is ending up with a dry, crumbly texture – to avoid this, make sure all your ingredients are at room temperature before mixing, as this helps create a smoother batter that bakes evenly. A common mistake is overmixing the batter, which can activate the xanthan gum too much and lead to dense, gummy cupcakes – instead, mix just until the ingredients are combined and stop as soon as you see no more flour streaks. When measuring your gluten-free flour blend, avoid packing it into the measuring cup – use the spoon-and-level method to prevent using too much flour, which can make your cupcakes heavy and dry. For the best champagne flavor, don’t substitute sparkling wine or prosecco, as real champagne provides the distinct taste these cupcakes are known for, and remember to let the champagne get completely flat before adding it to your batter to ensure proper rising.

What to Serve With Pink Champagne Cupcakes?
These pretty pink cupcakes are perfect for special occasions and pair wonderfully with a glass of bubbly champagne or prosecco! For a lovely afternoon tea setup, serve them alongside fresh berries, particularly strawberries and raspberries, which complement the delicate champagne flavor. If you’re hosting a celebration, consider setting up a dessert table with these cupcakes as the centerpiece, surrounded by chocolate-covered strawberries and macarons in matching pink hues. A cup of Earl Grey tea or a coffee with frothed milk makes for a nice non-alcoholic beverage pairing that won’t overshadow the cupcakes’ subtle flavors.
Storage Instructions
Counter Storage: These pretty cupcakes can hang out on your counter in an airtight container for up to 2 days. If you’re in a warm climate, it’s better to skip the counter storage since the buttercream might get too soft.
Refrigerate: Pop your frosted cupcakes in an airtight container in the fridge where they’ll stay fresh for up to 5 days. The cold firms up the buttercream nicely, but the cake might firm up a bit too – that’s totally normal for gluten-free treats!
Freeze: Want to plan ahead? You can freeze the unfrosted cupcakes for up to 2 months in a freezer-safe container. I’d recommend making the buttercream fresh when you’re ready to serve, as frozen buttercream can sometimes get a bit grainy.
Serve: When you’re ready to enjoy refrigerated cupcakes, let them sit at room temperature for about 30 minutes. This helps the cake soften up and brings the buttercream to the perfect consistency for eating.
| Preparation Time | 15-20 minutes |
| Cooking Time | 20-22 minutes |
| Total Time | 35-42 minutes |
| Level of Difficulty | Medium |
Estimated Nutrition
Estimated nutrition for the whole recipe (without optional ingredients):
- Calories: 2100-2300
- Protein: 30-35 g
- Fat: 110-120 g
- Carbohydrates: 290-310 g
Ingredients
- 1 1/4 cups gluten-free flour blend (I use Bob’s Red Mill 1-to-1 Baking Flour)
- 1/2 tsp vanilla essence (for a delicate aroma)
- 1/4 tsp salt
- 2 large eggs (room temperature for better emulsification)
- 1/2 tsp xanthan gum (ensures proper texture in gluten-free baking)
- 3 drops red food dye (optional, will create a light pink color)
- 1/2 cup vegetable oil
- 1 1/2 tsp gluten-free baking powder
- 1/2 cup champagne (use a brut or extra dry for less sweetness)
- 3 drops champagne essence (optional, for intensified champagne flavor)
- champagne buttercream icing
- 1 tbsp milk
- 1/4 cup almond flour
- 1 cup granulated sugar
Step 1: Prepare the Oven and Cupcake Pan
Place the oven rack in the center position and preheat the oven to 350°F (176°C).
Meanwhile, place cupcake liners in a pan that is large enough to hold 12 cupcakes.
This will prevent the cupcakes from sticking and make them easy to remove after baking.
Step 2: Mix the Dry Ingredients
In a medium-sized bowl, combine the gluten-free flour mix, almond flour, salt, baking powder, and xanthan gum.
Stir the ingredients together until they are well mixed.
This ensures an even distribution of leavening agents and spices.
Step 3: Beat Sugar and Eggs
In a large bowl, use an electric mixer on medium speed to beat together the sugar and eggs.
Mix for about one minute until the mixture is well combined and slightly thickened.
This will incorporate air into the batter, helping the cupcakes rise nicely.
Step 4: Combine Wet Ingredients
To the sugar and egg mixture, gently stir in the oil, champagne, milk, vanilla, and, if desired, the optional champagne flavoring and red food coloring.
Use a spoon to combine these ingredients slowly to maintain the airiness of the batter.
Step 5: Mix Batter and Fill Cupcake Liners
Add the dry flour mixture to the wet ingredients in the large bowl.
Beat the combined mixture with an electric mixer for one minute at medium speed, ensuring a smooth batter free of lumps.
Carefully pour the batter into each cupcake liner, filling each one about two-thirds full.
This allows space for the cupcakes to rise during baking.
Step 6: Bake and Cool Cupcakes
Place the cupcake pan in the oven on the center rack.
Bake for 20-22 minutes, or until a toothpick inserted into the center of a cupcake comes out clean.
The cupcakes should have a slightly golden brown top.
Once baked, cool the cupcakes in the pan for five minutes before transferring them to a cooling rack to cool completely.
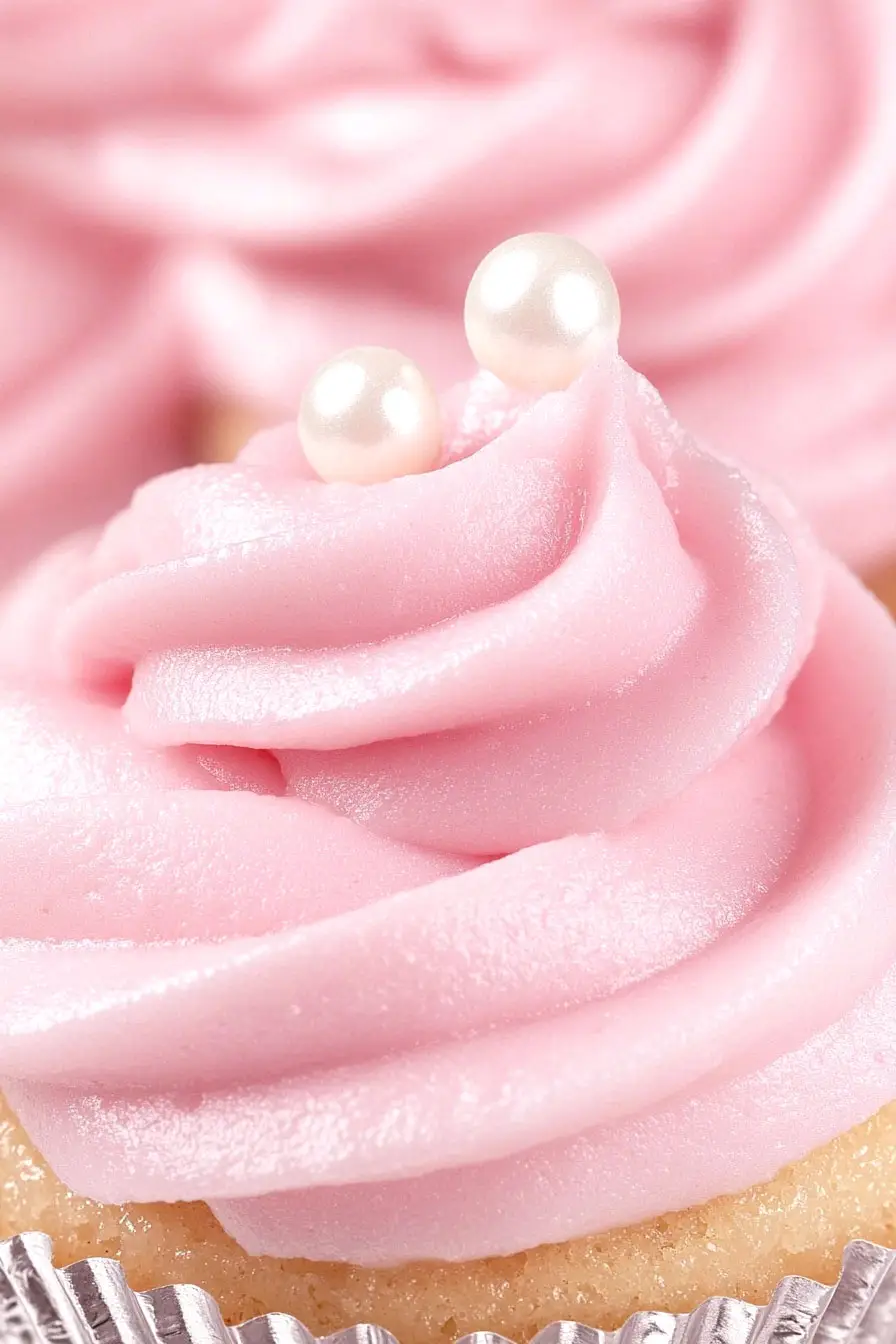
Step 7: Frost and Decorate
Once the cupcakes are completely cool, pipe on champagne buttercream frosting.
For a celebratory touch, sprinkle each cupcake with sparkling sugar or tiny silver dragees.
These additions not only make the cupcakes visually appealing but also enhance the festive flavor.
