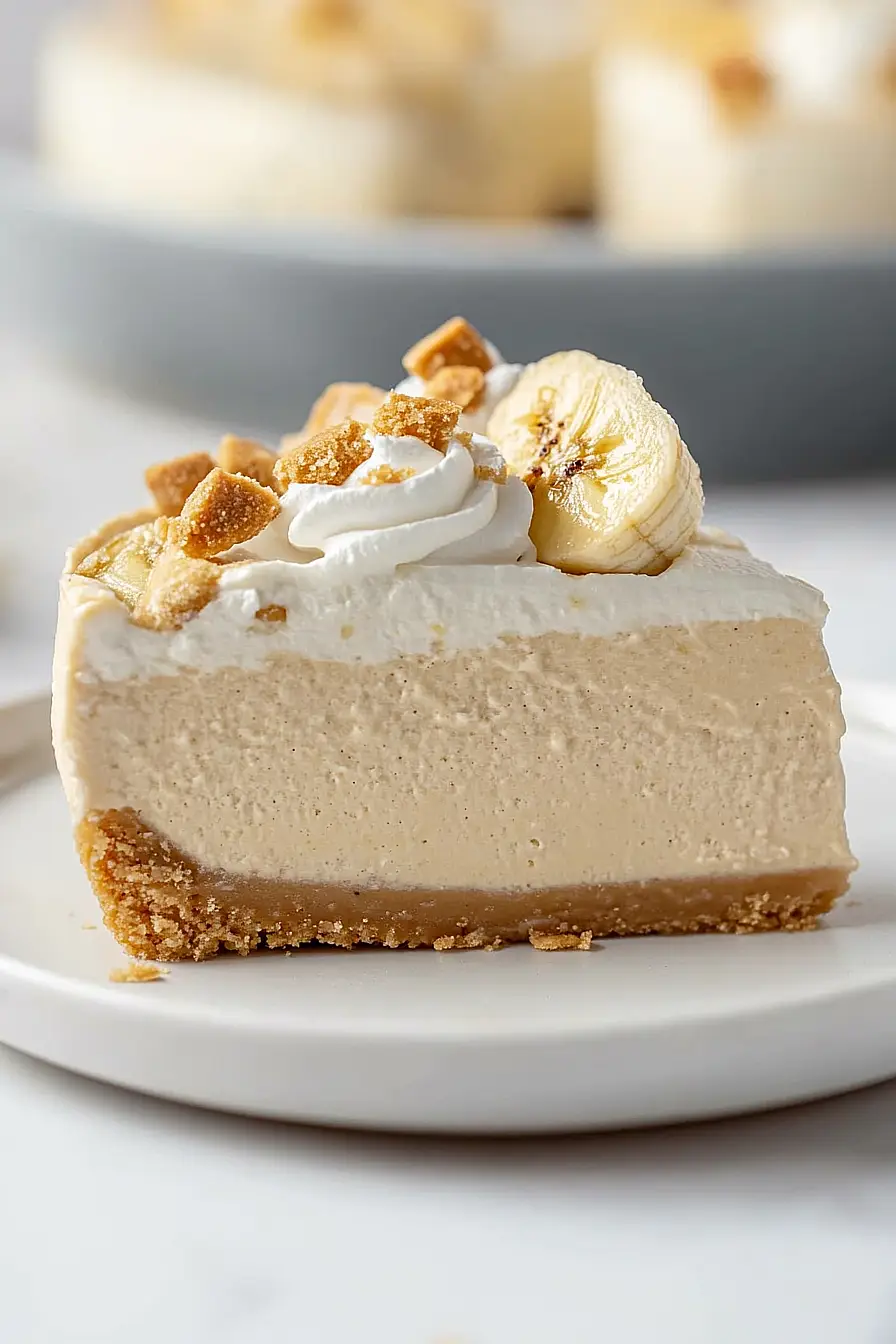
Here is my favorite banana pudding cheesecake recipe, with a creamy cheesecake base, layers of vanilla pudding, fresh bananas, and a crunchy vanilla wafer crust that brings it all together.
This banana pudding cheesecake is always a hit at family gatherings and potluck dinners. I love making it because it combines two classic desserts into one amazing treat. Plus, it’s way easier than you’d think to put together!
Why You’ll Love This Banana Pudding Cheesecake
- Two desserts in one – This recipe combines the creamy richness of cheesecake with all the nostalgic flavors of banana pudding, giving you the best of both worlds in every bite.
- Make-ahead friendly – Perfect for entertaining since it needs to chill anyway, you can make this dessert a day ahead and have one less thing to worry about when guests arrive.
- Crowd-pleasing flavor – The familiar taste of banana pudding appeals to all ages, making it a hit at family gatherings, potlucks, and special occasions.
- Simple ingredients – You probably already have most of these pantry staples at home, and the Nilla wafers give it that authentic banana pudding taste everyone loves.
- Impressive presentation – This dessert looks fancy enough for special occasions but uses straightforward techniques that home bakers can master.
What Kind of Cream Cheese Should I Use?
For the best banana pudding cheesecake, you’ll want to use full-fat cream cheese – avoid the light or reduced-fat versions since they can make your cheesecake less creamy and more prone to cracking. Make sure to buy the brick-style cream cheese rather than the spreadable kind, as it has a firmer texture that works better for baking. The most important thing is to let your cream cheese come to room temperature before you start mixing – this usually takes about 2-3 hours on the counter. If you’re in a hurry, you can cut the cream cheese into smaller cubes to help it soften faster, but don’t try to microwave it as that can create lumpy spots in your cheesecake.
Options for Substitutions
This cheesecake recipe is pretty forgiving when it comes to swaps, so here are some options if you need them:
- Nilla wafers: If you can’t find Nilla wafers, graham crackers work great as a substitute. You can also use vanilla cookies or even shortbread cookies – just crush them up the same way.
- Cream cheese: Make sure your cream cheese is full-fat for the best texture. Low-fat versions can make your cheesecake less creamy and more likely to crack.
- Pureed bananas: Use ripe bananas with brown spots for the sweetest flavor. If your bananas aren’t quite ripe enough, you can add an extra tablespoon of sugar to compensate.
- Heavy cream: You can substitute with whipping cream, but avoid using half-and-half or milk as they won’t whip properly for the topping.
- Instant vanilla pudding mix: This helps stabilize the whipped cream topping. If you don’t have it, you can skip it, but add the whipped cream just before serving instead of making it ahead.
- Eggs: Room temperature eggs mix better into the batter. If you forgot to take them out early, place them in warm water for 10 minutes before using.
Watch Out for These Mistakes While Baking
The biggest mistake when making banana pudding cheesecake is not having your cream cheese at proper room temperature, which leads to lumpy filling that won’t smooth out no matter how much you mix – take it out of the fridge at least 2 hours before baking.
Another common error is overbaking the cheesecake, so watch for the telltale signs: the edges should be set while the center still has a slight jiggle when you gently shake the pan.
To prevent cracks from forming on top, avoid opening the oven door during baking and consider placing a pan of hot water on the bottom rack to create steam.
Don’t rush the cooling process either – let your cheesecake cool gradually at room temperature for an hour before refrigerating, as sudden temperature changes can cause cracks and affect the texture.
What to Serve With Banana Pudding Cheesecake?
This rich and creamy dessert is pretty perfect on its own, but a cup of hot coffee or black tea makes a great companion to balance out all that sweetness. If you’re serving it for a special occasion, try pairing it with some fresh berries like strawberries or blueberries – the tartness cuts through the richness beautifully. A dollop of lightly sweetened whipped cream on the side never hurts either, especially if you want to make it feel extra special. For a fun touch, you could even serve it with a small glass of cold milk, just like you would with regular banana pudding!
Storage Instructions
Refrigerate: This cheesecake needs to chill in the fridge for at least 4 hours before serving, but overnight is even better. Once it’s set, cover it with plastic wrap or store it in an airtight container and it’ll keep beautifully for up to 5 days. The flavors actually get better after a day or two!
Freeze: You can absolutely freeze this cheesecake for up to 3 months. Wrap individual slices in plastic wrap and then foil, or freeze the whole thing covered tightly. Just remember to add the fresh banana slices and whipped cream topping after thawing, since those don’t freeze well.
Thaw: When you’re ready to enjoy frozen cheesecake, move it to the fridge and let it thaw slowly for about 4-6 hours or overnight. This keeps the texture nice and creamy. Add your fresh banana slices and any extra whipped cream right before serving for the best look and taste.
| Preparation Time | 20-30 minutes |
| Cooking Time | 70-80 minutes |
| Total Time | 290-480 minutes |
| Level of Difficulty | Medium |
Estimated Nutrition
Estimated nutrition for the whole recipe (without optional ingredients):
- Calories: 4400-4800
- Protein: 60-70 g
- Fat: 300-340 g
- Carbohydrates: 410-460 g
Ingredients
For the crust:
- 5 tbsp unsalted butter (melted and cooled slightly)
- 2 cups vanilla wafer crumbs
- 1/4 cup sugar
For the cheesecake filling:
- 1 1/3 cups sugar
- 32 oz cream cheese (room temperature for smooth mixing)
- 4 large eggs (lightly beaten, room temperature)
- 1 tbsp vanilla extract (I use Madagascar vanilla)
- 1 cup mashed ripe banana (about 2 large bananas)
For the whipped topping:
- 1 tbsp instant vanilla pudding powder
- 1/4 cup powdered sugar
- 1 cup cold heavy whipping cream (full-fat for best results)
For garnish:
- Banana slices
- Crushed vanilla wafer crumbs
Step 1: Prepare the Pan and Make the Crust
- 2 cups vanilla wafer crumbs
- 1/4 cup white sugar
- 5 tbsp unsalted butter, melted
Move the oven rack to the lower third position and preheat the oven to 350°F.
Tightly wrap the outer bottom of a 9-inch springform pan with heavy-duty aluminum foil to prevent leaks during baking.
In a bowl, combine the vanilla wafer crumbs, 1/4 cup white sugar, and melted butter until the mixture resembles wet sand.
Press this mixture firmly into the bottom and about 2 inches up the sides of the prepared pan.
Bake the crust for 10 minutes.
If the crust bubbles up during baking, gently press it back down.
Set the crust aside to cool while preparing the filling.
Step 2: Prepare the Cheesecake Filling
- 32 oz cream cheese, at room temperature
- 1 1/3 cups white sugar
- 1 cup mashed ripe banana (about 2 bananas)
- 1 tbsp vanilla extract
- 4 large eggs, lightly beaten and at room temperature
Reduce the oven temperature to 300ºF.
In a large mixing bowl, beat the cream cheese with an electric mixer until smooth and creamy, about 1 minute.
Add 1 1/3 cups white sugar and mix until fully combined.
Add the mashed bananas and vanilla extract, continuing to beat on low speed until smooth.
Using a silicone spatula, gently fold in the lightly beaten eggs just until combined, being careful not to overmix.
I find that gentle mixing at this stage helps keep the cheesecake creamy without incorporating too much air.
Step 3: Bake the Cheesecake
- cheesecake filling from Step 2
- crust from Step 1
Pour the cream cheese filling from Step 2 into the pre-baked crust from Step 1.
Place the cheesecake in the center of a large roasting pan.
Fill the roasting pan with a few inches of boiling water to create a water bath, which helps the cheesecake bake evenly and prevents cracks.
Bake for 1 hour, until the edges are set and the center is slightly jiggly.
Then, turn the oven off and leave the cheesecake in the oven, still in the water bath, for another hour.
This gradual cooling helps prevent the top from cracking.
Step 4: Cool and Refrigerate the Cheesecake
Remove the cheesecake from the water bath and set it on a wire rack.
Run a thin knife around the outer edge to loosen it from the pan, which helps it release cleanly later.
Allow the cheesecake to cool completely at room temperature.
Once cooled, cover the pan and refrigerate the cheesecake for at least 4 hours, preferably overnight, to set fully and develop the best flavor and texture.
Step 5: Make the Whipped Topping
- 1 cup cold heavy whipping cream
- 1/4 cup powdered sugar
- 1 tbsp instant vanilla pudding powder
In a medium bowl, combine the cold heavy whipping cream, powdered sugar, and instant vanilla pudding powder.
Using an electric mixer on medium-low speed, whip the mixture just until foamy.
Increase the speed to medium-high and continue to whip until medium to stiff peaks form.
The instant pudding adds stability to the whipped cream, so it holds up beautifully on the cheesecake!
I find this trick extremely useful for make-ahead desserts.
Step 6: Finish and Garnish the Cheesecake
- whipped topping from Step 5
- crushed vanilla wafer crumbs
- banana slices
Remove the sides of the springform pan.
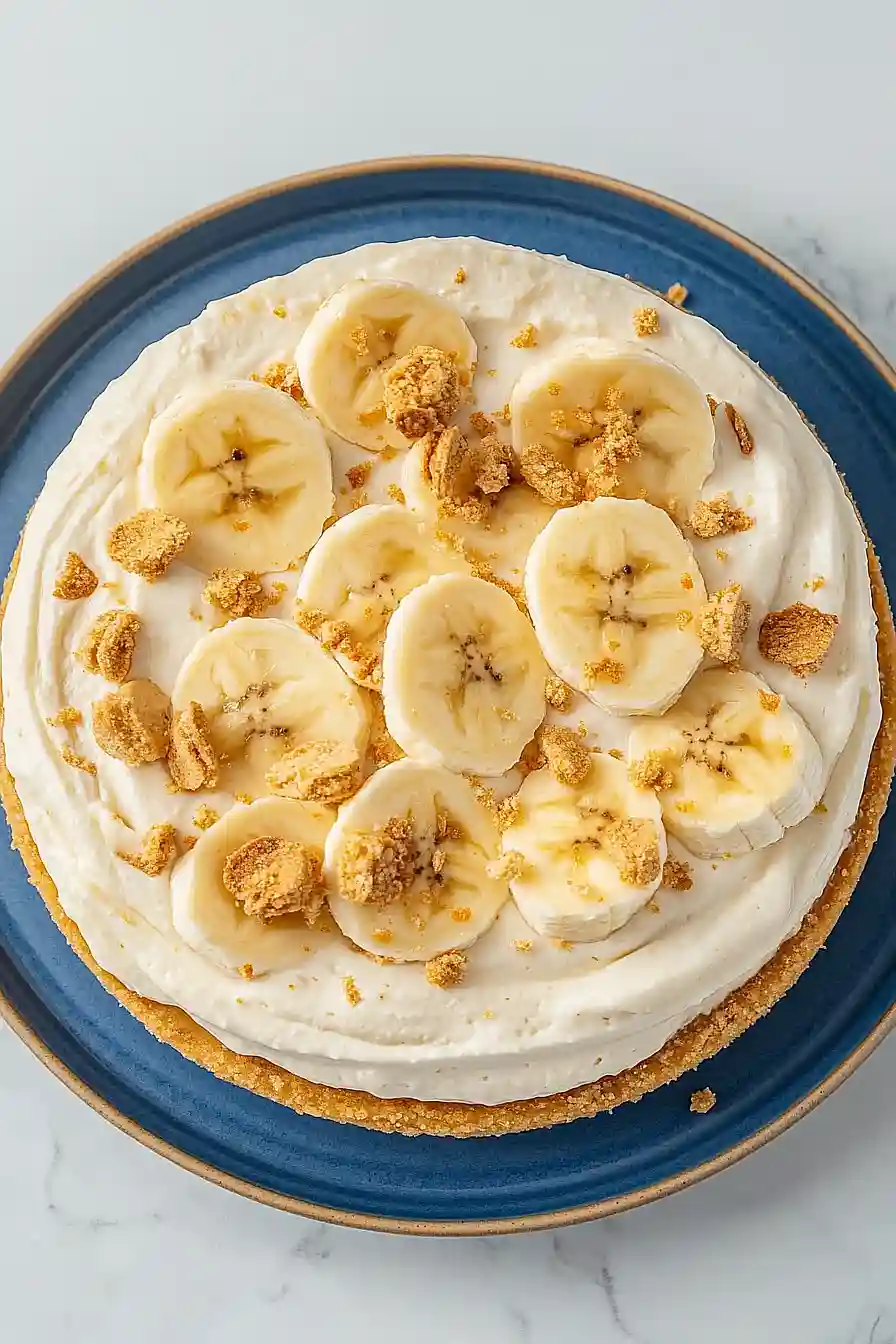
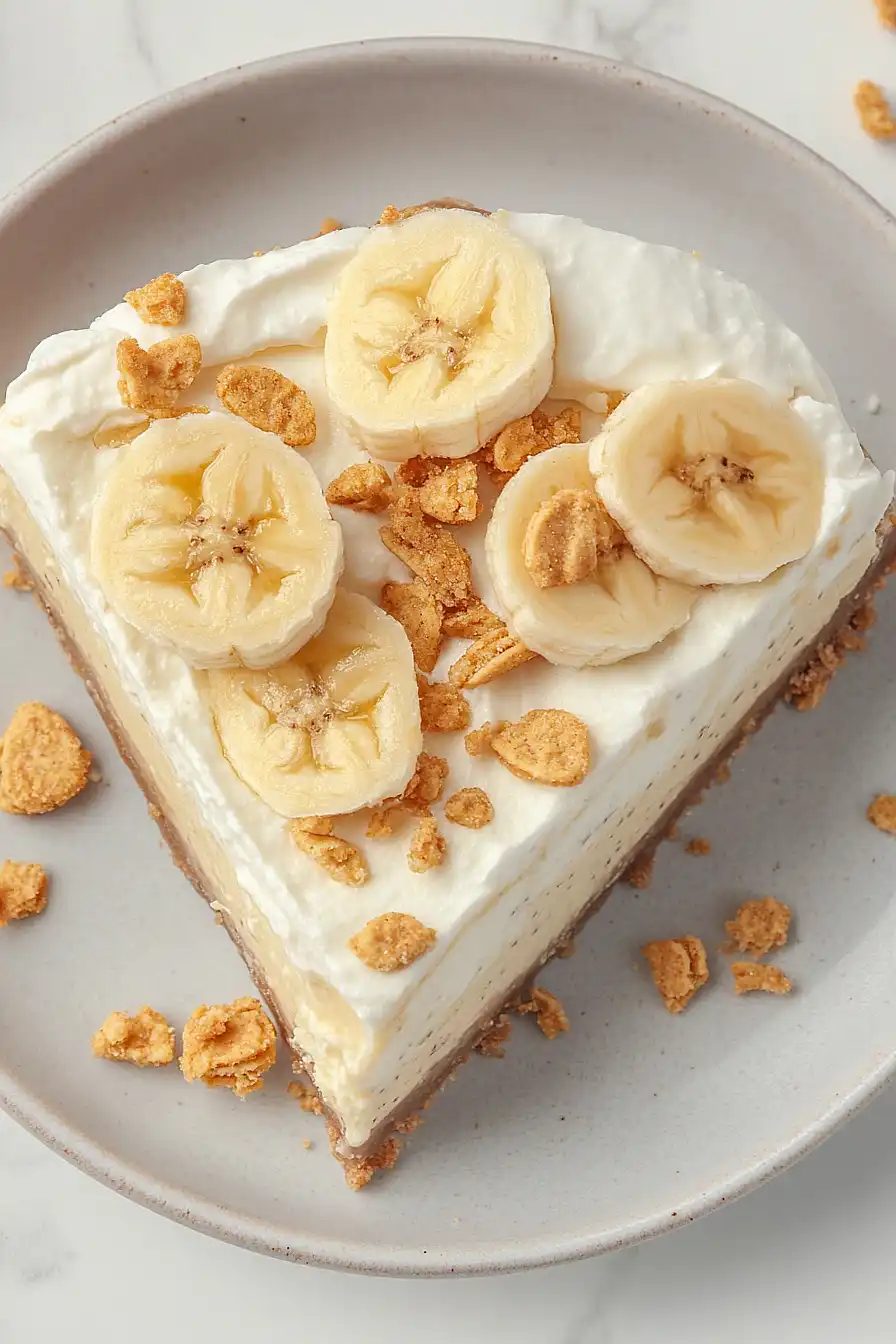
Spread the whipped topping from Step 5 evenly over the chilled cheesecake.
Garnish with crushed vanilla wafer crumbs and banana slices, if desired, for a beautiful and delicious finish.
Serve chilled.
