I’ve always loved finding ways to make breakfast easier for busy mornings. There’s something really nice about waking up knowing your breakfast is ready and waiting for you in the fridge. These dark chocolate oatmeal cups have become my go-to solution for hectic weekdays. I started making them when I realized I needed something that could work for both me and the kids – something nutritious but still a little indulgent.
What makes these oatmeal cups so great is how simple they are to prepare the night before. Just mix everything up, pop them in the oven, and they’re ready to grab and go in the morning. I usually make a batch on Sunday evening while I’m getting lunches ready for the week. No morning stress, no mess to clean up – just a good breakfast that feels a bit like having dessert for breakfast (but healthier!).
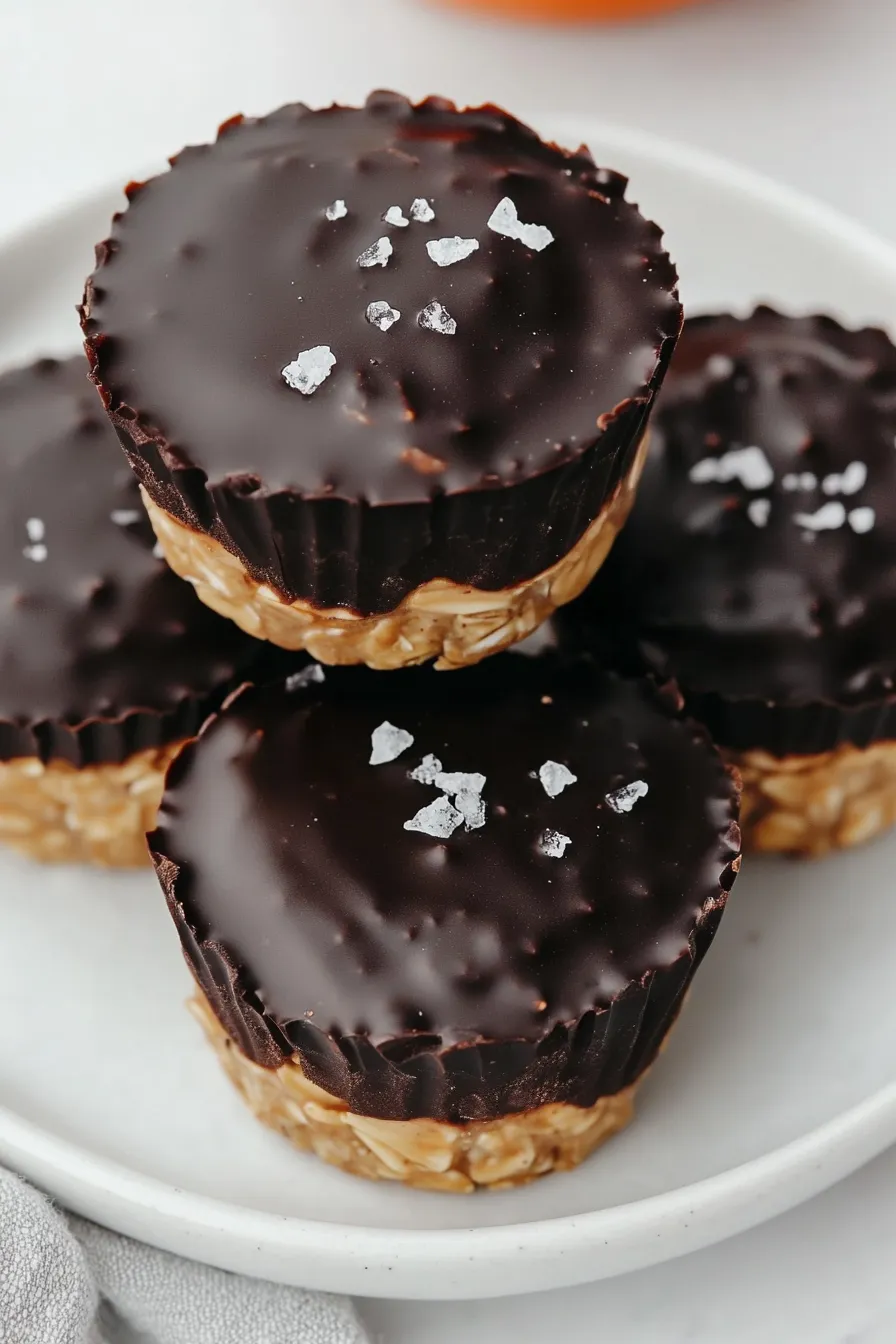
You can switch up the toppings depending on what you’re in the mood for, but the dark chocolate version is our family favorite. Sometimes I’ll make a double batch because they disappear so quickly!
Why You’ll Love These Dark Chocolate Oatmeal Cups
- No-bake treat – These oatmeal cups require zero oven time – just mix, chill, and enjoy! Perfect for hot summer days when you don’t want to turn on the oven.
- 5-ingredient simplicity – With just oats, peanut butter, honey, dark chocolate, and coconut oil, you probably have most of these pantry staples already on hand.
- Make-ahead friendly – These cups store beautifully in the fridge for up to a week, making them perfect for meal prep or quick grab-and-go snacks.
- Naturally sweetened – Using honey instead of refined sugar makes these treats a better-for-you option when you’re craving something sweet.
What Kind of Dark Chocolate Should I Use?
For these oatmeal cups, you’ll want to reach for dark chocolate that’s between 60-70% cacao – this range offers the perfect balance of sweetness and rich chocolate flavor. Regular chocolate chips can work in a pinch, but choosing a good quality bar and chopping it yourself will give you better melting results and a smoother texture. If you’re at the store, look for brands like Ghirardelli, Lindt, or Trader Joe’s dark chocolate bars – they’re reliable and won’t break the bank. Just make sure to avoid chocolate labeled “baking chocolate” since it’s usually unsweetened and might make your treats too bitter.

Options for Substitutions
These oatmeal cups are pretty adaptable and you can make several swaps based on what you have in your pantry:
- Peanut butter: Not a fan of peanut butter or have an allergy? You can use almond butter, sunflower seed butter, or cashew butter instead. Just make sure to use the smooth kind, as chunky varieties might make the cups harder to form.
- Honey: Maple syrup works great as a substitute and keeps these cups vegan. Agave nectar is another good option, though you might need a little less since it’s sweeter than honey.
- Traditional oats: While traditional old-fashioned oats give the best texture, you can use quick oats in a pinch. Just avoid steel-cut oats as they’ll be too hard and won’t hold together well.
- Dark chocolate: Feel free to swap in semi-sweet or milk chocolate if that’s what you prefer. You can even use chocolate chips instead of chopped chocolate.
- Coconut oil: Butter works just as well here, or you can use any neutral oil like vegetable or canola oil.
- Flaky sea salt: Regular kosher salt will do the job, though you might want to use a bit less since it’s finer than flaky salt. You can also skip the salt entirely if you prefer.
Watch Out for These Mistakes While Making
The biggest challenge when making oatmeal cups is getting the consistency right – if your peanut butter and honey mixture is too hot when combined with the oats, it won’t hold together properly, so let it cool for about 5 minutes after mixing these two ingredients.
When melting chocolate, avoid overheating it or letting any water droplets get into the mixture, as this will cause the chocolate to seize and become grainy – instead, use short 20-second bursts in the microwave, stirring between each interval, or use a double boiler method.
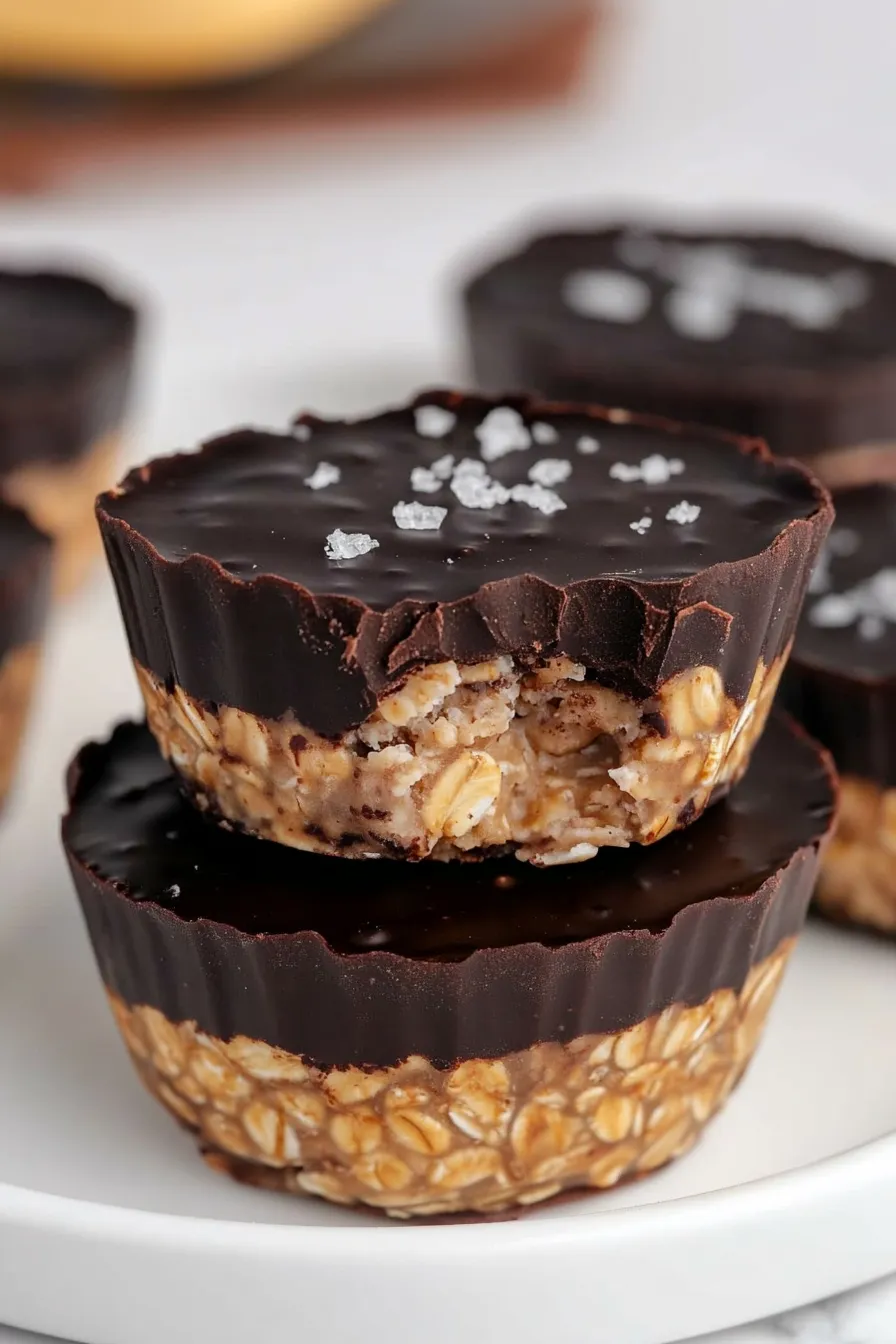
For the perfect texture, press the oat mixture firmly into the muffin cups using the back of a spoon or your fingers, as loose packing will result in crumbly cups that fall apart easily.
A helpful tip is to pop the cups in the freezer for 10-15 minutes before adding the chocolate layer – this ensures the chocolate sets quickly and creates a clean separation between layers.
What to Serve With Chocolate Oatmeal Cups?
These chocolate oatmeal cups make a fantastic snack or dessert that pairs really well with your favorite hot drinks! A cold glass of milk or warm cup of coffee helps balance out the richness of the dark chocolate and peanut butter. For breakfast, I like serving these alongside some fresh fruit like strawberries or banana slices to add a fresh element to the meal. If you’re packing them for lunch boxes or afternoon snacks, they go great with a handful of mixed nuts or a small yogurt cup for extra protein.
Storage Instructions
Keep Fresh: These chocolate oatmeal cups stay perfect in an airtight container at room temperature for up to 5 days. If your kitchen runs warm, you might want to pop them in the fridge to keep the chocolate from getting too soft. Just place some parchment paper between layers to prevent them from sticking together.
Freeze: Want to make a big batch? These cups freeze really well! Put them in a freezer-safe container with parchment paper between layers and they’ll stay good for up to 3 months. It’s so nice having these ready to grab whenever a chocolate craving hits!
Thaw: When you’re ready to enjoy your frozen oatmeal cups, just transfer them to the fridge overnight or let them sit at room temperature for about 30 minutes. They taste just as good as the day you made them!
| Preparation Time | 10-15 minutes |
| Cooking Time | 20-30 minutes |
| Total Time | 70-90 minutes |
| Level of Difficulty | Easy |
Estimated Nutrition
Estimated nutrition for the whole recipe (without optional ingredients):
- Calories: 1500-1700
- Protein: 40-50 g
- Fat: 80-100 g
- Carbohydrates: 180-200 g
Ingredients
For the oat cups:
- 3/4 cup peanut butter
- 3 cups traditional oats
- 1/3 cup honey
For the chocolate topping:
- Flaky sea salt (such as Maldon, for a gourmet finish)
- 5 oz dark chocolate (chopped into small pieces for even melting)
- 1 tbsp coconut oil (extra virgin preferred for a subtle coconut flavor)
Step 1: Prepare the Peanut Butter Mixture
In a small saucepan, heat the peanut butter and honey over medium-low heat, stirring frequently until the mixture is warm but not hot.
If you prefer, you can also use a microwave for this step, heating in short intervals and stirring in between to prevent overheating.
Step 2: Combine with Oats
Add the oats to the warm peanut butter mixture.
Stir everything together until the oats are thoroughly coated and combined with the peanut butter and honey mixture.
Step 3: Form the Oat Cups
Portion the oat mixture evenly into a silicone or non-stick 12-cup muffin pan, using approximately 1/3 cup of the oat mixture per baking cup.
With a spoon, firmly press the mixture into the base of each baking cup to form the oat cups.
Step 4: Melt the Chocolate
Rinse out the saucepan and return it to the burner.
Add the dark chocolate and coconut oil to the saucepan.
Heat over medium-low heat, stirring frequently until the chocolate is melted and smooth.
Remove the pan from heat once melted.
Step 5: Top the Oat Cups with Chocolate
Using a spoon, add approximately 1 tablespoon of the melted chocolate on top of each oat cup.
Spread the chocolate evenly to cover the top of each baking cup completely.
Step 6: Chill and Serve
Transfer the muffin pan to the freezer and chill for at least 1 hour, or until the oat cups are firm.
When ready to serve, pop out the desired number of oat cups, sprinkle each with a pinch of flaky sea salt, and serve immediately.
Store any remaining oat cups in the freezer until you are ready to enjoy them again.
