When I was a kid, the only cherry pie I knew came from the local diner down the street. Mom wasn’t much of a baker, and those store-bought frozen pies just didn’t do it for us. It wasn’t until I started experimenting in my own kitchen that I discovered something even better – cherry pie turnovers.
These little handheld pies are basically everything I love about cherry pie, but without the fuss of making a whole pie. Plus, there’s something fun about having your own personal pie that doesn’t require sharing or slicing. And the best part? They’re actually easier to make than a traditional pie, even if you’re not exactly best friends with your rolling pin.
Why You’ll Love These Cherry Turnovers
- Semi-homemade convenience – Using store-bought pie crusts and canned filling means you can skip the fussy parts and get straight to the fun of making these sweet treats.
- Just 5 ingredients – You only need a handful of basic ingredients to make these delicious pastries – perfect for when you’re craving something sweet but don’t want to run to the store.
- Perfect portion control – Each turnover is individually sized, making them great for packed lunches, quick snacks, or serving at parties without the need for cutting and plating.
- Beginner-friendly baking – If you’re new to baking, these turnovers are a great place to start – they’re nearly foolproof and always come out looking impressive.
What Kind of Cherry Pie Filling Should I Use?
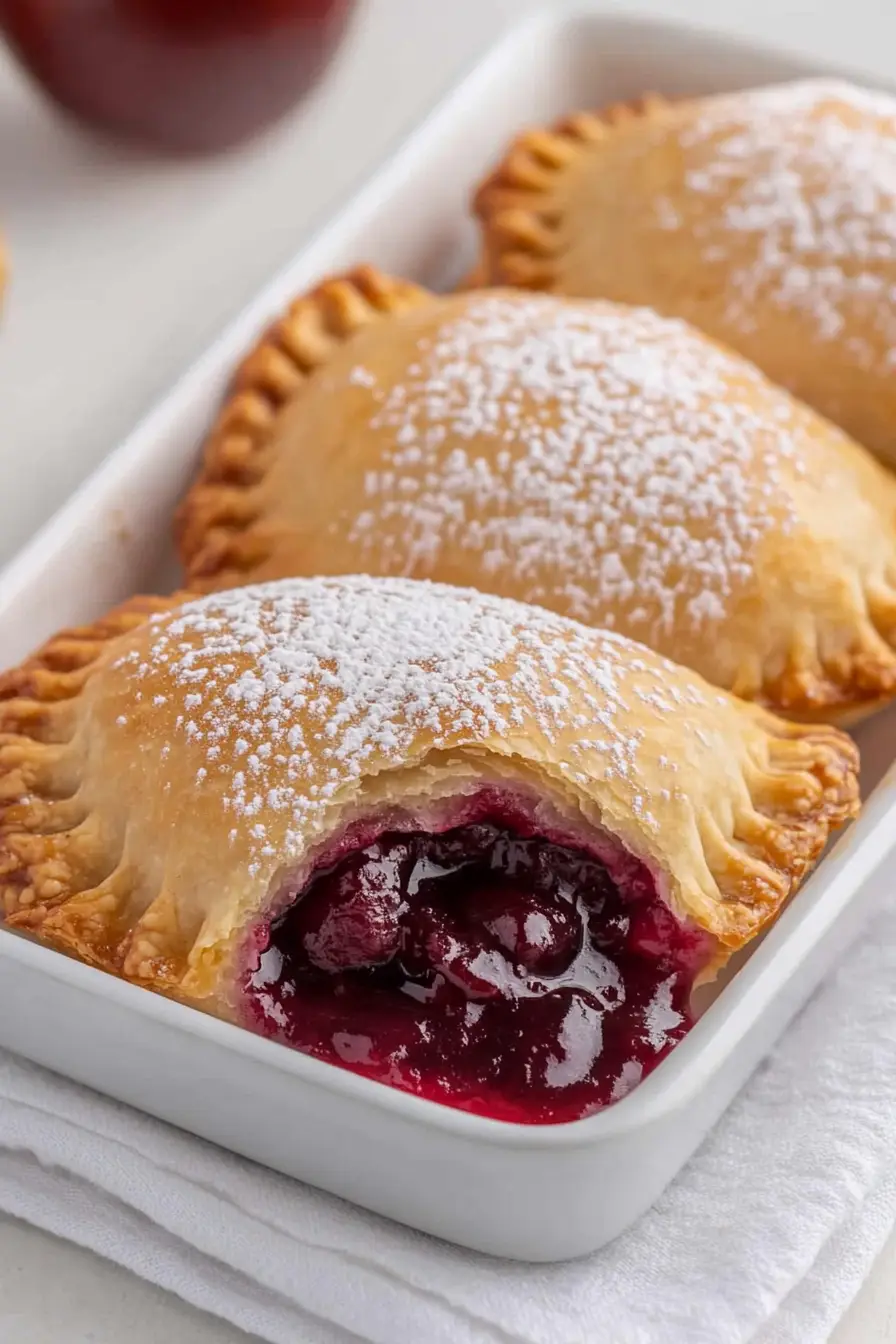
For these turnovers, you can go with either store-bought or homemade cherry pie filling – both will give you great results. If you’re using canned filling, look for one made with tart cherries (sometimes labeled as “sour cherries”) rather than sweet cherries, as they provide a better balance of flavors in the finished turnovers. Most grocery stores carry well-known brands like Comstock or Lucky Leaf, which work perfectly fine. If you’re making your own filling, Montmorency cherries are the classic choice, and you can find them fresh during summer months or frozen year-round. Just make sure your filling isn’t too runny, as this can make the turnovers leak during baking.

Options for Substitutions
Making these turnovers but missing something? Here are some helpful swaps you can try:
- Cherry pie filling: While cherry gives these turnovers their classic taste, you can use any pie filling you like – apple, blueberry, or peach work great. You can also make your own filling using fresh or frozen fruit mixed with sugar and cornstarch.
- Store-bought pie crusts: If you don’t have pre-made pie crusts, you can use puff pastry sheets instead. Or make your own pie crust from scratch – just make sure to chill it well before using. Crescent roll dough can work too, though the texture will be different.
- Egg wash: No egg? You can brush the tops with milk or heavy cream instead. This helps achieve that golden-brown color, though it won’t be quite as shiny as with egg wash.
- Granulated sugar topping: Feel free to skip the sugar topping, or try turbinado sugar for extra crunch. You could also use powdered sugar as a topping after baking instead.
- Flour for dusting: Any type of flour works for dusting your surface – all-purpose, bread flour, or even cornstarch in a pinch.
Watch Out for These Mistakes While Baking
The biggest challenge when making cherry turnovers is overfilling them – using more than 2-3 tablespoons of filling per turnover can lead to messy leaks and burst edges during baking. A common error is not sealing the edges properly, so make sure to press firmly with a fork and create small steam vents on top to prevent the filling from forcing its way out. Working with warm pie dough can make it sticky and hard to handle, so keep your dough chilled between batches and dust your work surface generously with flour to prevent sticking. For the crispiest, most golden-brown results, don’t skip the egg wash before baking, and make sure your oven is fully preheated to ensure even baking from the start.
What to Serve With Cherry Turnovers?
These sweet and flaky cherry turnovers are perfect for breakfast or dessert, and they pair wonderfully with a few simple additions to make them even more special. A scoop of vanilla ice cream on the side turns them into a more decadent dessert, while a hot cup of coffee or tea makes them perfect for breakfast or brunch. For a quick morning treat, I like to warm them slightly and serve with a dollop of whipped cream and some fresh berries on the side. If you’re serving these as an afternoon snack, try them with a cold glass of milk or a warm vanilla steamer for the kids.
Storage Instructions
Counter or Fridge: These cherry pie turnovers can hang out on your counter in an airtight container for about 2 days. If you want them to last a bit longer, pop them in the fridge where they’ll stay good for up to 5 days. Just make sure they’re completely cool before storing to keep that crust nice and flaky!
Freeze: These little pies are perfect for freezing! Once they’re completely cool, place them in a freezer bag or container with parchment paper between layers. They’ll keep well for up to 3 months in the freezer. It’s like having a ready-made dessert whenever the craving hits!
Warm Up: Want to bring back that fresh-baked taste? Pop a frozen or refrigerated turnover in the oven at 350°F for about 10 minutes, or until warm. You can also give them a quick zap in the microwave for 15-20 seconds, though the crust won’t be as crispy this way.
| Preparation Time | 20-30 minutes |
| Cooking Time | 30-40 minutes |
| Total Time | 50-70 minutes |
| Level of Difficulty | Medium |
Estimated Nutrition
Estimated nutrition for the whole recipe (without optional ingredients):
- Calories: 1800-2100
- Protein: 20-25 g
- Fat: 90-105 g
- Carbohydrates: 250-270 g
Ingredients
- 1/2 cup all-purpose flour
- 21 oz cherry pie filling (I like using Comstock Original Country Cherry Pie Filling)
- 1 tbsp granulated sugar (for sprinkling on top)
- 1 egg (large, beaten for egg wash)
- 3 pie crusts (store-bought, 9-inch diameter)
Step 1: Prepare the Work Surface and Baking Pan
Sprinkle your work surface liberally with flour, and also add a bit of flour to the baking pan.
This helps keep the pie crust from sticking as you work with it.
Step 2: Roll and Cut the Dough
Roll out your pie crust to an even thickness.
Use a round shape such as a cookie cutter, cup, or bowl to cut the dough into circles.
Aim for circles that are at least 3 ½ inches in diameter to fit a tablespoonful of filling.
For a larger turnover, cut circles about five inches across, which can accommodate two tablespoons of pie filling.
Step 3: Fill and Shape the Turnovers
Spoon your cherry pie filling onto the center of each dough circle.
Fold the circle over to create a half-moon shape and crimp the edges shut to seal.
Alternatively, for round turnovers, use a bit more filling and place a second dough circle on top of the first, then crimp all around to seal.
Step 4: Frying the Turnovers (Optional)
If you choose to fry your turnovers, make them smaller.
Heat a skillet with oil to 350°F.
Gently lower the turnovers into the hot oil and fry for 1-2 minutes, turning as needed to cook evenly on both sides.
Once golden and crispy, drain the turnovers on a paper towel to remove excess oil.
Step 5: Baking the Turnovers
For baked turnovers, larger circles work well.
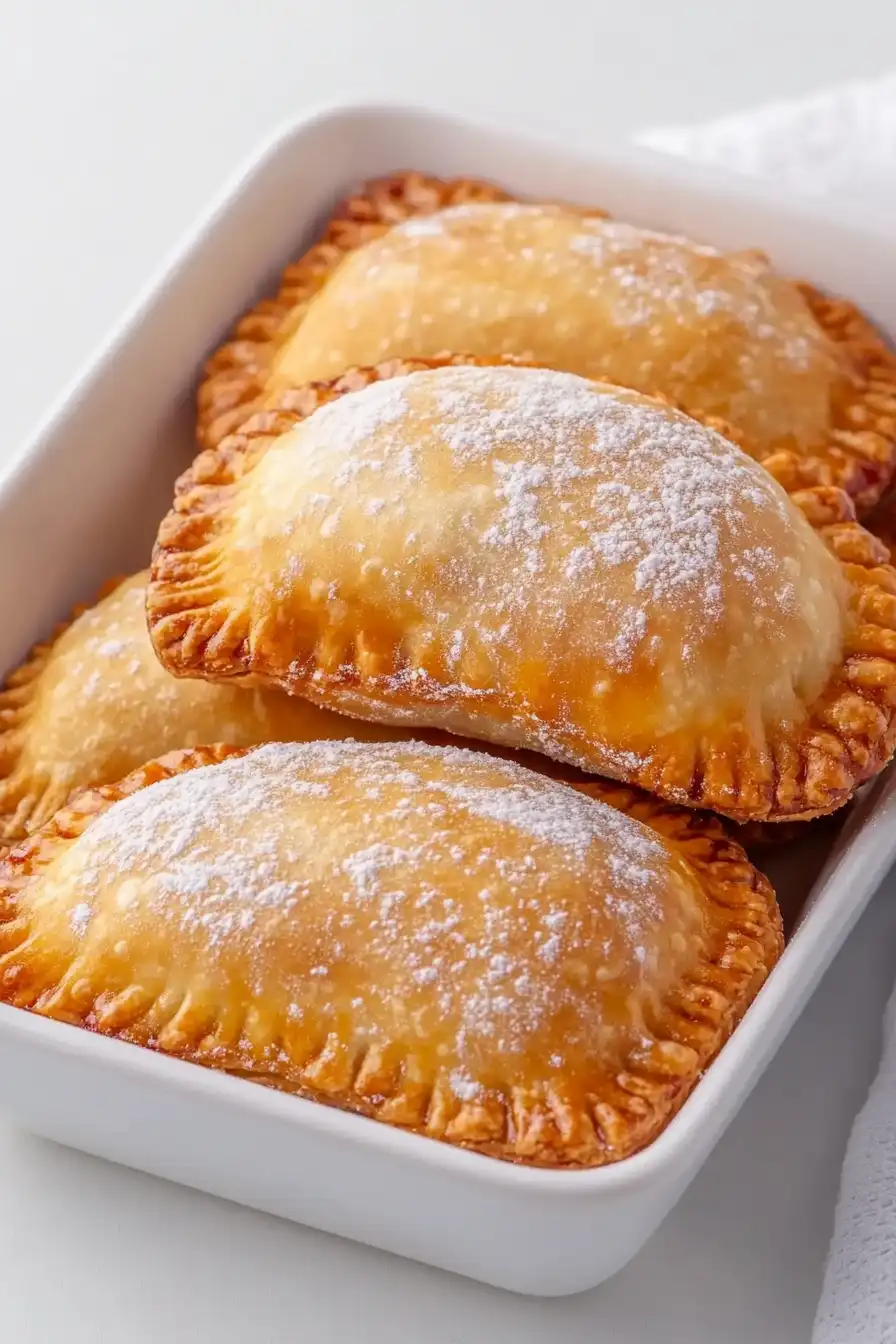
Before baking, brush the top of each turnover with whisked egg and sprinkle with granulated sugar for a shiny and crisp finish.
Place them in a preheated oven at 350°F and bake for approximately 30 minutes.
Keep an eye on them and bake until the crust reaches your desired shade of golden brown.
Step 6: Serve and Enjoy
Once cooked, let the turnovers cool slightly before serving.
Whether fried or baked, enjoy your homemade cherry turnovers as a delicious treat!
