Dealing with leftover holiday ham can feel like a puzzle, especially when your family is getting tired of the same old ham sandwiches day after day. We’ve all been there – staring at that chunk of meat in the fridge, wondering how to turn it into something the whole family will actually want to eat again.
That’s where this leftover ham pot pie comes in: it’s cozy, filling, and gives those holiday leftovers a completely new life. Plus, it’s a straightforward recipe that uses ingredients you probably already have in your kitchen.

Why You’ll Love This Ham Pot Pie
- Perfect for leftovers – This recipe is the best way to give leftover holiday ham a delicious makeover, turning yesterday’s dinner into a completely new and satisfying meal.
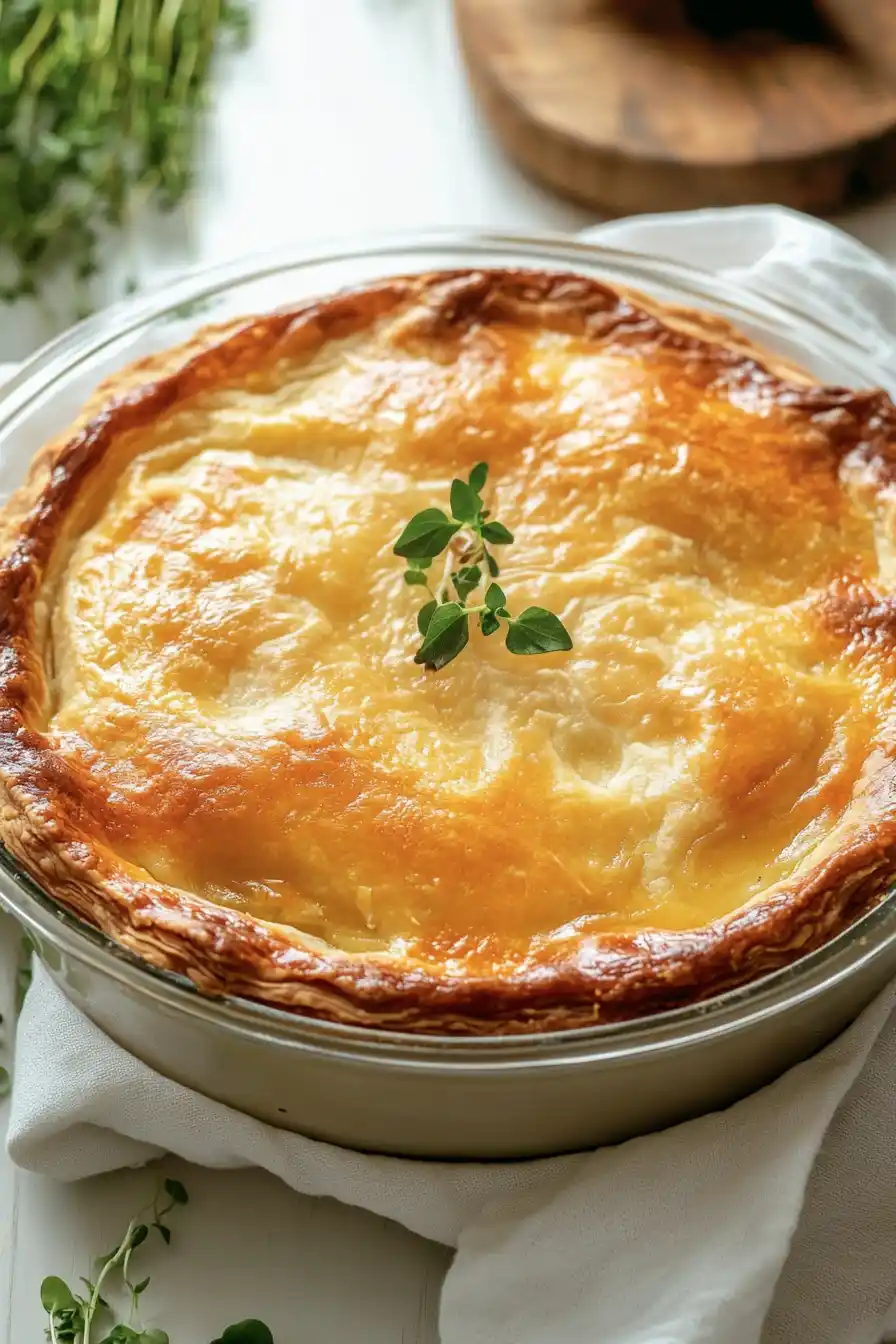
- Homemade buttery crust – The flaky, made-from-scratch pie crust wraps around the filling like a cozy blanket, making every bite better than the last.
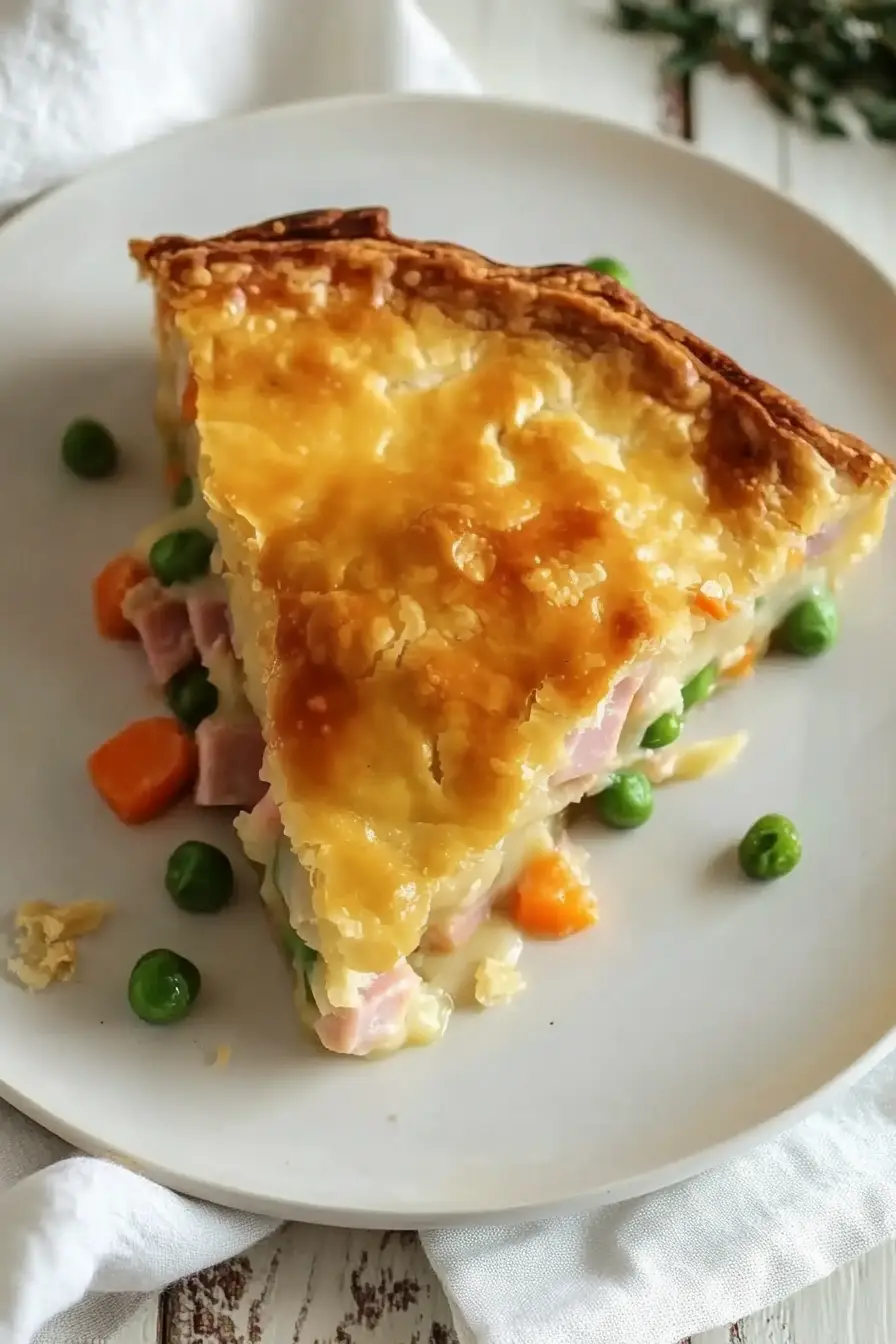
- Comforting filling – The creamy sauce, tender vegetables, and savory ham create that classic comfort food feeling that makes everyone feel at home.
- Make-ahead friendly – You can prepare the components in advance and assemble when ready, making it perfect for busy weeknights or planned-ahead meals.
- One-dish meal – With protein, vegetables, and carbs all wrapped up in one dish, there’s no need for extra sides – it’s a complete meal on its own.
What Kind of Ham Should I Use?
Any leftover holiday ham will work perfectly in this pot pie, whether it’s honey-glazed, smoked, or plain baked ham. The best part about using leftover ham is that it’s already cooked and seasoned, which adds extra flavor to your pot pie. If you don’t have leftovers, you can buy ham steaks from the meat counter and cube them up – just look for ham that’s not too heavily seasoned or sweet since you’ll be adding your own seasonings to the filling. For the best texture in your pot pie, try to cut your ham into evenly-sized cubes, about 1/2 inch across.
Options for Substitutions
This cozy pot pie recipe can handle quite a few substitutions if you’re in a pinch:
- Buttermilk: No buttermilk? Mix 1/2 cup regular milk with 1.5 teaspoons of lemon juice or white vinegar, let it sit for 5 minutes before using.
- Ham: While this recipe is perfect for leftover ham, you can use cooked chicken, turkey, or even rotisserie chicken instead. For a vegetarian version, try using mushrooms and extra vegetables.
- Full-fat milk: Heavy cream or half-and-half work great too. You can even use 2% milk, though the filling won’t be quite as rich.
- Fresh herbs: If you don’t have fresh herbs, use dried ones – but reduce the amount to about 2-3 tablespoons since dried herbs are more concentrated.
- Apple cider vinegar: White wine vinegar or lemon juice can step in for the apple cider vinegar – you just need something to add a bit of brightness.
- Frozen peas: Feel free to swap these with corn, green beans, or any other vegetables you have on hand. You can even leave them out if you’re not a pea fan.
- Egg wash: For a vegan option or if you’re out of eggs, brush the top with milk or melted butter instead.
Watch Out for These Mistakes While Baking
The success of your ham pot pie largely depends on the crust temperature – using warm butter or overworking the dough will result in a tough, chewy crust instead of the flaky layers you’re after, so keep your butter and buttermilk ice-cold until the moment you use them. When making the filling, avoid overcrowding your pan while sautéing the vegetables, as this will cause them to steam rather than develop that rich, caramelized flavor – work in batches if needed and give them space to brown properly. The roux (butter-flour mixture) needs about 2-3 minutes of cooking to remove the raw flour taste, but cooking it too long can make it grainy and affect the sauce’s thickening power. For the best results, let your baked pot pie rest for 15-20 minutes before serving – this allows the filling to set properly and prevents it from being too runny when you cut into it.
What to Serve With Ham Pot Pie?
Since ham pot pie is already packed with meat, veggies, and a buttery crust, you’ll want to keep the sides simple and fresh. A crisp green salad with a light vinaigrette dressing makes the perfect partner – try mixing in some apple slices to complement the savory flavors of the pie. For something warm, roasted green beans or steamed broccoli work great, and they’re easy enough to pop in the oven while the pot pie is baking. If you’re feeding a hungry crowd, add some cranberry sauce on the side – it adds a nice tang that cuts through the richness of the pie.
Storage Instructions
Keep Fresh: Your leftover ham pot pie will stay good in the fridge for up to 4 days when stored in an airtight container. The crust might soften a bit in the fridge, but the filling will stay just as tasty. It’s actually even better the next day when all those flavors have had time to mingle!
Freeze: This pot pie is perfect for freezing! Let it cool completely, then wrap it tightly in plastic wrap and aluminum foil. It’ll keep in the freezer for up to 3 months. You can freeze it either baked or unbaked – just add about 15-20 minutes to the baking time if cooking from frozen.
Reheat: To warm up your pot pie, pop it in the oven at 350°F for about 20-25 minutes, or until it’s heated through. Cover the top with foil if the crust starts getting too brown. If you’re reheating individual portions, the microwave works too – just know the crust won’t stay as crispy.
| Preparation Time | 30-60 minutes |
| Cooking Time | 50-70 minutes |
| Total Time | 80-130 minutes |
| Level of Difficulty | Medium |
Estimated Nutrition
Estimated nutrition for the whole recipe (without optional ingredients):
- Calories: 2500-2800
- Protein: 100-120 g
- Fat: 150-175 g
- Carbohydrates: 250-275 g
Ingredients
For the pie crust:
- 2 tbsp granulated sugar
- 2 1/2 cups all-purpose flour (I use King Arthur all-purpose flour)
- 1 cup cold unsalted butter, cubed (I like Kerrygold unsalted butter for this)
- 1/2 cup chilled buttermilk
- 1 large egg, beaten
- 1 tsp salt
For the filling:
- 1 small white onion, chopped
- 3 garlic cloves, minced (freshly minced for best flavor)
- 1 cup frozen peas
- 1 tsp salt
- 1 1/4 cups full-fat milk (gives better texture and moisture)
- 3 celery stalks, chopped
- 1/2 cup chopped fresh herbs (such as parsley, thyme, or sage)
- 1 cup chicken or vegetable stock
- 1/4 tsp black pepper
- 3 medium carrots, diced
- 2 cups cubed ham (leftover ham works perfectly)
- 4 tbsp unsalted butter
- 1 tbsp apple cider vinegar
- 1/4 cup all-purpose flour
Step 1: Prepare the Pie Crust Dough
Place flour, sugar, and salt in a food processor and pulse a couple of times to combine.
Add the cold, cubed butter and pulse until there are no large chunks of butter left.
Slowly stream in cold buttermilk while continuing to pulse.
Although the mixture may appear dry and crumbly initially, keep the food processor running until the dough comes together.
Turn the dough out onto a lightly floured surface and gently knead it until it forms a cohesive ball.
Divide the dough into 2 equal pieces and shape them into semi-flat, thick oval shapes.
Wrap each piece in plastic wrap and refrigerate for at least 30 minutes, or up to 3 days.
Step 2: Cook the Filling
In a large Dutch oven or deep pan, melt the butter over medium heat.
Add the onions, carrots, celery, and garlic, and sauté until fragrant and softened, about 8 minutes.
Season with salt and pepper to taste.
Stir in the flour to coat the vegetables evenly, then add the diced ham and combine.
Pour in the broth and milk, bringing the mixture to a boil before reducing to a simmer.
Cook until it reaches a thick, creamy consistency, about 5-7 minutes.
Mix in the peas, apple cider vinegar, and fresh herbs.
Taste and adjust the seasoning if necessary.
Remove from heat and allow the filling to cool while you prepare the crust.
Step 3: Prepare and Blind Bake the Bottom Crust (Optional)
Preheat the oven to 375°F.
Roll out one disk of dough on a lightly floured surface into a large circle, about 12 inches in diameter, and carefully transfer it to a 9-inch pie dish.
For a partially blind-baked crust, freeze the dough in the dish for 15-30 minutes to solidify the fat, minimizing shrinkage.
Line the crust with parchment paper and fill it with pie weights to keep the edges from sagging.
Bake the pie crust for about 15-20 minutes until the edges are set and lightly brown.
Remove from the oven and cool slightly.
Step 4: Assemble and Seal the Pie
Place the cooled filling into the prepared pie crust.
Roll out the second disk of dough on a floured surface and lay it carefully over the filling.
Trim excess dough and fold the ends under the bottom crust, crimping the two together to seal.
Use a small knife to cut a few slits in the center of the top crust to allow steam to escape during baking.
Step 5: Bake and Serve
Brush the top crust and edges with a beaten egg using a pastry brush.
Bake the pie for 35-40 minutes, or until the crust is golden brown.
Use foil or a pie crust shield as needed to prevent the edges from over-browning.
Allow the pie to rest for at least 15 minutes before slicing and serving to ensure it holds together well.
