Hey there! If you ask me, watermelon cake pops are such a fun twist on regular cake pops.
These sweet little treats combine the classic cake pop we all know with fresh watermelon flavor that’s perfect for summer parties and backyard gatherings. The pink and green colors naturally mimic the look of tiny watermelons, making them as cute as they are tasty.
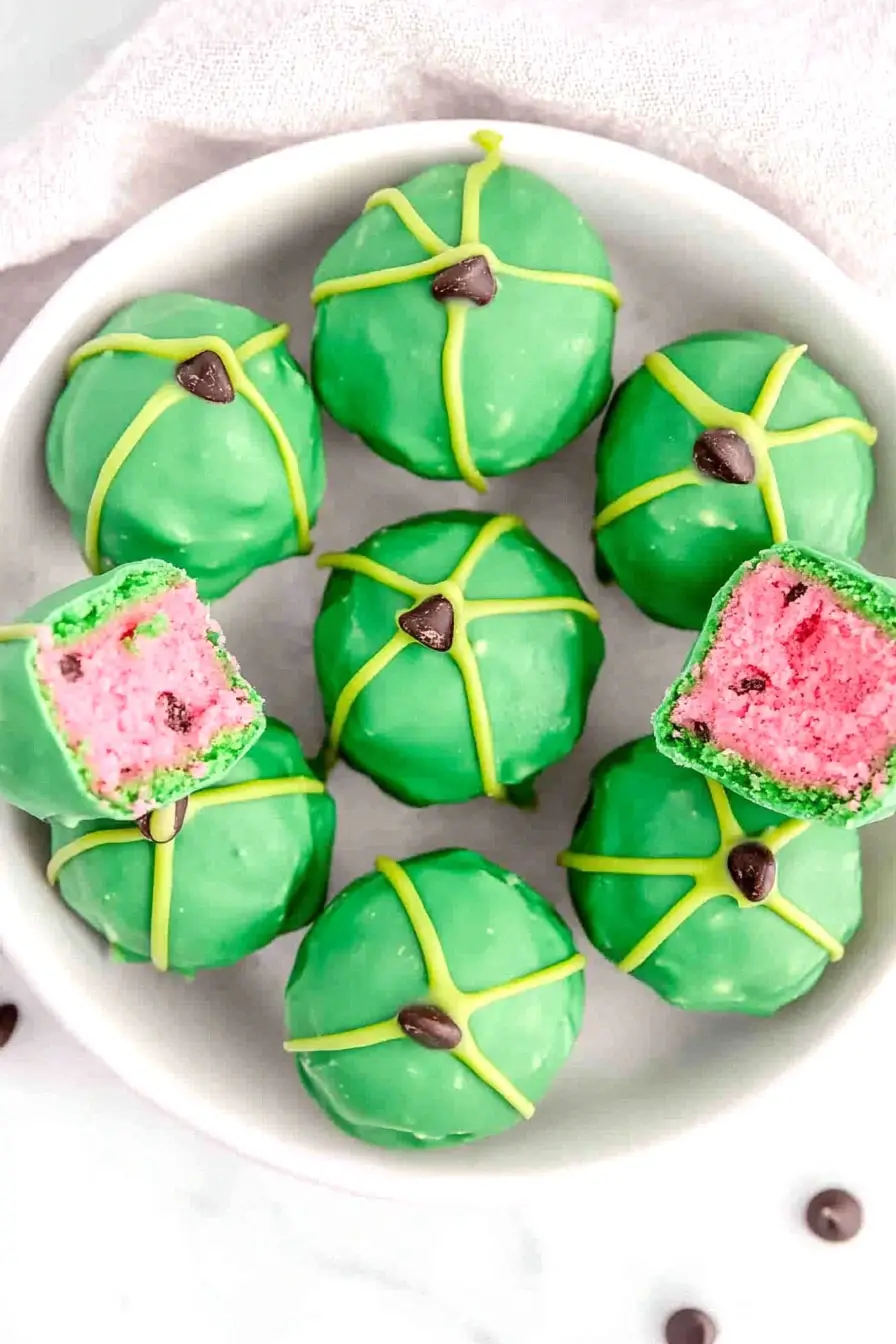
I make these with real watermelon flavoring mixed into the cake base, and coat them in colored candy melts to get that classic watermelon look. A sprinkle of mini chocolate chips creates those familiar “seeds” we all remember from childhood.
They’re the kind of dessert that makes people smile when they see them, and they’re just right for hot summer days when you want something sweet but light.

Why You’ll Love These Watermelon Cake Pops
- Fun summer project – These adorable cake pops are perfect for summer parties, picnics, or just a fun baking activity with kids – they’ll love helping to decorate them!
- Simple ingredients – Using basic items like cake mix and frosting means you don’t need to hunt down any special ingredients – most can be found at your regular grocery store.
- Make-ahead friendly – You can make these cute treats a few days before your event and store them in the fridge, making party prep so much easier.
- No special skills needed – Even if you’re new to cake pops, this recipe is totally doable – the watermelon design is actually easier to create than you might think!
What Kind of Cake Mix Should I Use?
For these watermelon cake pops, starting with a strawberry cake mix creates the perfect pink base that mimics real watermelon flesh. While the recipe calls for strawberry flavor, you could also use a white or vanilla cake mix and add extra pink food coloring to achieve the same visual effect. Box mixes work great for cake pops because they tend to be more moist and easier to roll into balls than scratch-made cakes. Just make sure to pick a brand you trust – most major brands like Betty Crocker, Duncan Hines, or Pillsbury will give you consistent results. If your cake mix comes with a pouch of strawberry flavoring, go ahead and use it for extra fruity taste.
Options for Substitutions
Making these cute cake pops but missing some ingredients? Here are some handy swaps you can try:
- Strawberry Cake mix: You can use vanilla cake mix plus 3 tablespoons strawberry gelatin powder for a similar flavor. Or try white cake mix with 1 teaspoon strawberry extract and a few drops of pink food coloring.
- Pink frosting: No pink frosting? Mix vanilla frosting with a few drops of pink food coloring. You can also make your own by beating 1 stick of butter with 2 cups powdered sugar and pink coloring.
- Chocolate chips: Regular chocolate chips work fine when chopped smaller, or you can use mini dark chocolate chips or even finely chopped chocolate bars.
- Green candy melts: If you can’t find dark green candy melts, use white candy melts and add green candy coloring (not regular food coloring as it can make the chocolate seize up).
- Green candy drizzle: You can melt white candy melts and add green candy coloring, or use green frosting in a piping bag with a small tip for the drizzle effect.
- Pink food coloring: If you’re out of pink coloring, mix red and white food coloring, or use beetroot powder for a natural alternative (though the shade will be lighter).
Watch Out for These Mistakes While Making
The biggest challenge when making cake pops is getting the right consistency in your cake mixture – adding too much frosting will make them too soft to hold their shape, while too little will cause them to crumble when dipped. Start by mixing in small amounts of frosting until the mixture holds together like play-dough when rolled.
Temperature control is crucial – your melted candy coating should be warm but not hot, and your cake balls need to be thoroughly chilled (at least 2 hours in the fridge) before dipping, otherwise they’ll fall right off the stick.
Working too slowly with the candy coating can lead to frustration as it starts to harden – dip your cake pops one at a time, and if the coating begins to thicken, reheat it gently in 15-second intervals. For the cleanest watermelon design, let each color layer set completely before adding the next, and keep your work space cool to prevent the pops from becoming too soft.

What to Serve With Cake Pops?
These cute watermelon cake pops are perfect for summer parties and deserve some equally fun companions on your dessert table! A glass of cold milk or chocolate milk is always a hit with cake pops, especially for the kids. Since these are sweet treats, I like to balance them out with some fresh fruit – actual watermelon slices would be super cute and tie in with the theme perfectly. You can also serve them alongside other summer party favorites like pink lemonade or fruit punch to keep with the festive vibe.
Storage Instructions
Keep Fresh: These cute watermelon cake pops stay fresh in an airtight container at room temperature for up to 3 days. Place them in a single layer or carefully stack them with wax paper in between to prevent sticking. They’re perfect for making a day before your party!
Refrigerate: Pop these treats in the fridge in a sealed container, and they’ll stay good for up to a week. Just remember to let them sit at room temperature for about 15 minutes before serving – this helps the candy coating taste its best.
Freeze: Want to plan way ahead? These cake pops freeze really well for up to 2 months. Place them in a freezer-safe container with parchment paper between layers. When you’re ready to enjoy them, thaw them overnight in the fridge, then let them come to room temperature before serving.
| Preparation Time | 10-20 minutes |
| Cooking Time | 30-40 minutes |
| Total Time | 40-60 minutes |
| Level of Difficulty | Medium |
Estimated Nutrition
Estimated nutrition for the whole recipe (without optional ingredients):
- Calories: 1600-1800
- Protein: 10-15 g
- Fat: 60-70 g
- Carbohydrates: 250-270 g
Ingredients
For the cake:
- 1 package strawberry cake mix (I like Duncan Hines)
For the cake pop mixture:
- 1 container pink frosting
- 1/2 cup mini chocolate chips (for the watermelon ‘seeds’)
For the decoration:
- 1 pack dark green candy melts (for the watermelon rind)
- pink food coloring
- 1 pouch bright green candy drizzle (for rind stripes)
Step 1: Bake the Cake
Prepare the cake mix according to the package directions and pour the batter into a 9×13 cake pan.
Bake as instructed on the package.
Let the cake cool completely before moving onto the next step.
Step 2: Crumble and Mix
Once the cake is cooled, crumble it into a medium-sized bowl.
Add about half of a can of frosting to the crumbled cake, along with the chocolate chips.
Mix everything together until well combined, creating a moist, dough-like texture.
Step 3: Form Cake Balls
Using your hands, roll the cake mixture into small balls.
Aim for uniform size to ensure even coating and a pleasing appearance.
Set the formed balls aside on a tray for dipping.
Step 4: Dip the Cake Balls
Melt the dark green chocolate according to the package directions.
Once melted, dip each cake ball into the chocolate, ensuring they are fully covered.
Lay the dipped cake balls onto a sheet of parchment paper to dry and set the chocolate coating.
Step 5: Decorate and Finish
Melt the drizzle pouch, following the package directions.
Using the melted drizzle, pipe thin lines around each cake ball to mimic the appearance of a watermelon design.
Allow the drizzle to dry completely before serving.
Step 6: Serve and Enjoy
Once the chocolate and decorative drizzle have set, your watermelon-themed cake balls are ready to be served.
Enjoy your fun and tasty treats!
