I never thought I’d be able to make a dessert that looked like it came from a fancy restaurant until I tried this white chocolate mousse dome. Growing up, my desserts were mostly box-mix cakes and store-bought cookies. When my friend showed me how to make this, I was sure I’d mess it up.
Turns out, making a mousse dome isn’t as complicated as it looks. The trick is having the right mold and being patient with the chilling time. While it might seem like something only professional pastry chefs can pull off, I promise you’ll be surprised at how manageable it really is.
Why You’ll Love This White Chocolate Mousse Dome
- Show-stopping presentation – These elegant white chocolate domes look like they came from a fancy pastry shop, making them perfect for special occasions or when you want to impress your guests.
- Make-ahead friendly – You can prepare these domes a day or two in advance, which means less stress when you’re planning a dinner party or special event.
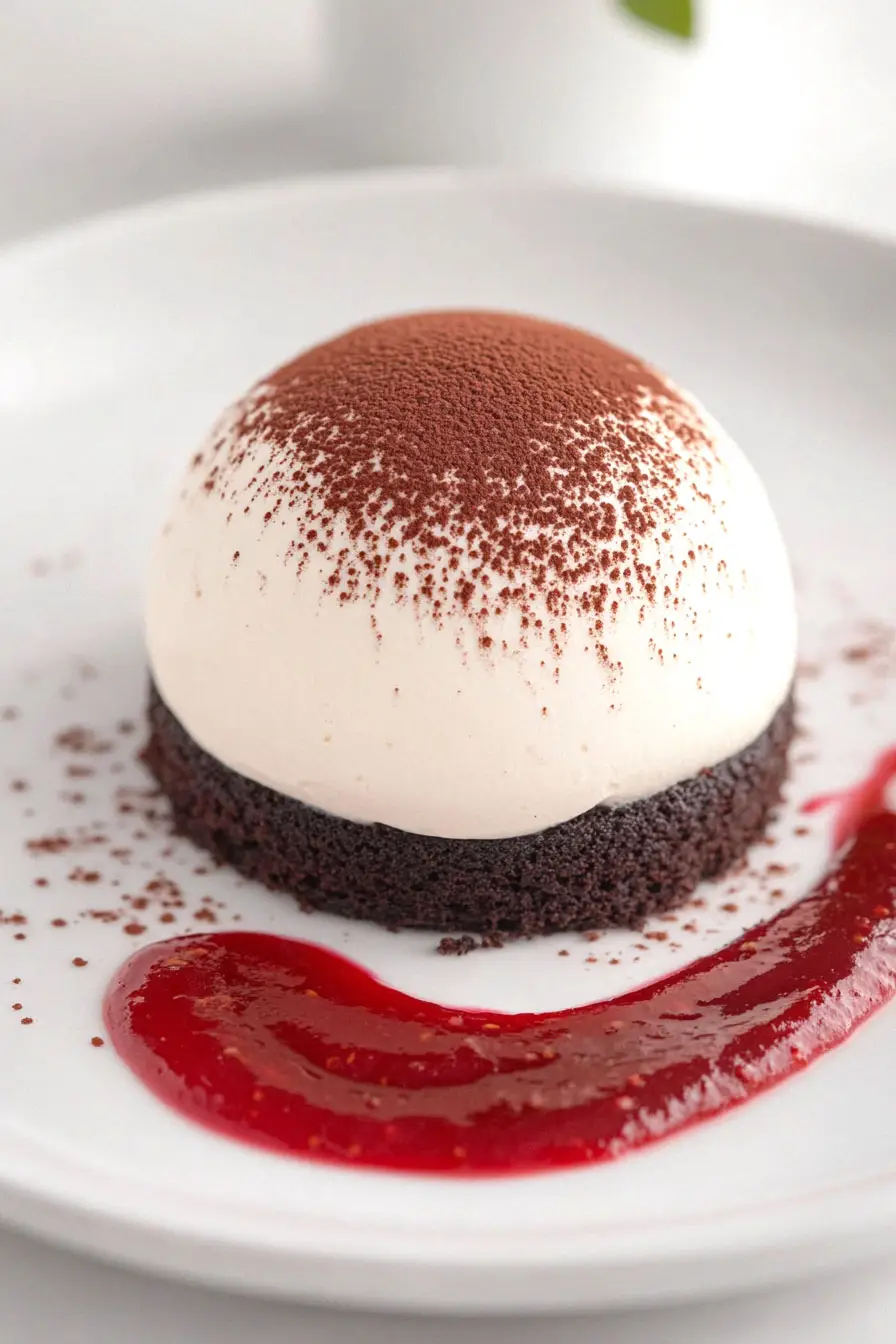
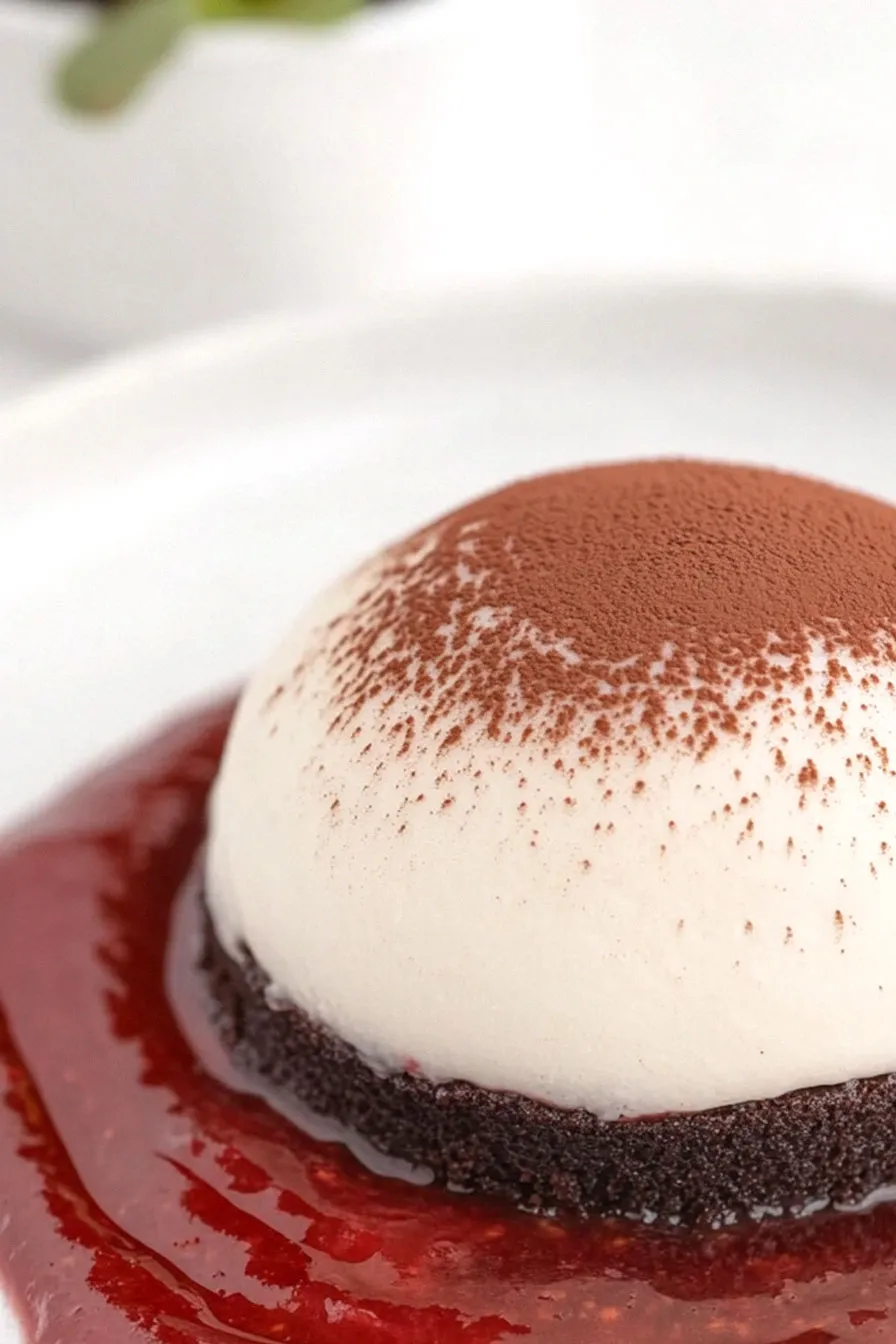
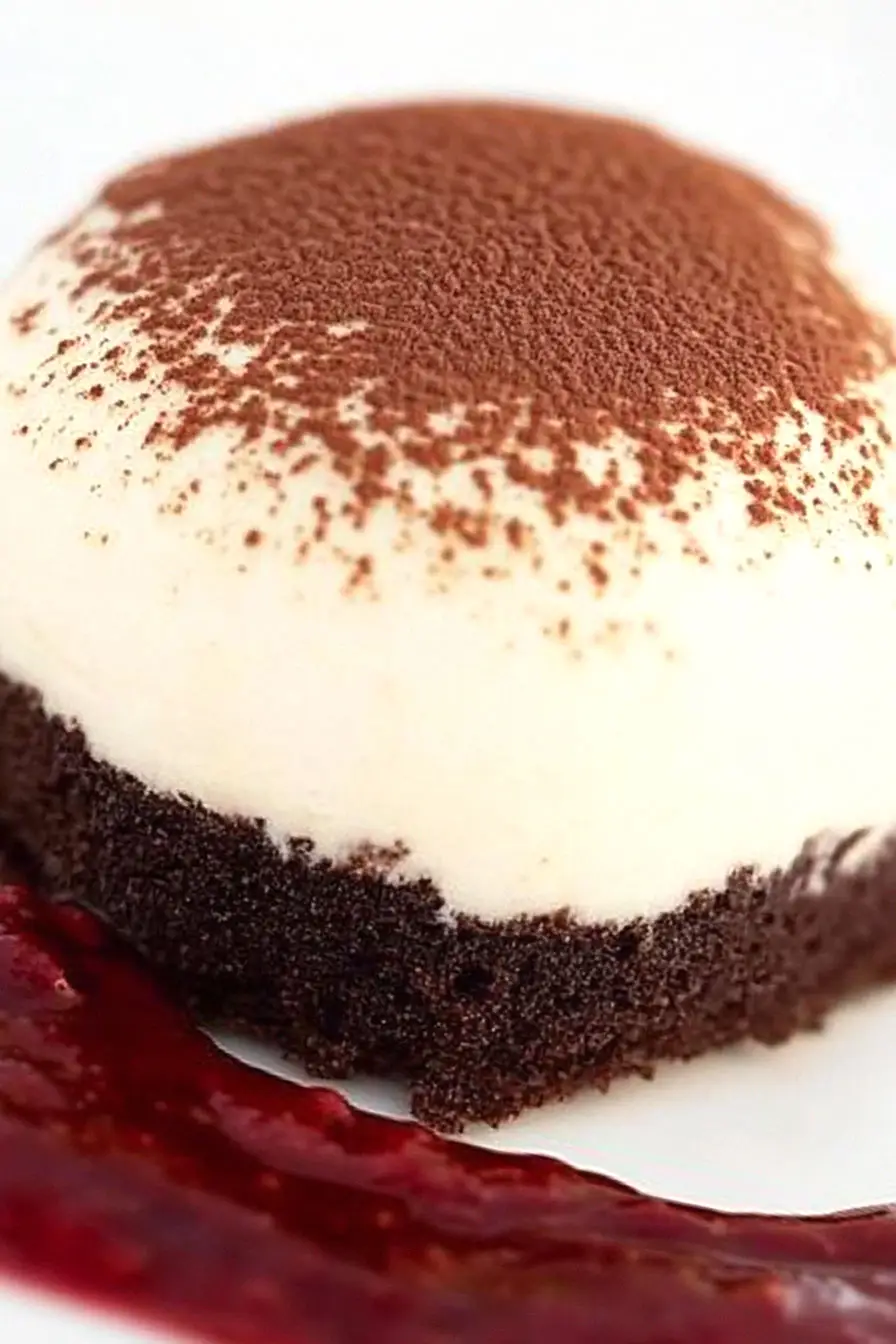
- Perfect flavor combination – The rich white chocolate mousse pairs beautifully with the tart raspberry center and chocolate cake base, creating a balanced dessert that’s not too sweet.
- Customizable components – While this recipe uses raspberries, you can switch up the fruit filling or cake flavor to create your own unique variation – strawberries or blackberries work great too!
What Kind of White Chocolate Should I Use?
For a mousse dome, you’ll want to use real white chocolate that contains cocoa butter, not the candy coating or “white baking chips” that are made with palm oil. Check the ingredient list – if cocoa butter isn’t listed as one of the first ingredients, keep looking. Good quality white chocolate brands like Callebaut, Valrhona, or even Ghirardelli will melt smoothly and give your mousse a rich, creamy texture. If you’re buying from the grocery store, look for bars rather than chips, as they typically have a better cocoa butter content. Just remember that white chocolate can be a bit tricky to melt – use gentle heat and stir frequently to avoid scorching.
Options for Substitutions
While some ingredients are essential for this elegant dessert, there are several substitutions you can try:
- White chocolate: For both the shells and mousse, you’ll need to stick with white chocolate – milk or dark chocolate won’t give you the same look or texture. Just make sure to use real white chocolate with cocoa butter, not candy melts.
- Buttermilk: No buttermilk? Make your own by adding 1 tablespoon of lemon juice or white vinegar to regular milk and letting it sit for 5 minutes.
- Gelatin: If you need a vegetarian option, you can use agar agar powder instead of gelatin. Use the same amount but be sure to bring the mixture to a boil to activate it.
- Frozen raspberries: Fresh raspberries work just as well for the sauce, and you can try other berries like strawberries or blackberries for a different flavor profile. For the center filling, stick with frozen fruit as it helps maintain the dome structure.
- Heavy cream: The cream in this recipe needs to be full-fat heavy cream (35-40% fat) for proper whipping. Lower fat alternatives won’t work for the mousse structure.
Watch Out for These Mistakes While Making
The trickiest part of making white chocolate mousse domes is temperature control – if your white chocolate is too hot when folding in the whipped cream, it will deflate and lose its airy texture, so let it cool to just barely warm before combining. Working with tempered chocolate for the shells requires precision – if the chocolate is too warm (above 89°F) or too cold (below 84°F), your shells won’t have that perfect snap and shine. Another common mistake is unmolding the domes too early – make sure they’re completely frozen solid (at least 6 hours, preferably overnight) before attempting to remove them from the molds, or you’ll end up with collapsed domes. For the smoothest mousse texture, always strain your melted chocolate mixture before folding in the whipped cream to remove any tiny lumps, and when assembling, work quickly with the frozen components to prevent melting.
What to Serve With White Chocolate Mousse Dome?
This elegant dessert pairs wonderfully with a few simple accompaniments that complement its rich, creamy texture. A small cup of strong espresso or French press coffee helps balance the sweetness of the white chocolate and adds a nice temperature contrast to the chilled mousse. If you’re feeling fancy, try serving it with a few fresh berries scattered around the plate – strawberries, blackberries, or additional fresh raspberries work great since they echo the raspberry filling. For an extra special touch, a small scoop of vanilla bean ice cream on the side creates a nice play of temperatures and textures that your guests will love.
Storage Instructions
Keep Cool: These white chocolate mousse domes need to stay chilled! Place them in an airtight container in the fridge, where they’ll stay fresh for up to 3 days. The mousse keeps its shape best when it stays cold, so try to minimize the time they spend at room temperature.
Freeze: Good news – these domes freeze really well! Place them in a freezer-safe container and they’ll keep for up to 1 month. Just remember to leave some space between each dome to prevent them from sticking together. When you’re ready to serve, move them to the fridge the night before.
Make Ahead: You can prepare these domes a couple of days before your special event. Make all the components and assemble them, then keep them in the fridge until you’re ready to serve. The raspberry sauce can be made up to a week ahead and stored separately in an airtight container in the fridge.
| Preparation Time | 40-60 minutes |
| Cooking Time | 15-20 minutes |
| Total Time | 4 hours 55 minutes – 5 hours 20 minutes |
| Level of Difficulty | Medium |
Estimated Nutrition
Estimated nutrition for the whole recipe (without optional ingredients):
- Calories: 3500-4000
- Protein: 50-60 g
- Fat: 200-220 g
- Carbohydrates: 500-550 g
Ingredients
For the shells:
- 4 oz white chocolate (melted and tempered, I recommend Valrhona for this)
For the cake:
- 10 oz granulated sugar
- 8.25 oz all-purpose flour
- 1/2 tsp salt
- 2 oz cocoa powder (Dutch-processed for a darker color)
- 2 eggs
- 8.5 oz buttermilk
- 1/2 tsp baking powder
- 8 oz butter (unsalted, at room temperature)
- 1/2 tsp baking soda
- 3 egg yolks
For the mousse:
- 1 tsp gelatin (unflavored powdered gelatin)
- 2 oz cream
- 2 egg yolks
- 5.25 oz white chocolate (high-quality couverture chocolate works best)
- a pinch of salt
- 6 oz cream (whipped to soft peaks and chilled, use heavy cream)
- frozen raspberries
- 2 tbsp water
For the raspberry sauce:
- 16 oz frozen raspberries
- 4 oz sugar
Step 1: Prepare the Molds
Begin by placing the dome mold sheet onto a sheet pan for stability.
Use a pastry brush to evenly paint melted, tempered chocolate on the surface of each mold cavity, making sure the chocolate goes straight to the edges.
Once finished, place the molds into the fridge to allow the chocolate to set.
Step 2: Prepare the Cake
Preheat your oven to 350°F (180°C).
Prepare a rimmed baking sheet by making an X with butter on its surface, then lining it with parchment paper.
In the bowl of a stand mixer fitted with a paddle attachment, cream butter and sugar together on high speed until the mixture is light and fluffy, making sure to scrape down the sides of the bowl periodically.
Add eggs and yolks one at a time, mixing well after each addition.
Sift the dry ingredients together.
Turn the mixer down to low speed and add half of the dry ingredients, followed by half the buttermilk.
Mix until just incorporated, then add the rest of the dry ingredients and buttermilk.
Finish mixing by hand with a large rubber spatula.
Pour the batter into the prepared pan and spread it evenly with an offset spatula.
Bake for 15 to 20 minutes, rotating halfway through, until a tester inserted into the center comes out clean and the cake begins to pull away from the sides of the pan.
Allow the cake to cool for 15 minutes in the pan, then run a paring knife around the edges.
Place a piece of parchment on top of the cake, followed by an inverted sheet pan, then turn the cake upside down.
Gently peel back the top parchment and allow the cake to rest for 10 minutes before using a round cutter to punch out circles the same size as the mold cavities.
Step 3: Prepare the Mousse
In a large bowl set over simmering water, melt white chocolate gently.
Gradually add 2 ounces of cream, stirring until the mixture becomes smooth and warm to the touch.
Melt bloomed gelatin in the microwave, checking every 15 seconds, and stir it into the chocolate mixture.
In a separate bowl, whisk together egg yolks and salt, then gradually incorporate them into the chocolate mixture.
Continue whisking over the double boiler for 1 minute, then remove from heat and place in the fridge to cool to room temperature (the mixture should be neither warm nor cold, about 20 minutes).
Whisk the firmed chocolate mixture to smooth it out, then stir 1/4 of the chilled whipped cream into the chocolate mixture to lighten it.
Gently fold in the remaining cream.
Step 4: Assemble the Bombes
Transfer the mousse into a piping bag and pipe it into each chilled chocolate mold, taking care to fill just to the top.
Place a raspberry or two into each bombe and smooth the mousse over the top.
Place a circle of cake over each mold and gently press it into the mousse.
Set the sheet pan with molds in the freezer for at least 4 hours to set completely.
Step 5: Make the Sauce
In a saucepan over low heat, combine frozen raspberries and sugar, stirring occasionally.
As the raspberries melt, help break them up by stirring.
Once the mixture begins to simmer, remove from heat.
Press the fruit pulp and juice through a fine-mesh strainer to remove the seeds, then chill the sauce.
Step 6: Serve the Bombes
On each plate, place a tablespoon of sauce and create a design by dragging the back of a spoon through the sauce.
Gently loosen the edges of each bombe, then carefully turn each mold cavity inside out to unmold them.
Allow the bombes to sit for 20 minutes to let the cake thaw before placing them onto the prepared plates.
Serve and enjoy your beautifully crafted bombes.
