Let’s be honest – who doesn’t miss crispy onion rings when doing Whole30? I used to think I’d have to say goodbye to this classic side dish forever when eating clean. But after a lot of trial and error in my kitchen, I figured out how to make onion rings that are actually Whole30 compliant.
These onion rings have become a regular weekend treat at our house. They’re perfect when you’re craving something crunchy but want to stick to your healthy eating goals. I love that I can make these without feeling like I’m missing out on the real thing. And the best part? My family can’t even tell the difference between these and the traditional version.
If you’ve been avoiding onion rings because they don’t fit your Whole30 lifestyle, this recipe is going to make your day. Trust me, once you try these, you’ll want to keep the recipe handy even after your Whole30 is done.
Why You’ll Love These Onion Rings
- Diet-friendly – These onion rings are completely Whole30 and paleo compliant, plus they’re naturally gluten-free and dairy-free, making them perfect for anyone with dietary restrictions.
- Quick preparation – Ready in just 20-35 minutes, these onion rings are perfect for when you’re craving a quick snack or side dish without spending hours in the kitchen.
- Simple ingredients – Made with basic pantry staples like almond flour and coconut milk, you won’t need to hunt down any special ingredients at specialty stores.
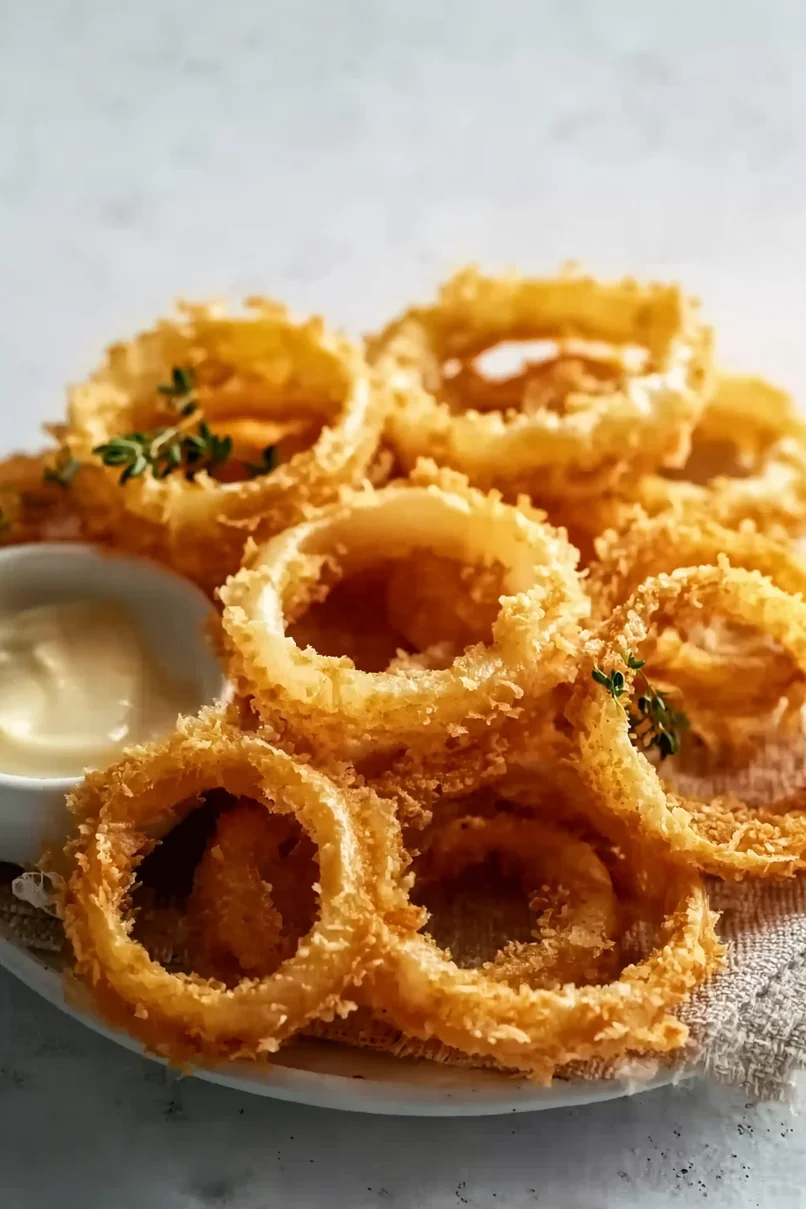
- Healthier alternative – Get all the crunch and flavor of traditional onion rings without the heavy breading and deep frying – these are made with clean ingredients and just a light spray of avocado oil.
What Kind of Onion Should I Use?
For onion rings, sweet white onions are your best bet since they have a milder, less sharp flavor that caramelizes beautifully when cooked. While the recipe calls for white onions, you could also use Vidalia or Walla Walla onions, which are even sweeter and make fantastic onion rings. When picking your onion, look for one that’s firm and heavy for its size, with no soft spots or sprouting. To get the best rings, slice your onion into thick rounds (about 1/2 inch) and carefully separate the rings – the outer layers usually make the biggest, most impressive rings, while the inner rings are perfect for snacking.

Options for Substitutions
Need to make some swaps? Here are some helpful substitutions that keep this recipe Whole30 compliant:
- Almond flour: If you can’t use almond flour, try cashew flour as a 1:1 replacement. Just avoid coconut flour as it absorbs too much moisture and won’t give you the same crispy coating.
- Tapioca/arrowroot powder: These starches are pretty interchangeable – use whichever you have on hand. Cassava flour can also work in the same amount.
- Coconut milk: Make sure to use full-fat canned coconut milk. If you need to substitute, cashew cream (1 cup soaked cashews blended with 1/2 cup water) works well too.
- Avocado oil spray: Regular avocado oil, olive oil, or coconut oil spray all work fine here. Just make sure whatever you choose is Whole30 compliant.
- White onion: Yellow or sweet onions work just as well. Red onions can be used too, though they might have a stronger flavor.
Watch Out for These Mistakes While Cooking
The biggest challenge when making grain-free onion rings is achieving that perfectly crispy coating without traditional breadcrumbs – the key is to make sure your onion slices are completely dry before coating them, as any moisture will prevent the breading from sticking properly. A common mistake is not double-dipping your onion rings (first in coconut milk mixture, then coating, then repeat) which helps create a thicker, more satisfying crust that won’t fall off during cooking. Temperature control is crucial when air-frying or baking these rings – too high heat will burn the almond flour coating before the onions can become tender, so stick to a moderate temperature around 375°F and flip them halfway through cooking. For best results, avoid overcrowding your cooking surface and spray the rings generously with avocado oil before cooking – this helps achieve that golden-brown color and crispy texture you’re looking for.

What to Serve With Onion Rings?
These Whole30 onion rings make a fantastic side dish or snack, and they pair really well with burgers made with lettuce wraps instead of buns to keep things Whole30 compliant. A simple garlic aioli made with compliant mayo is perfect for dipping – just mix in some minced garlic, lemon juice, and herbs. If you’re serving these as part of a bigger meal, try them alongside grilled chicken or fish with a fresh side salad dressed in olive oil and lemon juice. They’re also great with other finger foods like buffalo cauliflower wings or sweet potato fries if you’re putting together a party platter.
Storage Instructions
Keep Fresh: These onion rings are best enjoyed right after cooking when they’re hot and crispy! If you have leftovers, keep them in an airtight container in the fridge for up to 2 days. Just know that they might lose some of their crunchiness due to the moisture from the coconut milk coating.
Crisp Up: Want to bring back some crunch to your leftover onion rings? Place them on a baking sheet and pop them in the oven at 350°F for about 5-7 minutes. The air fryer works great too – just 2-3 minutes at 350°F will do the trick. They won’t be exactly like fresh-made, but they’ll still be pretty good!
Prep Ahead: If you’re planning ahead, you can slice your onions and mix your dry coating ingredients up to 2 days in advance. Store the sliced onions in an airtight container in the fridge, and keep the dry mixture in a sealed container at room temperature. This makes assembly much quicker when you’re ready to cook!
| Preparation Time | 10-15 minutes |
| Cooking Time | 10-20 minutes |
| Total Time | 20-35 minutes |
| Level of Difficulty | Easy |
Estimated Nutrition
Estimated nutrition for the whole recipe (without optional ingredients):
- Calories: 900-1000
- Protein: 10-15 g
- Fat: 60-70 g
- Carbohydrates: 80-90 g
Ingredients
For the dry coating:
- 1/2 tsp paprika
- 1/2 cup almond flour (I use Bob’s Red Mill super-fine almond flour for best texture)
- 1 tsp garlic seasoning
- 1 tsp onion seasoning
- 1/2 cup tapioca powder
For the wet coating:
- 1 tsp lemon juice
- 1 cup coconut milk (full-fat is essential for a rich coating)
For the main dish:
- avocado oil spray (for easy and even coating)
- 1 large white onion (sliced into 1/2-inch rings)
Step 1: Preheat Air Fryer or Oven
Start by preheating your air fryer or oven to 400 degrees Fahrenheit.
This ensures it’s at the right temperature when you’re ready to cook your onion rings.
Step 2: Prepare the Onion
Slice an onion into rings and set them aside.
This will help them be ready when you start the coating process.
Step 3: Prepare the Coating Mixtures
In a shallow bowl, combine almond flour, tapioca flour, garlic powder, onion powder, and paprika.
Stir until the ingredients are well blended.
In a separate shallow bowl, mix together coconut cream and lemon juice to create your wet mixture.
Step 4: Prepare the Baking Sheet
Prepare your baking sheet by spraying it with avocado oil spray.
If using an oven, line the baking sheet with parchment paper to prevent sticking and ensure even baking.
Step 5: Coat the Onion Rings
Begin the coating process by dipping each onion ring into the flour mixture, then into the wet coconut cream mixture.
Dip the ring back into the flour mixture to ensure a good coating.
Place each coated ring onto the prepared baking sheet.
Repeat this process for all the onion rings.
Step 6: Cook the Onion Rings
Place the prepared onion rings in the air fryer or oven.
Cook for 10 minutes.
Check for crispiness on the outside; if they are crispy to your liking, remove them.
If not, continue air frying or baking until they reach the desired crispiness.
Step 7: Serve and Enjoy
Once the onion rings are crispy, remove them from the oven or air fryer.
Serve immediately with Whole30 Garlic Aioli or your desired sauce for dipping.
Enjoy your homemade crispy onion rings!
