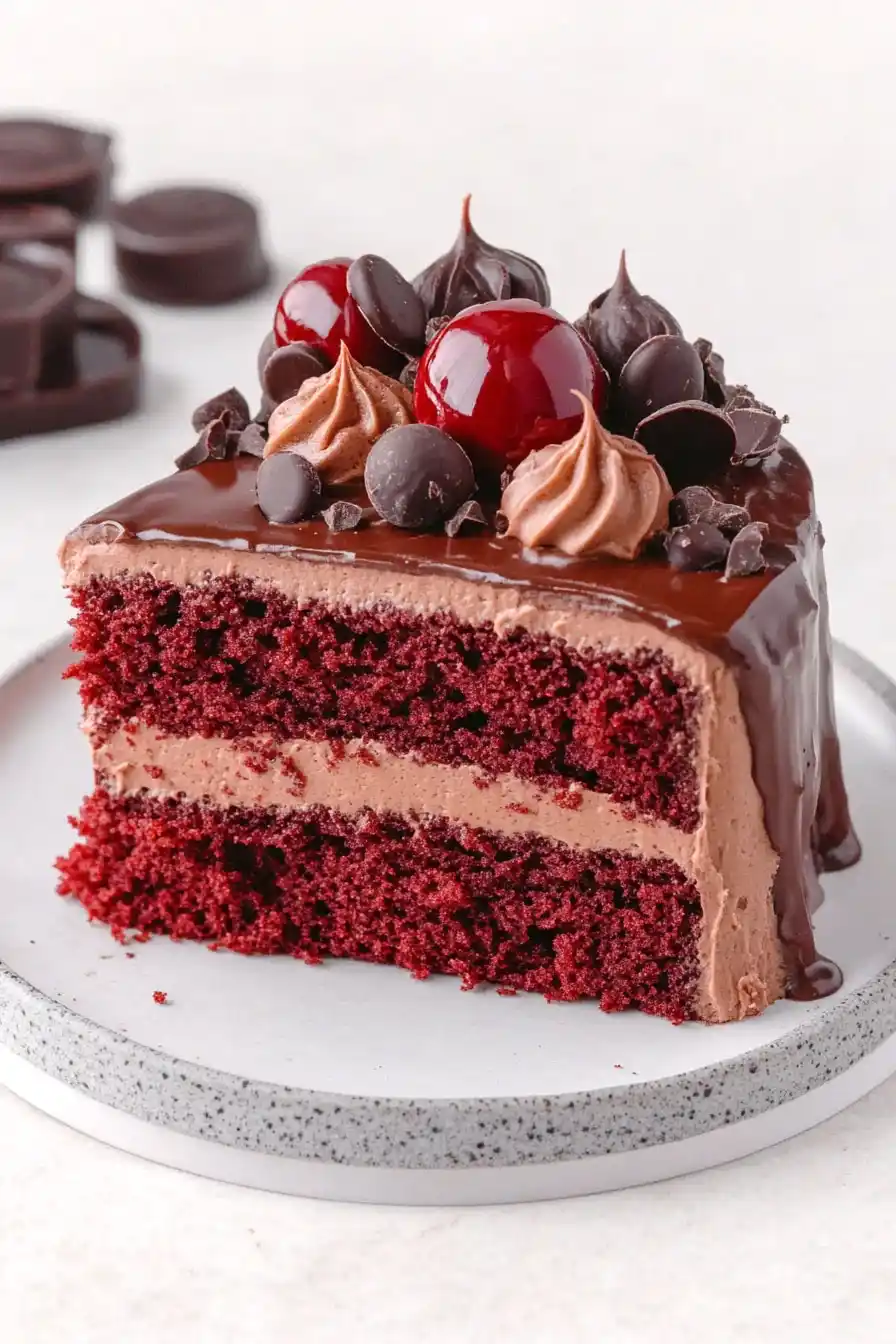
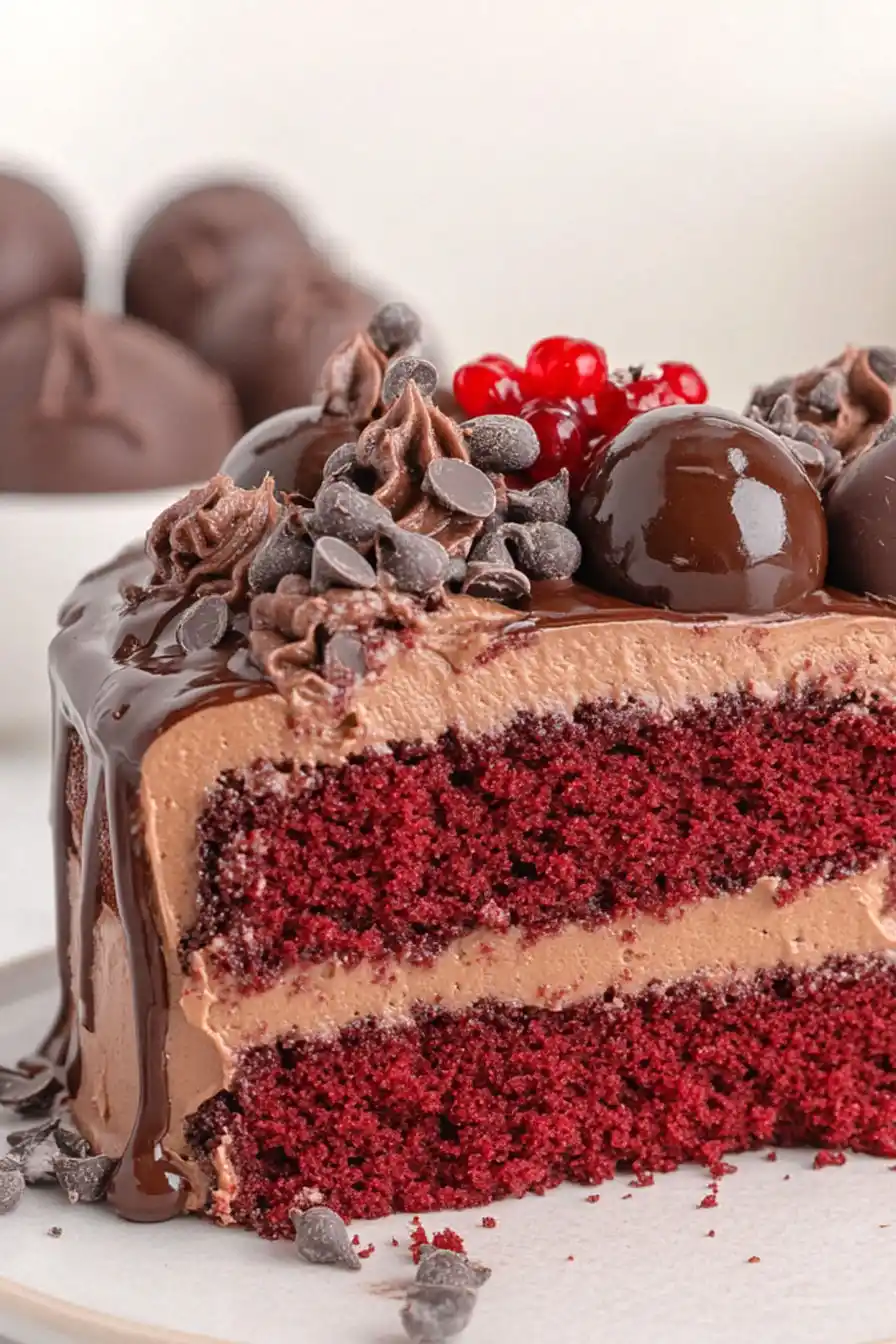
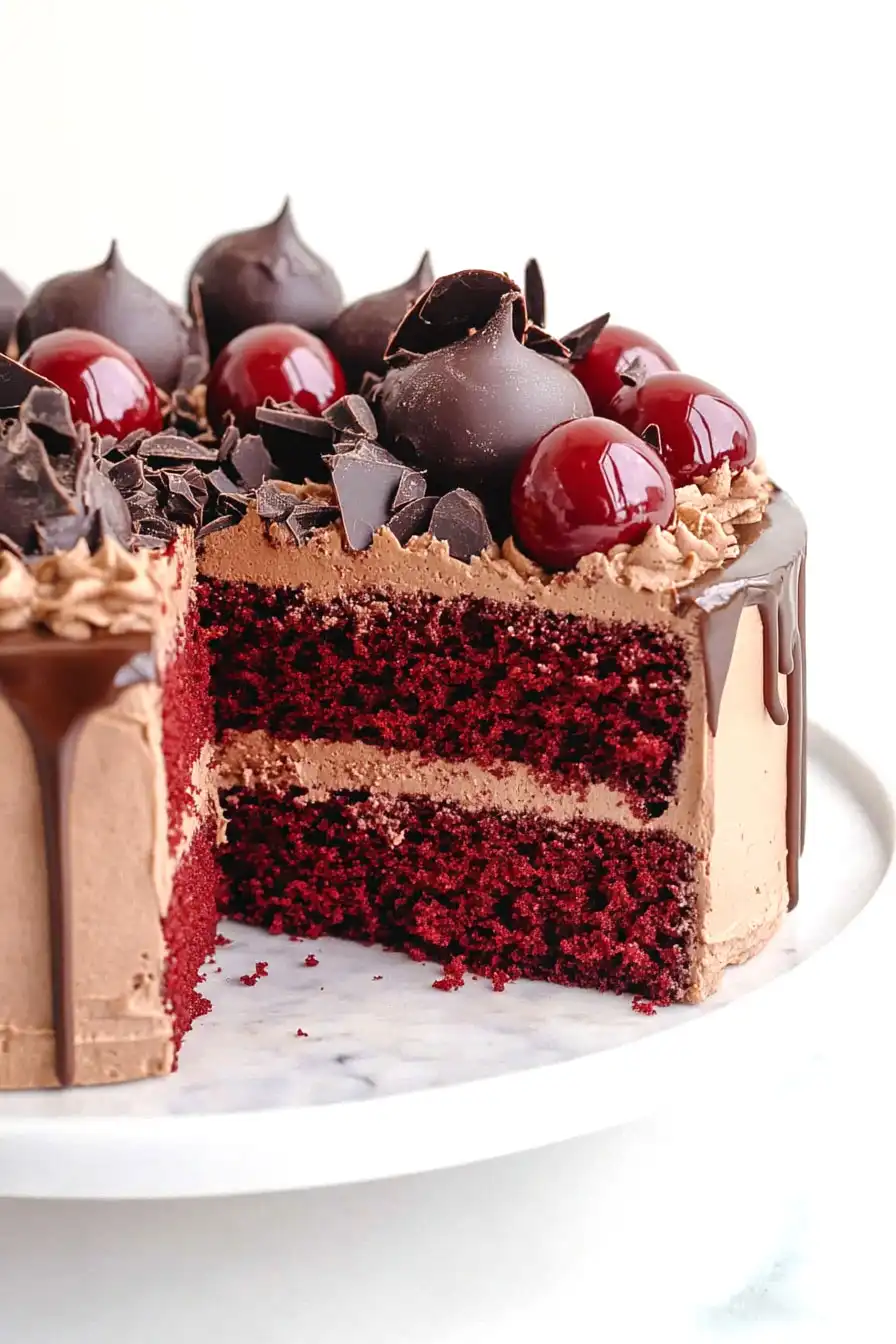
Red velvet cake has been a favorite in my house for as long as I can remember. There’s something special about that rich red color and the way chocolate frosting pairs perfectly with each slice. I started making this cake years ago when my kids begged for something “different” for their birthdays, and it’s been our go-to celebration cake ever since.
If you’ve never tried making red velvet cake before, don’t worry – it’s simpler than you might think. I remember being nervous the first time I made it, but now it’s as easy as any other cake recipe in my collection. The real magic happens when you add that final layer of chocolate frosting and watch everyone’s eyes light up at the table.
Want to know the best part? This recipe is pretty forgiving. Whether you’re baking for a birthday, holiday, or just because it’s Wednesday, this red velvet cake hits all the right notes. And trust me, once you make it once, your family will be asking for it again and again.
Why You’ll Love This Red Velvet Cake
- Rich chocolate flavor – This cake combines cocoa powder and dark chocolate in both the cake and frosting, creating deep chocolate notes that perfectly balance the classic red velvet taste.
- Moist texture – The combination of Greek yogurt and butter ensures a perfectly moist cake that stays fresh for days – no dry cake here!
- Make-ahead friendly – You can bake the layers a day ahead and frost when ready, making it perfect for party planning or special occasions.
- Show-stopping appearance – With its deep red color and chocolate decorations, this cake makes a beautiful centerpiece for any celebration without requiring advanced decorating skills.
What Kind of Cocoa Powder Should I Use?
For red velvet cake, natural unsweetened cocoa powder is your best bet. Dutch-processed cocoa powder can affect how the cake rises since it’s been treated to neutralize its acidity – and in this recipe, we want that natural acidity to react with the baking soda. Regular unsweetened cocoa powder will give you that classic, subtle chocolate flavor that red velvet cake is known for, without overwhelming the other flavors. Just make sure your cocoa powder is fresh and hasn’t been sitting in your pantry for too long, as it can lose its punch over time.
Options for Substitutions
Let’s talk about how you can adjust this red velvet cake recipe if you’re missing some ingredients:
- Greek yogurt: You can replace Greek yogurt with sour cream in equal amounts, or use buttermilk (increase to 1 1/4 cups) for a similar tangy taste.
- Red food coloring: If you prefer natural alternatives, try 2 tablespoons of beetroot powder mixed with 2 tablespoons of water. The color won’t be as bright, but it works! Just note that natural coloring might slightly affect the taste.
- Caster sugar: Regular granulated sugar works perfectly fine. If you only have powdered sugar, use 1 3/4 cups instead.
- Dark chocolate: For the frosting, you can use milk chocolate or semi-sweet chocolate chips instead. Keep in mind that milk chocolate will make the frosting sweeter.
- Heavy cream: For the ganache, you can use half-and-half, but the texture will be slightly thinner. If using half-and-half, reduce the amount to 2/3 cup.
- Decorations: The malt balls and chocolate biscuits are optional – feel free to use any chocolate candy, fresh berries, or simply leave the cake with just the frosting.
- White vinegar: Apple cider vinegar or lemon juice can be used instead – you need the acidity to react with the baking soda.
Watch Out for These Mistakes While Baking
The secret to a perfectly moist red velvet cake lies in the temperature of your ingredients – cold eggs or butter can lead to a dense, uneven texture, so make sure all refrigerated items reach room temperature before mixing. A common mistake bakers make is overmixing the batter once the flour is added, which develops too much gluten and results in a tough cake – instead, fold the dry ingredients gently until just combined. When it comes to achieving that signature red color, don’t skimp on the food coloring, but be careful not to add too much liquid as it can throw off the cake’s moisture balance – stick to gel food coloring if possible. For the chocolate frosting, rushing the cooling process can lead to a runny mess, so make sure your cake layers are completely cool before frosting, and if your frosting becomes too soft while working, pop it in the fridge for 15-20 minutes to firm up.
What to Serve With Red Velvet Cake?
Red velvet cake is rich and decadent on its own, so I like to keep the accompaniments simple and complementary. A scoop of good vanilla ice cream or a dollop of fresh whipped cream makes this cake even more special – the cool, creamy texture plays really nicely with the cake’s chocolatey notes. For drinks, try serving it with a hot cup of coffee or tea to balance out the sweetness, or even a cold glass of milk for that classic cake-and-milk combo. If you’re feeling fancy, you could also add some fresh berries on the side – strawberries or raspberries work particularly well with the chocolate frosting.
Storage Instructions
Counter Storage: Your red velvet cake will stay fresh at room temperature for up to 2 days when stored under a cake dome or in an airtight container. If your kitchen is warm, it’s better to pop it in the fridge to keep the chocolate frosting from getting too soft.
Refrigerate: This cake keeps really well in the fridge for up to 5 days. Just place it in a covered container to prevent it from absorbing any fridge smells. The chocolate frosting will firm up nicely in the cold, which some people actually prefer!
Freeze: You can freeze unfrosted cake layers wrapped well in plastic wrap and foil for up to 3 months. For frosted cake, freeze individual slices on a baking sheet until firm, then wrap each piece well – they’ll keep for about 2 months.
Serve: When you’re ready to enjoy refrigerated or frozen cake, let it sit at room temperature for about 30 minutes before serving. This allows the cake to soften and the frosting to reach the perfect consistency. Trust me, it’s worth the wait!
| Preparation Time | 30-45 minutes |
| Cooking Time | 30-40 minutes |
| Total Time | 60-85 minutes |
| Level of Difficulty | Medium |
Estimated Nutrition
Estimated nutrition for the whole recipe (without optional ingredients):
- Calories: 5000-5500
- Protein: 50-60 g
- Fat: 300-350 g
- Carbohydrates: 650-700 g
Ingredients
For the cake:
- 1 tsp baking soda
- 1.5 cups granulated sugar
- 0.75 oz cocoa powder (natural unsweetened for classic red color)
- 4 large eggs
- 2.5 cups all-purpose flour
- 2 tsp white vinegar
- 2 tsp vanilla essence (pure vanilla extract preferred)
- 1 cup full-fat greek yogurt
- 4 tsp red food coloring (gel food coloring for vibrant red)
- 0.25 cup whole milk
- 1 cup butter (softened or at room temperature)
For the chocolate buttercream frosting:
- 5 cups powdered sugar (sifted to prevent lumps)
- 0.25 cup whole milk
- 1 cup softened butter (unsalted, at room temperature)
- 1 cup dark chocolate (melted and cooled)
For the chocolate ganache:
- 0.75 cup heavy cream
- 1 cup dark chocolate pieces (good quality for best ganache)
For decoration:
- chocolate marshmallow biscuits
- chocolate malt balls
Step 1: Prepare the Cake Tins and Preheat the Oven
Preheat your oven to 180°C (350°F) for a standard oven or 160°C (320°F) for a fan-forced oven.
Grease and line two 8-inch round cake tins with baking or parchment paper to prevent sticking and ensure easy removal of the cakes once baked.
Step 2: Mix Dry Ingredients and Prepare Butter
In a large mixing bowl, sift together the flour, baking soda, and cocoa powder.
Add the sugar and give everything a good whisk to combine.
Meanwhile, melt the butter in the microwave in short bursts of 20 seconds, stirring in between until just melted.
Use a fork to eliminate any lumps for a smooth consistency.
Step 3: Blend Wet Ingredients and Combine with Dry Mixture
In a separate mixing bowl, whisk together the eggs, vanilla, and melted butter until smooth.
Stir in the Greek yogurt; it might look a bit lumpy but that’s okay.
In a small separate bowl, mix the food coloring and vinegar together.
Add the wet mixture to the dry ingredients, include the food coloring mix, and gently fold together.
Pour in 1/4 cup of milk, stirring until just combined.
Divide and spoon the mixture into the prepared cake tins.
Step 4: Bake the Cakes
Bake the cakes in the preheated oven for around 30 minutes or until a skewer inserted into the center comes out clean.
Once baked, set the cakes on a wire rack and leave to cool completely before frosting.
Step 5: Prepare the Chocolate Buttercream Frosting
For the frosting, beat the softened butter in a large mixing bowl with an electric mixer on medium speed until pale and creamy.
Melt the chocolate in the microwave stirring in 20-second intervals until just melted, then set aside to cool slightly.
Gradually beat in one cup of icing sugar and one tablespoon of milk at a time, mixing on low and then medium speed, until thick and creamy.
Blend in the melted chocolate until evenly mixed through.
Step 6: Assemble and Frost the Cake
Level the tops of the cooled cakes using a cake leveler or a serrated knife.
Place one cake on a turntable and frost the top, then layer the second cake on top and frost the sides and top for a smooth finish.
For a ‘naked cake’ appearance, use a cake scraper to remove excess buttercream from the sides.
Chill in the fridge while you prepare the ganache.
Step 7: Make the Chocolate Ganache
Finely chop the dark chocolate and place it in a heatproof bowl.
Heat the cream in a small saucepan over medium heat until it simmers just before boiling.
Pour the warm cream over the chocolate, cover the bowl with a plate, and let it sit for 3-5 minutes.
Whisk the mixture until smooth and creamy, then refrigerate for 5-10 minutes to thicken slightly.
Step 8: Decorate the Cake
Pour the ganache over the top of the frosted cake, using a small spatula to gently push drips over the sides for effect.
Allow the ganache to set slightly.
Before serving, use a piping bag with a large star tip to add dollops of the reserved chocolate buttercream on top.
Finish by adding chocolate marshmallow cookies, chocolate malt balls, and crumbled leftover cake for garnish.
