Coming up with crowd-pleasing desserts for parties and gatherings can feel like a real puzzle. Between juggling different tastes, dealing with transport issues, and trying to make something that looks nice without spending hours in the kitchen, it’s enough to make anyone reach for the store-bought option instead.
That’s why these mini cheesecakes with vanilla wafers have become my go-to solution: they’re perfectly portioned, easy to make ahead of time, and always get eaten up fast. Plus, they’re simple enough that you can whip them up even when life gets busy.

Why You’ll Love These Mini Cheesecakes
- Quick and easy – These mini cheesecakes come together in just 30-40 minutes, making them perfect for last-minute dessert cravings or unexpected guests.
- Simple ingredients – You only need 5 basic ingredients that you might already have in your pantry and fridge – no special shopping trip needed.
- Perfect portion control – Each mini cheesecake is individually sized, so you can enjoy just one (or two!) without having a whole cheesecake tempting you in the fridge.
- Make-ahead friendly – These little treats can be made in advance and stored in the fridge, making them ideal for parties or when you want to plan ahead.
What Kind of Cream Cheese Should I Use?
For mini cheesecakes, regular full-fat block cream cheese is your best bet – specifically, look for the kind that comes in the brick-style packaging rather than the spreadable type in tubs. Make sure to let it come to room temperature before using, which usually takes about an hour on your counter. While reduced-fat cream cheese can work in a pinch, it often leads to a less creamy texture and might make your cheesecakes more prone to cracking. Philadelphia brand is the go-to choice for most bakers, but any quality block cream cheese will do the job nicely. Just remember to avoid whipped cream cheese or cream cheese spreads, as they have extra ingredients that can mess with your cheesecake’s texture.
Options for Substitutions
Making these mini cheesecakes but missing something? Here are some helpful swaps you can try:
- Cream cheese: This is the star ingredient that’s hard to replace, but in a pinch, you can use Neufchâtel cheese for a lighter version. Just know the texture might be slightly different.
- Nilla Wafers: Don’t worry if you can’t find Nilla Wafers! Graham crackers, digestive biscuits, or any plain butter cookie will work great as the base. Just make sure they’re roughly the same size as Nilla Wafers.
- White sugar: You can swap in light brown sugar (same amount) for a slight caramel note, or use coconut sugar. If using artificial sweeteners, check the package for proper conversion amounts.
- Vanilla essence: Feel free to use vanilla bean paste (same amount) or vanilla extract. You could even try almond extract or another flavoring for a different twist – just use half the amount as these are usually stronger.
- Eggs: The eggs are crucial for structure in this recipe and can’t be easily substituted without changing the texture and outcome of your cheesecakes.
Watch Out for These Mistakes While Baking
The biggest challenge when making mini cheesecakes is preventing cracks on the surface, which often happens when you mix the ingredients at too high a speed – instead, beat the cream cheese mixture on medium-low and stop as soon as ingredients are combined. Temperature control is crucial too – make sure all your ingredients (especially cream cheese and eggs) are at room temperature before starting, as cold ingredients lead to lumpy batter and uneven baking. To avoid over-baking, which can make your cheesecakes dry and crumbly, take them out of the oven when the centers still have a slight jiggle – they’ll continue to set as they cool. For the smoothest texture, try placing a pan of hot water on the bottom rack of your oven while baking, as this creates a gentle, humid environment that helps the cheesecakes bake evenly.
What to Serve With Mini Cheesecakes?
These bite-sized cheesecakes are perfect for serving with fresh fruit toppings or sweet sauces that add a pop of flavor and color. Fresh berries like strawberries, raspberries, or blueberries work great, or try a drizzle of caramel or chocolate sauce if you’re feeling extra indulgent. A dollop of whipped cream on top is always welcome, and I love setting up a little toppings bar so everyone can customize their own mini cheesecake. For drinks, these pair wonderfully with coffee or tea, making them perfect for afternoon gatherings or dessert time.
Storage Instructions
Keep Fresh: These mini cheesecakes stay good in the fridge for up to 5 days when stored in an airtight container. I like to place them in a single layer to keep their pretty tops intact. If you need to stack them, put a piece of parchment paper between layers to prevent them from sticking together.
Freeze: Good news – these little treats freeze really well! Once they’re completely cool, pop them into a freezer-safe container and they’ll keep for up to 3 months. Just remember to leave some space between each cheesecake so they don’t stick together when frozen.
Thaw: When you’re ready to enjoy your frozen mini cheesecakes, just transfer them to the fridge the night before. Let them thaw overnight, and they’ll be perfect by dessert time the next day. The vanilla wafer base might be slightly softer after freezing, but they’ll still taste great!
| Preparation Time | 15-20 minutes |
| Cooking Time | 15-18 minutes |
| Total Time | 30-40 minutes |
| Level of Difficulty | Easy |
Estimated Nutrition
Estimated nutrition for the whole recipe (without optional ingredients):
- Calories: 1600-1800
- Protein: 20-25 g
- Fat: 70-80 g
- Carbohydrates: 220-240 g
Ingredients
For the cheesecake filling:
- 2 eggs (large, at room temperature)
- 16 oz cream cheese (softened to room temperature for smooth mixing)
- 1 tsp vanilla extract
- 3/4 cup sugar
For the base:
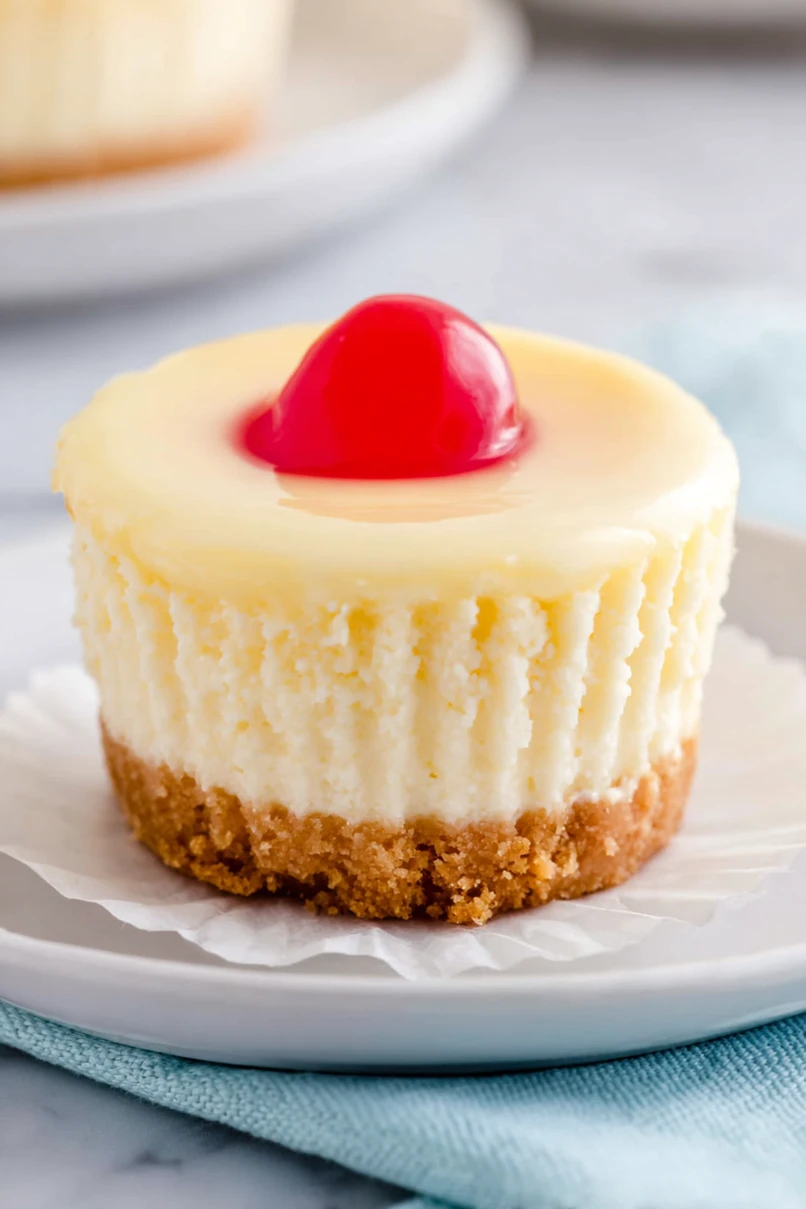
- 24 vanilla wafer cookies (I use Nabisco Nilla Wafers)
Step 1: Prepare Cheesecake Filling
Start by preheating your oven to 375°F (190°C).
In a large bowl, beat together 16 ounces of cream cheese and 3/4 cup of granulated sugar until smooth and creamy.
Next, add 2 eggs, incorporating them one at a time for best results.
Then mix in the lemon juice, if desired, and 1 teaspoon of vanilla extract.
Continue mixing until all ingredients are smoothly combined.
Step 2: Prepare Muffin Pan with Vanilla Wafers
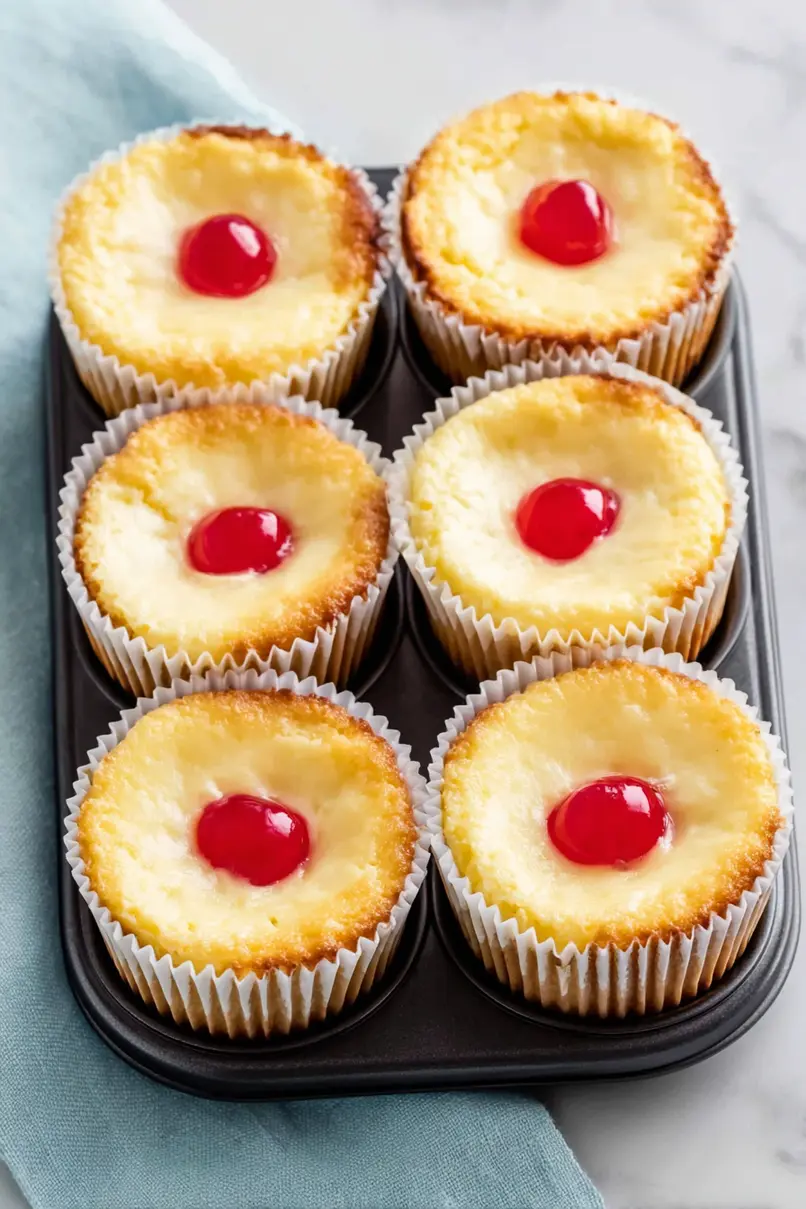
Fill a standard muffin pan with cupcake liners.
Place 2 vanilla wafers at the bottom of each liner.
If you prefer not to use liners, a silicone muffin pan is a great alternative.
This step creates a delightful crust for each cheesecake.
Step 3: Fill Muffin Cups with Batter
Carefully divide the cheesecake batter between the 12 muffin liners.
Fill each cup approximately 1/4 inch from the top, ensuring you have enough batter for all the cups evenly.
This allows room for the cheesecakes to expand while baking.
Step 4: Bake the Mini Cheesecakes
Bake the filled muffin liners for 15-18 minutes, or until a toothpick inserted in the center comes out clean.
This indicates that the cheesecakes are properly set.
Once done, remove them from the oven and allow to cool completely.
For best results, place them in the fridge for a minimum of 30 minutes, or until they are firm to the touch.
Step 5: Chill and Add Toppings
Once the mini cheesecakes have chilled and are firm, you can add your favorite toppings before serving.
Fresh fruit, a dollop of whipped cream, or a drizzle of chocolate or caramel sauce are popular choices that enhance the flavor of these delightful treats.
Enjoy your homemade mini cheesecakes!
