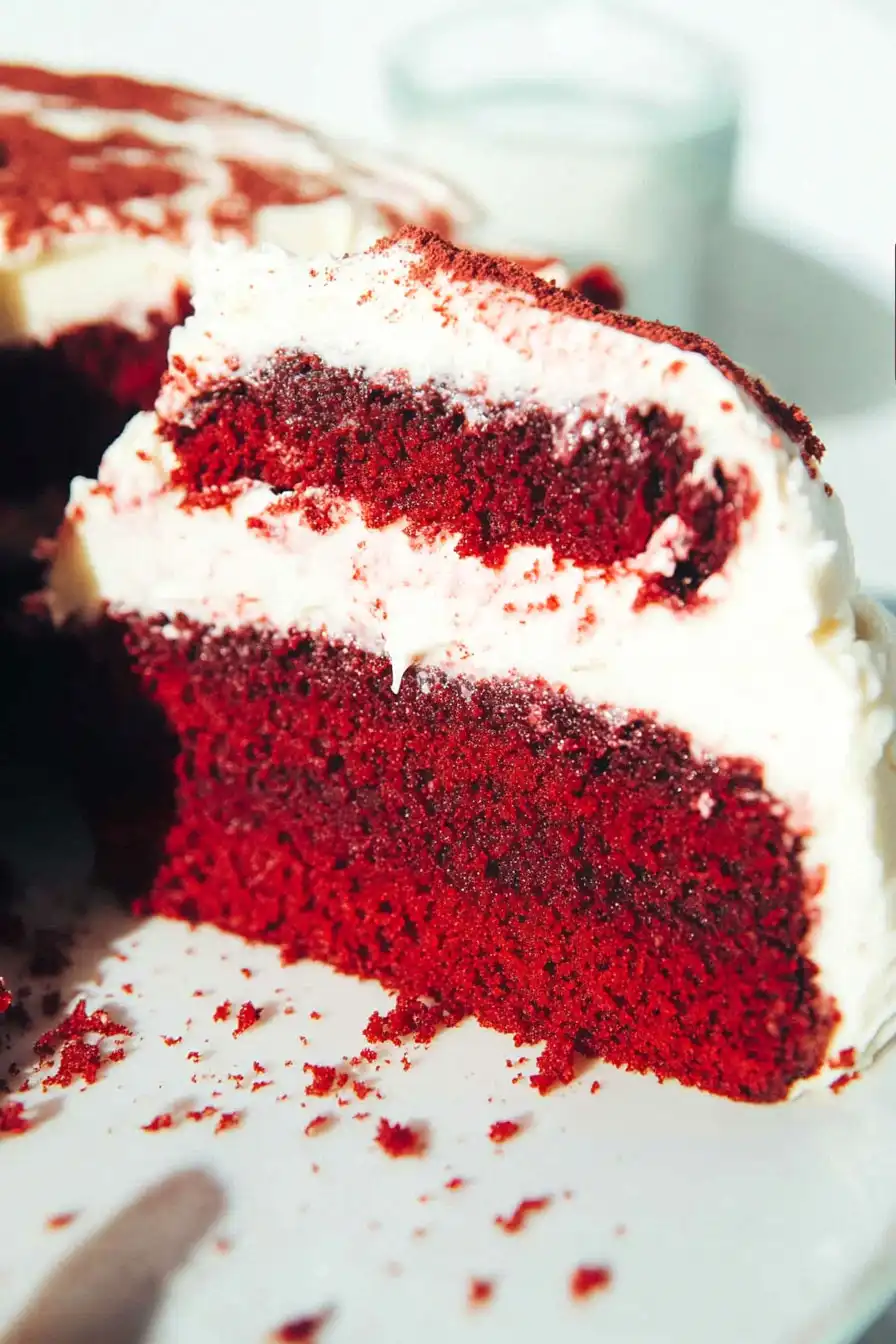
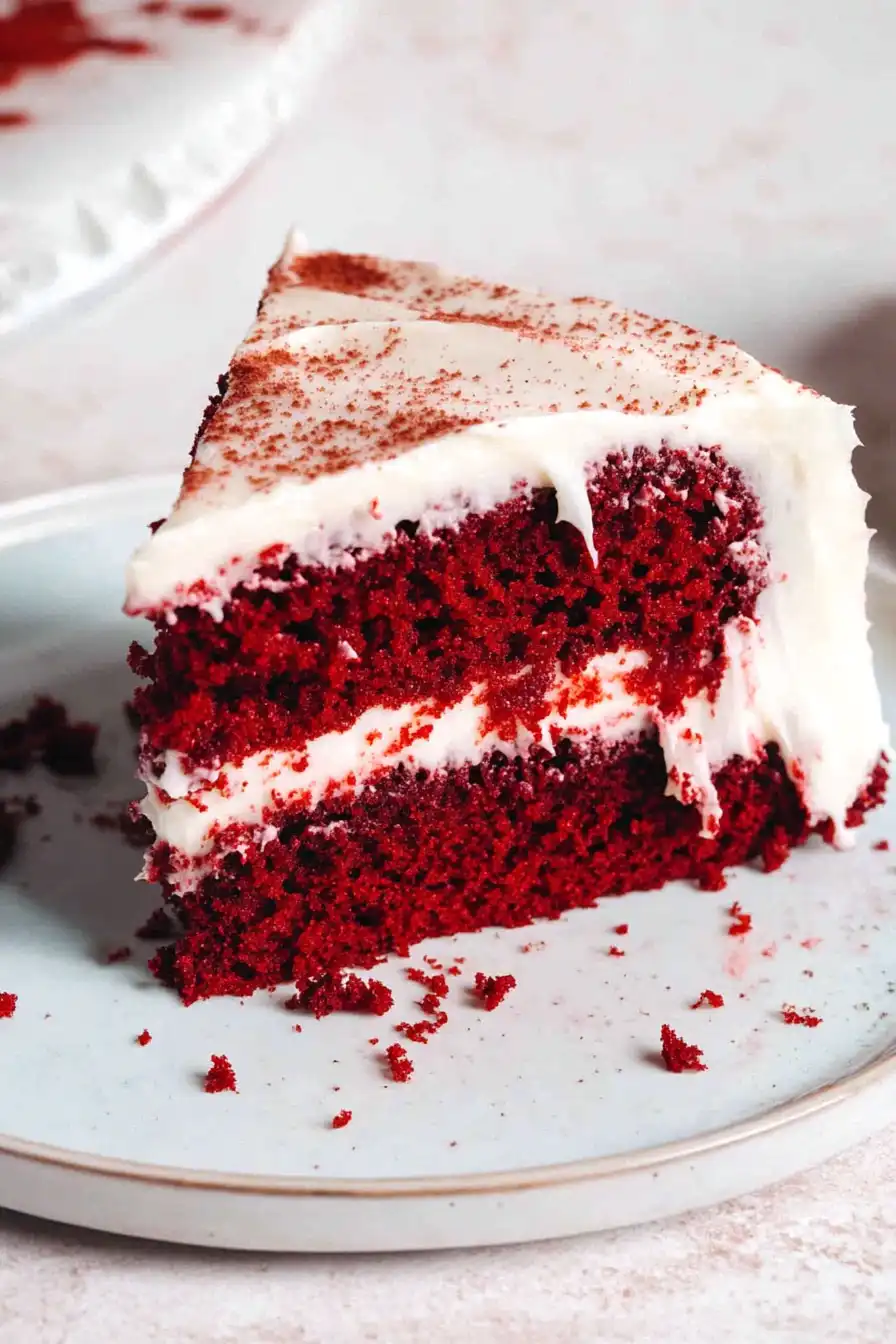
Making a red velvet cake that actually looks red without using artificial food coloring can feel like an impossible task. Between juggling the need for that classic crimson color and wanting to keep things natural, it’s easy to see why many home bakers just reach for the bottle of red dye.
But here’s the good news: this red velvet cake recipe uses natural ingredients like beetroot powder and cocoa to create that beautiful color we all love, while keeping the same rich, familiar taste that makes red velvet so special.
Why You’ll Love This Natural Red Velvet Cake
- All-natural coloring – Instead of artificial food dyes, this cake gets its beautiful red hue from fresh beetroot, making it a healthier choice for those avoiding artificial ingredients.
- Rich, authentic flavor – The combination of cocoa powder, vanilla, and natural beetroot creates a complex, sophisticated taste that’s better than traditional food-colored versions.
- Moist texture – Thanks to the pureed beetroot and perfect balance of butter and oil, this cake stays incredibly moist and tender for days.
- Crowd-pleasing dessert – With its classic cream cheese frosting and natural ingredients, this cake is perfect for birthdays, holidays, or any special occasion where you want to impress your guests.
What Kind of Beetroot Should I Use?
Fresh, raw beetroot is your best bet for this natural red velvet cake, though vacuum-packed cooked beets can work in a pinch. Look for medium-sized beets that feel firm and heavy for their size, with smooth skin and deep purple-red coloring. Raw beets will give you the most vibrant color, but they’ll need to be cooked until tender before pureeing – you can either roast them wrapped in foil or boil them until a knife slides in easily. Just make sure to peel them after cooking when they’re cool enough to handle, and don’t forget to wear gloves unless you want pink-stained hands!

Options for Substitutions
This natural red velvet cake recipe has some room for adjustments if needed:
- Beetroot: The beetroot is key for the natural red color, but you can use canned beets if fresh ones aren’t available. Just make sure to drain them well and still add the lemon juice. I don’t recommend substituting this ingredient as it’s essential for the color.
- Apple cider vinegar: White vinegar or lemon juice work just as well here – you need the acidity to react with the baking powder and cocoa.
- Corn starch: You can replace this with an equal amount of potato starch, or use just plain flour (add an extra 1/4 cup to the recipe).
- Whole milk: Feel free to use buttermilk instead – it actually works great in this recipe. For dairy-free options, try almond or soy milk mixed with 1/2 teaspoon of lemon juice.
- Cream cheese: Philadelphia cream cheese is recommended for the frosting, but any full-fat cream cheese will work. Just avoid using low-fat versions as they can make the frosting too runny.
- Milk powder: Since this is marked as optional, you can skip it entirely. It just adds a bit more richness to the cake.
Watch Out for These Mistakes While Baking
The biggest challenge when making natural red velvet cake is getting the right color from beets – to achieve the best red hue, make sure to puree your beets completely smooth and strain out any fibrous bits that could affect the cake’s texture. A common mistake is using Dutch-processed cocoa powder, which can react differently with the beets and turn your cake brown instead of red – always stick to natural unsweetened cocoa powder for this recipe. The temperature of your ingredients matters more than you might think – using cold butter, eggs, or cream cheese can lead to a lumpy batter or frosting, so remember to take them out of the fridge at least 2 hours before starting. For the most consistent results, measure your ingredients by weight rather than volume, especially the flour and sugar, as incorrect proportions can affect both the texture and the natural coloring of your cake.
What to Serve With Red Velvet Cake?
This naturally colored red velvet cake pairs wonderfully with a cold glass of milk or a hot cup of coffee to balance its rich, sweet flavor. If you’re serving it for a special occasion, add a scoop of vanilla ice cream on the side – the cool, creamy texture works really well with the cake’s moist crumb and cream cheese frosting. For a fun twist, try serving small slices with fresh berries scattered around the plate – strawberries and raspberries not only look pretty but taste great with the subtle chocolate and tangy cream cheese flavors of the cake.
Storage Instructions
Keep Fresh: Your red velvet cake will stay moist and fresh when stored in an airtight container in the fridge for up to 5 days. Since it has cream cheese frosting, it’s best not to leave it at room temperature for more than a couple of hours. The cake actually tastes even better the next day, as the flavors have time to develop!
Freeze: Want to plan ahead? You can freeze the unfrosted cake layers wrapped tightly in plastic wrap and aluminum foil for up to 3 months. For frosted cake, freeze individual slices on a baking sheet until firm, then wrap them well – they’ll keep for about 2 months in the freezer.
Thaw & Serve: When you’re ready to enjoy your frozen cake, let it thaw overnight in the refrigerator. For the best texture and flavor, bring it to room temperature for about 30 minutes before serving. The natural beetroot color might slightly darken over time, but the taste will still be great!
| Preparation Time | 30-45 minutes |
| Cooking Time | 35-40 minutes |
| Total Time | 65-85 minutes |
| Level of Difficulty | Medium |
Estimated Nutrition
Estimated nutrition for the whole recipe (without optional ingredients):
- Calories: 4500-4900
- Protein: 40-50 g
- Fat: 250-270 g
- Carbohydrates: 600-650 g
Ingredients
For the cake:
- 1/2 cup unsalted butter (room temperature, about 68-70°F for proper creaming)
- 2 1/4 cups all-purpose flour (I always use King Arthur all-purpose for superior results)
- 1 1/2 tbsp apple cider vinegar
- 1/2 cup whole milk
- 1/4 cup corn starch
- 1 tbsp milk powder
- 1 1/2 tsp baking powder
- 2 cups white sugar
- 3 large eggs
- 2 tsp vanilla extract
- 1/2 tsp kosher salt
- 1 tbsp lemon juice
- 1/2 cup vegetable oil
- 1 cup pureed beetroot (cooked until tender then pureed smooth with a little water)
- 3 tbsp unsweetened cocoa powder
For the cream cheese frosting:
- 12 oz full-fat cream cheese (room temperature, I always use Philadelphia brand for best consistency)
- 5 cups powdered sugar (sifted to prevent lumps)
- 1/2 tsp vanilla extract
- 1 cup unsalted butter (room temperature, I prefer Land O’Lakes for frosting)
Step 1: Prepare the Beet Puree
Start by cutting off the stems and rinsing the beets thoroughly.
Slice the beets in half and place them into a pot.
Fill the pot with water until it covers the beets by a couple of inches.
Stir in lemon juice for added flavor.
Bring the pot to a boil, then reduce the heat and let it simmer for 30-35 minutes until the beets are fork-tender.
Once cooked, transfer the warm beets to a cutting board or plate, reserving the water they were boiled in.
Using a fork, gently scrape away the skins and transfer the skinned beets to a food processor.
Add 1/4 cup of the reserved water and blitz until smooth, achieving an applesauce-like consistency.
Check for any large clumps and process again if necessary.
Measure exactly 1 cup of beet puree.
If needed, add a couple of tablespoons of the reserved water to reach 1 cup.
Step 2: Prepare the Cake Pans and Mix Milk and Vinegar
Preheat your oven to 350°F.
Grease and line two 8” or 9” cake pans, wrapping them in damp cake strips if available.
In a small measuring glass, combine the milk and vinegar and set aside to curdle slightly, forming a buttermilk-like mixture.
Step 3: Combine Dry Ingredients and Cream Butter and Sugar
In a medium bowl, whisk together the flour, cornstarch, cocoa powder, milk powder, baking powder, and salt.
Set aside.
In a separate bowl, use a hand or stand mixer with the paddle attachment to cream together the butter and 1 cup of sugar until light and fluffy.
Add the oil and the remaining cup of sugar, mixing until the result is smooth and well combined.
Step 4: Integrate Wet Ingredients and Beet Puree
Mix in the eggs one at a time, ensuring each is fully incorporated before adding the next.
Follow by mixing in the vanilla extract and beet puree for vibrant color and moisture.
Alternating between wet and dry ingredients, mix in half of the dry mixture first, followed by the milk and vinegar mixture, then the remaining dry mixture.
Mix until just combined to avoid overmixing.
Step 5: Bake and Cool the Cakes
Evenly divide the batter between the prepared cake pans.
Bake in the preheated oven—35-40 minutes for 8” pans or 30-35 minutes for 9” pans.
The cakes are ready when a toothpick comes out clean with a few moist crumbs.
Allow the cakes to cool completely on a wire rack before assembling.
Optionally, chill the cakes overnight by wrapping them in plastic wrap after cooling to temperature.
Step 6: Prepare the Frosting and Assemble
While the cakes cool, prepare the cream cheese frosting.
In a large bowl, use a hand or stand mixer with the paddle attachment to mix the butter until smooth.
Add the cream cheese and mix until combined thoroughly, scraping down the bowl as needed.
Gradually mix in the powdered sugar, one cup at a time, followed by the vanilla extract.
Store the frosting in the refrigerator to maintain its thickness while the cakes finish cooling.
To assemble, level off the tops of the cakes if necessary.
Optionally, preheat the oven to 350°F, crumble the cake tops onto a baking sheet, and bake until dry.
Blitz into crumbles for decorative purposes.
Spread an even layer of cream cheese frosting between the cooled cakes and cover the entire surface with the remaining frosting.
Decorate as desired before serving and enjoying!

I’m really looking forward to trying this recipe however, the instructions recommend weighing ingredients for accuracy, but they are listed by volume. Can you share the weights of the ingredients as well, please? Thank you.