Here’s my go-to recipe for hatch chile relleno casserole, with layers of roasted hatch chiles, melted cheese, and a light, fluffy egg mixture that bakes up perfectly every time.
This casserole has become our family’s favorite way to enjoy chile rellenos without all the frying. I often make a double batch because everyone always asks for seconds, and the leftovers heat up great for breakfast the next day. Who doesn’t love starting their morning with a little kick?

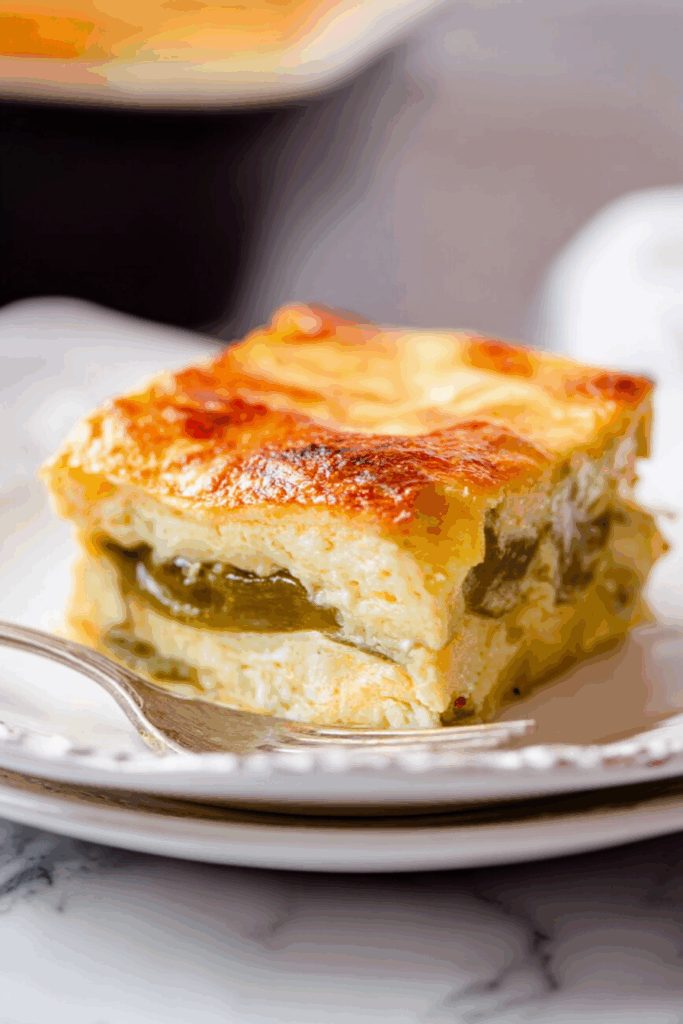
Why You’ll Love This Chile Relleno Casserole
- Easy preparation – Unlike traditional chile rellenos that require stuffing and frying individual peppers, this casserole version gives you all the same flavors with way less work – just layer and bake!
- Make-ahead friendly – You can prep this casserole the night before and pop it in the oven when you’re ready to eat, making it perfect for busy weeknights or weekend brunches.
- Crowd-pleasing comfort food – With its creamy egg base, melty cheese, and mild green chiles, this casserole hits all the right notes for a satisfying Mexican-inspired meal that feeds a crowd.
- Naturally gluten-free option – Simply swap the all-purpose flour for your favorite gluten-free blend, and you’ve got a delicious gluten-free main dish that everyone can enjoy.
What Kind of Green Chiles Should I Use?
Hatch green chiles are the traditional choice for chile rellenos, but you’ve got options if you can’t find them. Fresh roasted Hatch chiles are amazing when they’re in season (typically late summer), but good-quality canned whole green chiles work great in this casserole too. If you’re using canned, look for brands that keep the chiles whole rather than chopped – you’ll want them intact for the best layering effect. For those who prefer less heat, Anaheim peppers make a milder substitute, while poblanos offer a slightly earthier flavor profile. Just remember that if you’re using fresh peppers, you’ll need to roast and peel them first to get that classic chile relleno texture.

Options for Substitutions
Need to make some swaps? Here are some helpful substitutions for this casserole:
- Hatch green chiles: If you can’t find Hatch chiles, you can use Anaheim peppers or poblano peppers instead. Just roast and peel them yourself, or look for canned versions. The flavor will be a bit different, but still tasty!
- Heavy cream/full-fat milk: You can use any milk you have on hand, but remember that lower-fat options will make the casserole less rich. For a dairy-free version, unsweetened plain almond milk works too, though the texture will be slightly different.
- Sour cream: Plain Greek yogurt makes a great substitute with similar tanginess and texture. You could also use Mexican crema if you have it.
- Cheese blend: While the sharp cheddar and pepper jack combo gives great flavor, you can mix it up with Monterey Jack, Colby Jack, or even Mexican cheese blends. Just keep the total amount of cheese the same.
- All-purpose flour: For a gluten-free version, use a 1-to-1 gluten-free flour blend. Regular gluten-free flour might change the texture slightly, but it’ll still work well.
- Onion and garlic seasoning: If you don’t have these, use 1/4 teaspoon each of onion powder and garlic powder instead.
Watch Out for These Mistakes While Baking
The biggest challenge when making chile relleno casserole is dealing with excess moisture from the canned chiles – be sure to drain them thoroughly and pat them dry with paper towels to prevent a watery casserole. A common mistake is not properly layering the ingredients; for best results, create even layers of chiles and cheese, making sure to seal any gaps that could cause the egg mixture to pool unevenly. The baking temperature is crucial – cooking at too high a heat can cause the eggs to become rubbery and the cheese to separate, so stick to 350°F and watch for that slightly golden top. For the creamiest texture, let the casserole rest for 10-15 minutes after baking, which allows the eggs to set properly and makes it much easier to slice and serve clean portions. If you’re using fresh roasted chiles instead of canned, make sure they’re completely cooled and peeled before adding them to avoid extra moisture and bitter bits of charred skin in your casserole.
What to Serve With Chile Relleno Casserole?
This cheesy, egg-based casserole pairs perfectly with classic Mexican side dishes that help balance out its richness. A scoop of Mexican rice and some refried or black beans make the meal feel complete and satisfying. I love serving it with warm corn tortillas on the side – they’re great for scooping up any extra bits of cheese and chile. For freshness, try adding a simple side salad with crisp lettuce, tomatoes, and avocado dressed in lime juice, or serve some pico de gallo and sour cream on top of the casserole itself. If you’re feeding a crowd, chips and salsa make an easy starter while the casserole is in the oven.
Storage Instructions
Keep Fresh: This chile relleno casserole is perfect for leftovers! Pop it in an airtight container and keep it in the fridge for up to 4 days. The flavors actually get even better after a day or two as everything melds together nicely.
Freeze: Good news – this casserole freezes really well! Let it cool completely, then wrap it tightly in plastic wrap and aluminum foil, or place portions in freezer-safe containers. It’ll keep in the freezer for up to 3 months. Just remember to label it with the date!
Reheat: When you’re ready to enjoy your leftovers, heat individual portions in the microwave for 1-2 minutes, or place the casserole in a 350°F oven for about 20 minutes until heated through. If reheating from frozen, thaw overnight in the fridge first for best results.
| Preparation Time | 15-20 minutes |
| Cooking Time | 35-40 minutes |
| Total Time | 50-60 minutes |
| Level of Difficulty | Medium |
Estimated Nutrition
Estimated nutrition for the whole recipe (without optional ingredients):
- Calories: 2000-2200
- Protein: 80-90 g
- Fat: 130-150 g
- Carbohydrates: 150-170 g
Ingredients
- 1 cup grated sharp cheddar cheese
- 1/4 tsp garlic powder
- 8 large eggs
- 1/4 tsp onion powder
- 1 tsp black pepper
- 2 cups grated pepper jack cheese (I like Sargento brand)
- 1 tsp baking powder
- 1/4 cup sour cream (full-fat for richness)
- 2/3 cup all-purpose flour
- 24 oz roasted whole green chiles (Hatch chiles preferred, peeled and seeded)
- 3/4 cup whole milk
- 1 tsp salt
Step 1: Preheat and Prepare the Baking Dish
Start by preheating your oven to 375°F.
While the oven is heating, spray a 9×13 inch baking dish with nonstick spray to prevent sticking and set it aside for later.
Step 2: Prepare the Egg Mixture
In a large mixing bowl or blender, combine the eggs, milk, sour cream, flour, baking powder, salt, pepper, onion powder, and garlic powder.
Whisk or blend until the mixture is completely smooth and fluffy, ensuring there are no clumps of flour or baking powder.
Using a blender can be particularly effective to achieve a smooth consistency.
Step 3: Assemble the Casserole Layers
Pour just enough of the egg mixture into the prepared baking dish to cover the bottom.
Layer half of the green chiles over this egg base.
Next, sprinkle 1/2 cup of cheddar cheese and 1 cup of pepper jack cheese evenly over the green chiles.
Follow with the remaining green chiles, and then sprinkle the remaining cheese over the top.
Step 4: Add the Remaining Egg Mixture
Carefully pour the rest of the egg mixture over the layers of cheese and green chiles in the baking dish.
Ensure that the mixture covers the ingredients evenly, filling in any gaps.
Step 5: Bake the Casserole
Place the assembled casserole in the preheated oven and bake for 35-40 minutes.
You’ll know it’s ready when the edges begin to turn golden brown and the center is set.
Keep an eye on the casserole towards the end of the baking time to avoid overcooking.
Step 6: Cool and Serve
Once baked, remove the casserole from the oven and allow it to cool for about 10 minutes.
This resting period helps the flavors meld and makes it easier to serve.
After cooling, cut into portions and enjoy your delicious dish!

Love – this dish. Looks Amazing