There’s something so festive about bringing a layered cake to a summer celebration. I’ve lost count of how many times I’ve made this red, white, and blue cake for Fourth of July gatherings and Memorial Day picnics. The kids always get excited when they see the colorful layers, and honestly, I do too – even after all these years of baking it.
What I really love about this cake is how simple it is to put together. You don’t need any fancy decorating skills or special equipment. Just a few basic ingredients, some food coloring, and a couple of cake pans. I usually make it the day before our get-togethers, which means less stress and more time to enjoy the festivities with family and friends.
Whether you’re hosting a backyard barbecue or heading to a potluck, this cake is always a crowd-pleaser. And let me tell you – watching people’s faces light up when you cut into those patriotic layers makes all the mixing and layering worth it.
Why You’ll Love This Layer Cake
- Perfect for holidays – This festive red, white, and blue cake is ideal for Memorial Day, Fourth of July, or any patriotic celebration – it’s guaranteed to be the centerpiece of your dessert table.
- Easy ingredients – Using cake mix as a base means you don’t need to measure out multiple dry ingredients, making this recipe approachable for bakers of all skill levels.
- Kid-friendly activity – Children love helping with the food coloring and decorating process – it’s a fun way to get the whole family involved in holiday preparations.
- Make-ahead friendly – You can bake the layers a day in advance and frost them just before serving, which helps manage your party preparation time better.
What Kind of Food Coloring Should I Use?
For vibrant red and blue cake layers, gel food coloring is your best bet rather than the liquid drops you might have in your pantry. Gel colors are more concentrated, so you’ll need less to achieve bright colors, and they won’t thin out your cake batter like liquid food coloring can. The most reliable brands for true red and blue shades are AmeriColor, Wilton, or ChefMaster – you’ll want to look for “Super Red” and “Royal Blue” or similar deep shades. If you’re using liquid food coloring, you might need to use quite a bit more to get the same intensity, and your cake layers might end up with more of a pink or light blue tone instead of the bold colors you’re aiming for.
Options for Substitutions
Let me share some helpful substitutions for this festive cake recipe:
- White cake mix: While the white cake mix gives the cleanest color for dyeing, you can use vanilla cake mix instead. Just know your colors might be slightly less bright. You can also make it from scratch using a basic white cake recipe that yields two 9-inch cakes.
- Vegetable oil: Feel free to swap this with an equal amount of melted coconut oil, canola oil, or even unsweetened applesauce (though this will make a denser cake).
- Food dye: Regular food coloring works fine, but gel food coloring will give you more intense colors without adding too much liquid. You can also try natural food dyes, but the colors won’t be as bold.
- Butter (for frosting): For the frosting, you can use margarine or shortening instead of butter, though butter gives the best flavor. If using margarine, you might need slightly more powdered sugar to achieve the right consistency.
- Maraschino cherries: Fresh strawberries, raspberries, or even red candies work great for decoration instead of maraschino cherries.
- Patriotic sprinkles: No patriotic sprinkles? Try blue and red sanding sugar, or make your own mix using regular rainbow sprinkles – just pick out the red, white, and blue ones!
Watch Out for These Mistakes While Baking
The trickiest part of making a layered patriotic cake is achieving distinct, vibrant colors without letting them bleed into each other – start with a small amount of food coloring and gradually add more until you reach your desired shade, remembering that the color will deepen slightly during baking.
Temperature control is crucial: using ingredients that aren’t at room temperature (especially butter and eggs) can lead to uneven mixing and a dense, heavy cake, so plan ahead and let them sit out for about an hour before starting.
When stacking your layers, a common mistake is skipping the crumb coat – this thin layer of frosting sealed in the fridge for 15-20 minutes creates a smooth surface and prevents cake crumbs from showing through in your final coat.
For perfectly level layers that stack well, avoid the temptation to skip trimming the dome off each cake layer, and use a serrated knife in a gentle sawing motion rather than pressing down, which can crush the cake.

What to Serve With Layer Cake?
This festive layer cake is a showstopper on its own, but there are some great ways to make serving it even more special! A scoop of vanilla ice cream on the side helps balance out the sweetness and adds a nice temperature contrast to each bite. Coffee or tea makes for perfect beverages to serve alongside – I especially love a cup of hot coffee with this rich dessert. If you want to keep with the patriotic theme, try serving some fresh strawberries and blueberries on the side, which not only look pretty but also add a fresh, tart element to complement the sweet cake.
Storage Instructions
Keep Fresh: This festive layer cake stays fresh when stored in an airtight container in the fridge for up to 5 days. I recommend using a cake keeper or covering it well with plastic wrap to keep the frosting from picking up any fridge odors. The butter-based frosting will firm up in the fridge, which actually helps the layers stay neat and tidy!
Freeze: You can freeze this cake either whole or in slices! Wrap it tightly in plastic wrap, then in aluminum foil, and pop it in the freezer for up to 3 months. Individual slices are great for when you want just a piece of something sweet – wrap them the same way and grab one whenever you’re craving cake.
Serve: When you’re ready to enjoy your cake from the fridge, let it sit at room temperature for about 30 minutes before serving – this lets the frosting soften up to the perfect consistency. If frozen, thaw overnight in the refrigerator, then let it come to room temperature before serving.
| Preparation Time | 30-40 minutes |
| Cooking Time | 20-25 minutes |
| Total Time | 50-65 minutes |
| Level of Difficulty | Medium |
Estimated Nutrition
Estimated nutrition for the whole recipe (without optional ingredients):
- Calories: 7000-7500
- Protein: 50-60 g
- Fat: 400-420 g
- Carbohydrates: 900-950 g
Ingredients
For the cake:
- blue food dye
- 6 egg whites (from large eggs)
- 1 cup vegetable oil
- 2 packages (15.25 oz each) white cake mix
- 2 cups water
- red food dye (liquid or gel)
For the buttercream frosting:
- 2 cups softened butter (unsalted, at room temperature)
- 2 lb powdered sugar (sifted to prevent lumps)
For decoration (optional):
- maraschino cherries
- patriotic sprinkles (I like Wilton brand)
Step 1: Prepare the Cake Pans and Batter
Preheat your oven to 350°F (175°C).
Spray three 8″ cake pans with cooking spray to prevent sticking.
In a large mixing bowl, combine both cake mixes, egg whites, oil, and water.
Mix the ingredients together until well incorporated, ensuring there are no lumps.
Step 2: Color and Divide the Batter
Divide the cake batter evenly between three separate bowls.
In the first bowl, add red food coloring and mix until you reach your desired shade.
In the second bowl, add blue food coloring and mix well.
The third bowl of batter will remain uncolored for the white layer.
Adjust the food coloring in the red and blue bowls as needed, adding a little at a time.
Step 3: Bake the Cakes
Pour each color of batter into its own prepared cake pan.
Place the pans in the preheated oven and bake for 20 – 25 minutes.
The cakes are done when a toothpick inserted into the center comes out clean.
Once baked, cool the cakes in their pans for 5 minutes, then invert them onto a cooling rack to cool completely.
Step 4: Make the Buttercream Frosting
In a large mixing bowl, combine butter and powdered sugar.
Whip the mixture until it becomes light and fluffy.
If the frosting needs to be thinned slightly, add a tablespoon of milk or water to achieve the desired consistency.
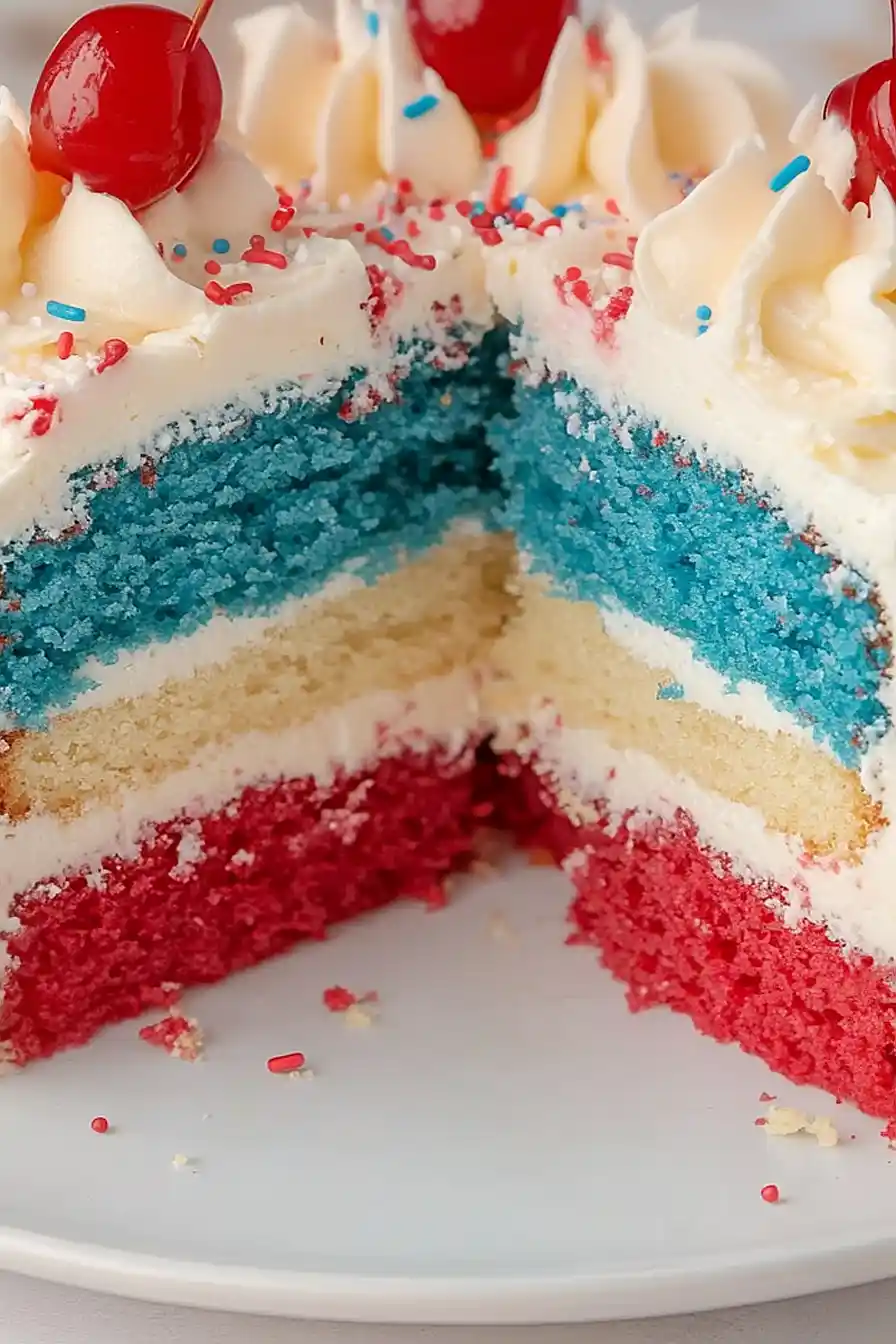
Step 5: Assemble the Cake Layers
Place the red cake onto your cake plate and frost the top with the prepared buttercream.
Stack the uncolored white cake on top of the frosted red cake and frost the top of the white layer.
Finally, place the blue cake layer on top of the white cake.
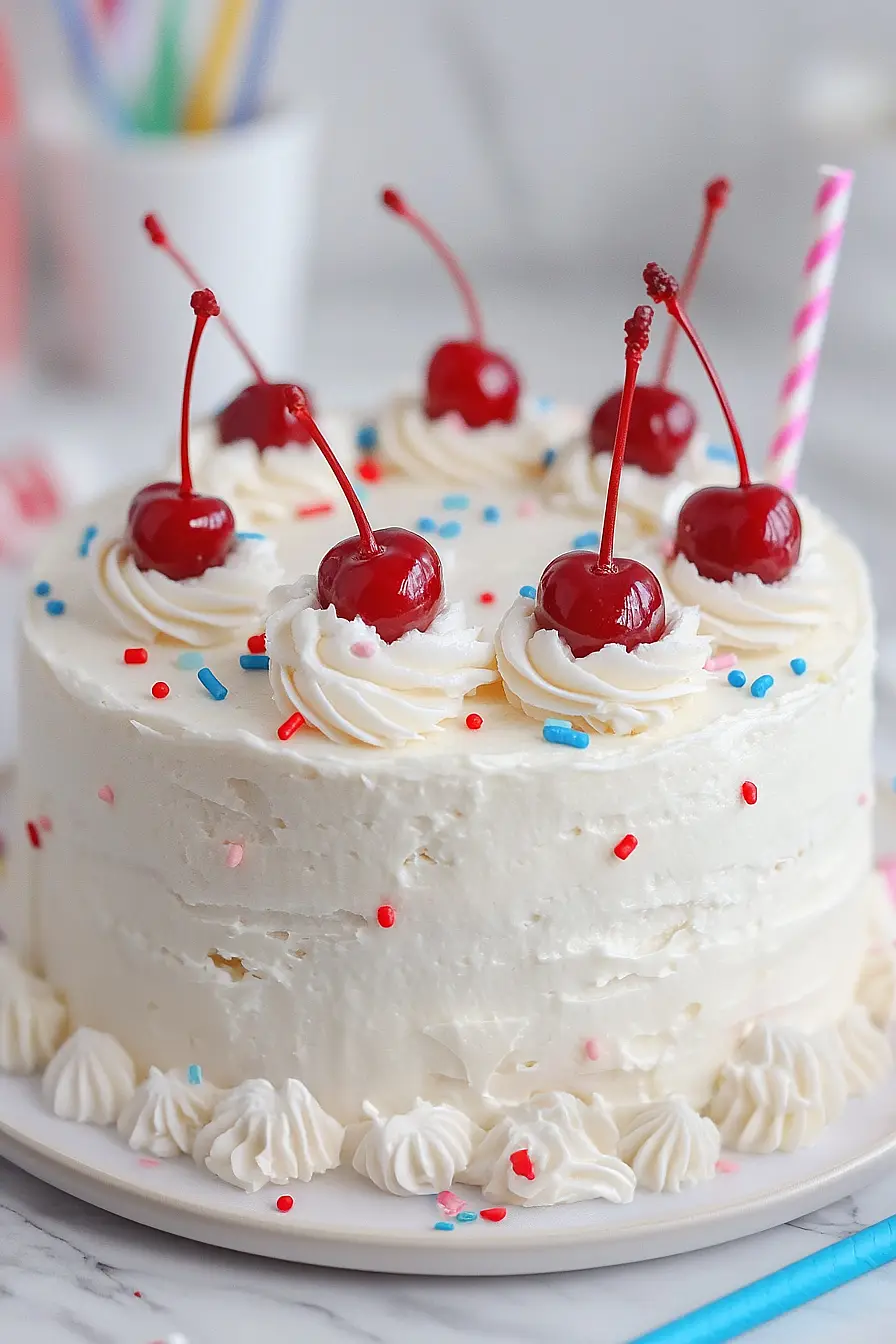
Step 6: Frost and Decorate the Cake
Once all the cake layers are stacked, use the remaining buttercream to frost the entire cake, including the sides.
If you have any leftover buttercream, you can pipe decorations around the top edges of the cake.
To finish, garnish the top with patriotic sprinkles and maraschino cherries.
Chill the cake for at least an hour before serving to set the frosting and flavors.
Enjoy your vibrant and festive cake!
