Growing up, birthday cakes always meant a trip to the local bakery for something fancy. My mom wasn’t much of a baker, and the thought of making anything beyond a box mix seemed overwhelming. But one summer day, while watching my kids devour ice cream cones at the park, I had this random thought – what if we turned their favorite ice cream cone into a cake?
Turns out, making an ice cream cone cake is way easier than I expected. You don’t need any special baking skills or fancy equipment – just a few basic ingredients and a regular cake pan. It’s become our go-to party cake, and even my mom, who still swears by store-bought desserts, asks for the recipe.

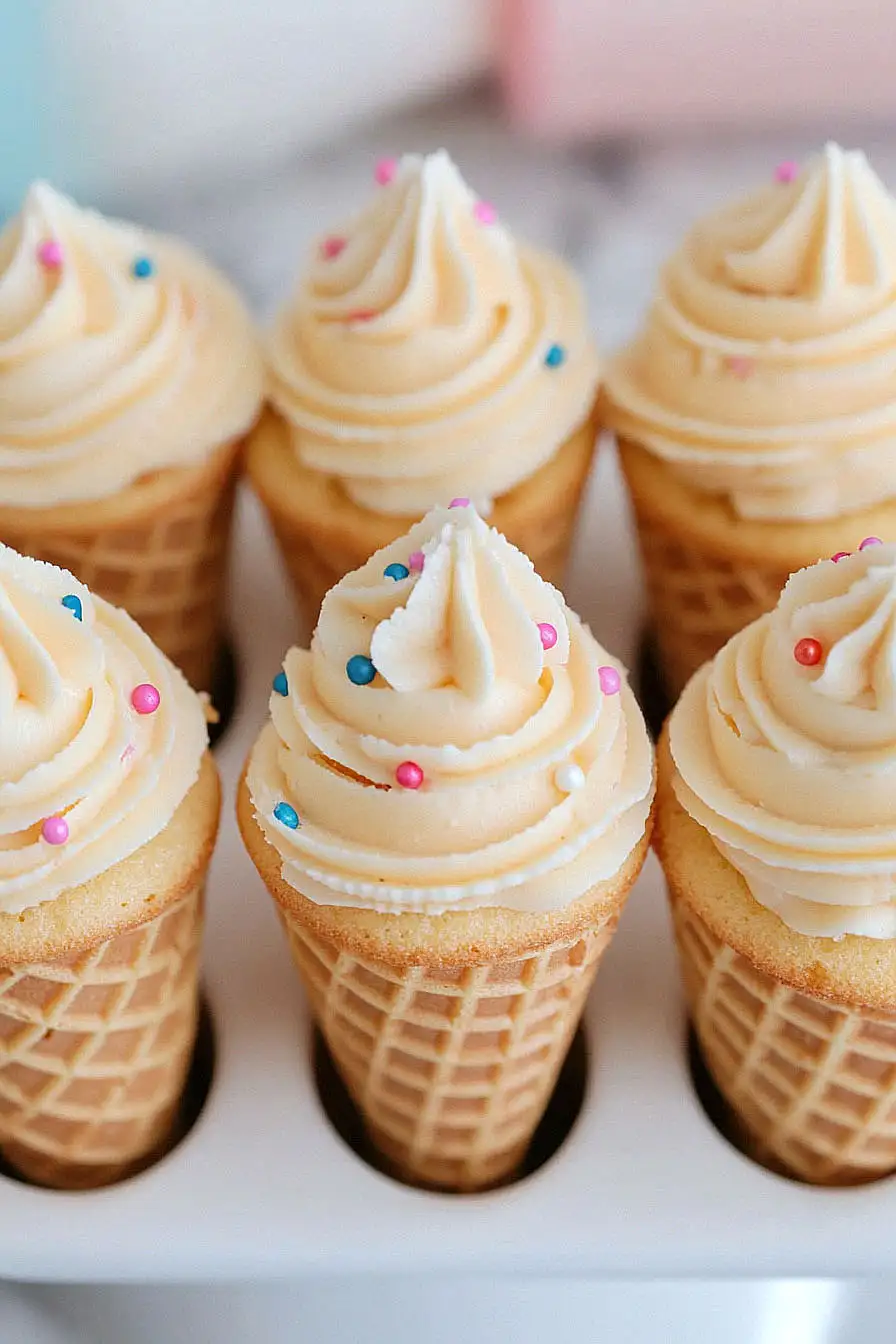
Why You’ll Love This Ice Cream Cone Cake
- Kid-friendly fun – These whimsical treats look just like ice cream cones, making them perfect for birthday parties and special occasions where you want to see children’s faces light up with joy.
- Simple ingredients – Using a box cake mix and ready-made frosting means you can skip measuring multiple ingredients and focus on the fun part – decorating!
- Make-ahead friendly – You can bake these cute cakes a day before your event and frost them when you’re ready to serve, making party planning much easier.
- Portable treats – Each cone is an individual serving that’s easy to hand out and doesn’t require plates or utensils – perfect for parties and gatherings.
- Customizable design – Switch up the cake flavors, frosting colors, and toppings to match any party theme or celebration.
What Kind of Ice Cream Cones Should I Use?
For this fun cake recipe, you’ll want to stick with flat-bottom ice cream cones, also known as cake cones or wafer cones. These are the sturdy, light-colored cones with the wide openings that sit flat on your counter without tipping over. Skip the pointy sugar cones or waffle cones for this recipe – they won’t stand up properly and could lead to some messy spills. The standard-sized cake cones (about 3 inches tall) work best, though you can find some brands that offer slightly taller versions if you want a more dramatic presentation. Just make sure to check that the cones don’t have any cracks before using them, as damaged cones can leak batter during baking.

Options for Substitutions
This fun cake recipe can be customized in several ways to match your preferences or pantry items:
- Rainbow chip cake mix: Any cake mix flavor works great here! Try vanilla, chocolate, strawberry, or funfetti. You can even use a homemade cake batter if you prefer.
- Ice cream cones: Flat-bottom cones are best for this recipe and shouldn’t be substituted with pointed cones as they won’t stand up. However, you can use waffle cones if you create a stand to hold them upright.
- Vegetable oil: Feel free to swap the oil with an equal amount of melted butter, applesauce (for a lighter version), or melted coconut oil. Each will give slightly different results in texture.
- Vanilla frosting: Any frosting flavor works here – chocolate, strawberry, cream cheese, or even homemade buttercream. Just make sure it’s thick enough to hold its shape when piped.
- Sprinkles: Get creative with toppings! Try chocolate chips, crushed cookies, chopped nuts, shredded coconut, or candy pieces instead of traditional sprinkles.
Watch Out for These Mistakes While Baking
The biggest challenge when making ice cream cone cakes is overfilling the cones – fill them only about 2/3 full with batter, as they will rise significantly during baking and can overflow, creating a mess in your oven.
Getting the cones to stand upright during baking is crucial – use a 9×13 baking pan and create supports by making holes in aluminum foil, or invest in a specialized cone-holding baking rack to keep them perfectly vertical and prevent tipping.
Many bakers make the mistake of frosting these treats while they’re still warm, which leads to melted, runny frosting – instead, let the cakes cool completely (about 30-45 minutes) before decorating, and if you’re using a piping bag, chill your frosting for 15 minutes first to achieve those perfect swirls.
To keep your cones crispy, avoid storing them in an airtight container as this traps moisture and can make them soggy – instead, place them in a container with some airflow and consume within 1-2 days for the best texture.
What to Serve With Ice Cream Cone Cakes?
These fun ice cream cone cakes are already a complete dessert on their own, but you can make them even more special with some tasty additions! I love setting up a little toppings bar with extra sprinkles, mini chocolate chips, and crushed nuts so everyone can customize their own cake cone. A scoop of real ice cream on the side is always welcome – try vanilla, chocolate, or strawberry to match the festive vibe. For drinks, cold milk or chocolate milk are perfect partners, especially at kids’ parties where these cone cakes are always a hit.
Storage Instructions
Keep Fresh: These ice cream cone cakes are best enjoyed within 2 days of making them. Place them in a tall container with a lid (like a cupcake carrier) and keep them in the fridge. The cones might soften slightly in the fridge, but they’ll still taste great! Try to avoid stacking them, as this could mess up your pretty frosting swirls.
Make Ahead: Want to prep these cute treats in advance? You can bake the cakes in the cones up to a day ahead and store them unfrosted in an airtight container at room temperature. Just add the frosting and sprinkles right before serving – this way, they’ll look and taste their absolute best!
Transport: Taking these to a party? Place each cone in a tall drinking glass or cup, then put all the glasses in a box with crumpled paper between them to prevent tipping. This trick helps keep your cone cakes steady and looking perfect during the journey!
| Preparation Time | 15-20 minutes |
| Cooking Time | 13-18 minutes |
| Total Time | 58-68 minutes |
| Level of Difficulty | Easy |
Estimated Nutrition
Estimated nutrition for the whole recipe (without optional ingredients):
- Calories: 3200-3600
- Protein: 30-40 g
- Fat: 150-180 g
- Carbohydrates: 480-520 g
Ingredients
For the cake:
- Eggs (as directed on cake mix packaging)
- Water (as directed on cake mix packaging)
- Vegetable oil (as directed on cake mix packaging, I use Mazola)
- 1 box rainbow chip cake mix
- 24 flat-bottom ice cream cones
For the frosting and decoration:
- 2 containers (16 oz each) vanilla frosting (Betty Crocker is my go-to for convenience)
- Sprinkles (for a fun, colorful topping)
Step 1: Prep the Oven and Muffin Cups
Begin by heating your oven to 350°F (or 325°F if you’re using dark or nonstick pans).
Place a paper baking cup in each of the 24 regular-size muffin cups, which will help prevent sticking and make for easy cleanup.
Step 2: Prepare and Divide the Batter
Prepare the cake batter according to the instructions on the box.
Once your batter is ready, evenly divide it among the 24 lined muffin cups.
Then, place an ice cream cone upside down on top of the batter in each cup.
The batter should spread around the base of each cone as it bakes.
Step 3: Bake the Cupcakes
Bake the cones in the preheated oven for 13 to 18 minutes, or until a toothpick inserted into the batter comes out clean.
Note that the cones may tilt slightly while baking, which is perfectly normal.
Once done, let them cool in the pans for about 10 minutes.
Step 4: Cool and Remove Paper Cups
Carefully remove the cones from the pans and place them cone side up on a cooling rack.
Allow them to cool completely, which should take about 30 minutes.
Once cooled, gently remove the paper baking cups from around the cupcake bases.
Step 5: Frost and Decorate
Generously frost each cupcake with your desired frosting.
Use a piping bag for precision or a simple knife or spatula for a more rustic look.
Decorate with your choice of sprinkles, chocolate chips, or other toppings to add a personal touch.
Store your decorated cupcakes loosely covered at room temperature to maintain their freshness.