The holidays wouldn’t be complete without cute desserts, and these mini Santa hat cheesecakes have become a Christmas tradition in our house. I started making them a few years ago when I wanted something fun but not too complicated for our family gatherings. The best part? You can make them ahead of time, which is a real lifesaver during the busy holiday season.
I love how these little treats bring smiles to everyone’s faces – there’s something special about seeing a tiny Santa hat sitting on top of a creamy cheesecake. My kids always help me decorate them, though I’ll admit quite a few strawberries mysteriously disappear during the process. But that’s what holiday baking memories are made of, right?
These mini cheesecakes are perfect for parties, school events, or just because you want to add a little Christmas cheer to your dessert table. And if you’re worried about your baking skills, don’t be – this recipe is as straightforward as they come.

Why You’ll Love These Mini Santa Hat Cheesecakes
- Perfect holiday dessert – These adorable mini cheesecakes are guaranteed to be the star of your Christmas dessert table – they look like they came from a fancy bakery but you can make them right at home.
- Make-ahead friendly – You can prepare these cheesecakes up to 2 days before your event, making holiday entertaining so much easier.
- No special skills needed – Even if you’ve never made cheesecake before, this recipe breaks down into simple steps that anyone can follow.
- Portion controlled – The mini size means everyone gets their own perfect serving, and there’s no messy cutting or serving required.
- Basic ingredients – Most of these ingredients are easy to find at any grocery store, and you might already have many of them in your pantry.
What Kind of Cream Cheese Should I Use?
For cheesecakes, regular full-fat block cream cheese is the way to go – skip the spreadable kinds that come in tubs. Philadelphia is the go-to brand for most bakers, but any block-style cream cheese will work well as long as it’s not reduced fat. Make sure your cream cheese is properly softened at room temperature (about 30-60 minutes on the counter) before you start mixing – this helps prevent lumps and ensures a smooth, creamy texture in your mini cheesecakes. If you’re in a hurry, you can cut the cream cheese into cubes to speed up the softening process, but avoid microwaving it as this can affect the texture.
Options for Substitutions
Need to make some changes to this festive recipe? Here are some helpful swaps you can try:
- Oreo cookies: You can use graham crackers or any chocolate cookie crumbs for the base. If using graham crackers, add 1 extra tablespoon of melted butter to help bind the crust.
- Cream cheese: While regular cream cheese works best for cheesecake, you could use Neufchâtel cheese for a lighter version. Just avoid spreadable cream cheese as it won’t set properly.
- White chocolate morsels: Any good quality white chocolate chips or chopped white chocolate bars will work. Just avoid candy melts as they won’t give you the same smooth texture.
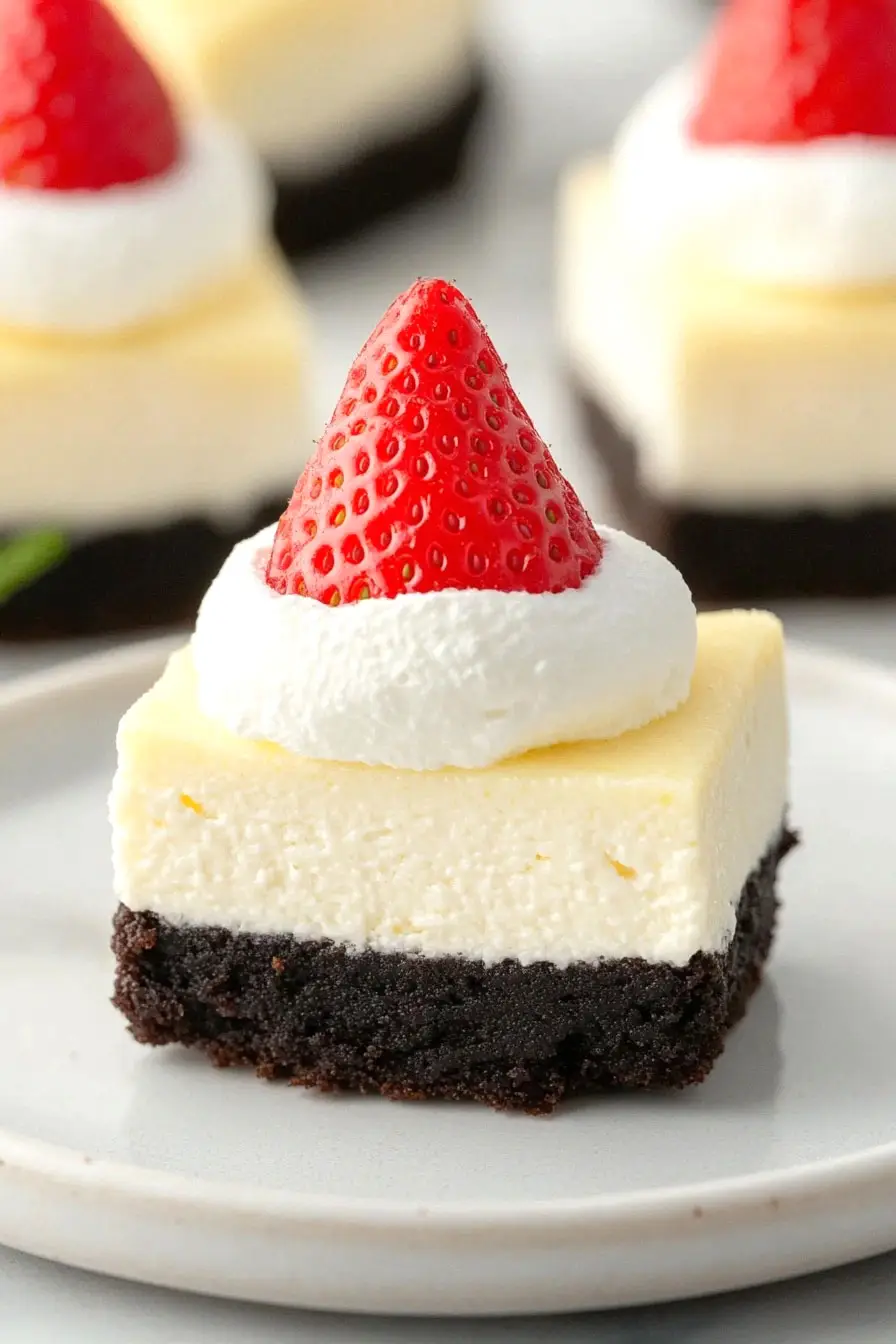
- Fresh strawberries: If fresh strawberries aren’t available, you can use raspberries instead. Just make sure they’re firm and similarly sized for the hat tops.
- Heavy cream: For the whipped topping, you can use whipping cream instead of heavy cream. Just avoid half-and-half or milk as they won’t whip up properly.
- Vanilla essence: Feel free to use vanilla extract, vanilla bean paste, or even almond extract for a different flavor note.
Watch Out for These Mistakes While Baking
The biggest challenge when making mini cheesecakes is preventing them from cracking – make sure all your ingredients are at room temperature before starting, and avoid overmixing the batter once you’ve added the eggs, as this can incorporate too much air. A common mistake is overbaking these little treats – they’re done when the centers still have a slight jiggle, as they’ll continue to set while cooling (about 20-22 minutes at 325°F). For the perfect strawberry topping, select berries that are similar in size and shape, and pat them completely dry before placing them on the cheesecakes to prevent any moisture from seeping into your beautiful white chocolate ganache. Speaking of ganache, watch the temperature carefully when melting white chocolate – it’s more sensitive than dark chocolate and can seize up if it gets too hot, so use short bursts in the microwave or a gentle double-boiler method.
What to Serve With Mini Santa Hat Cheesecakes?
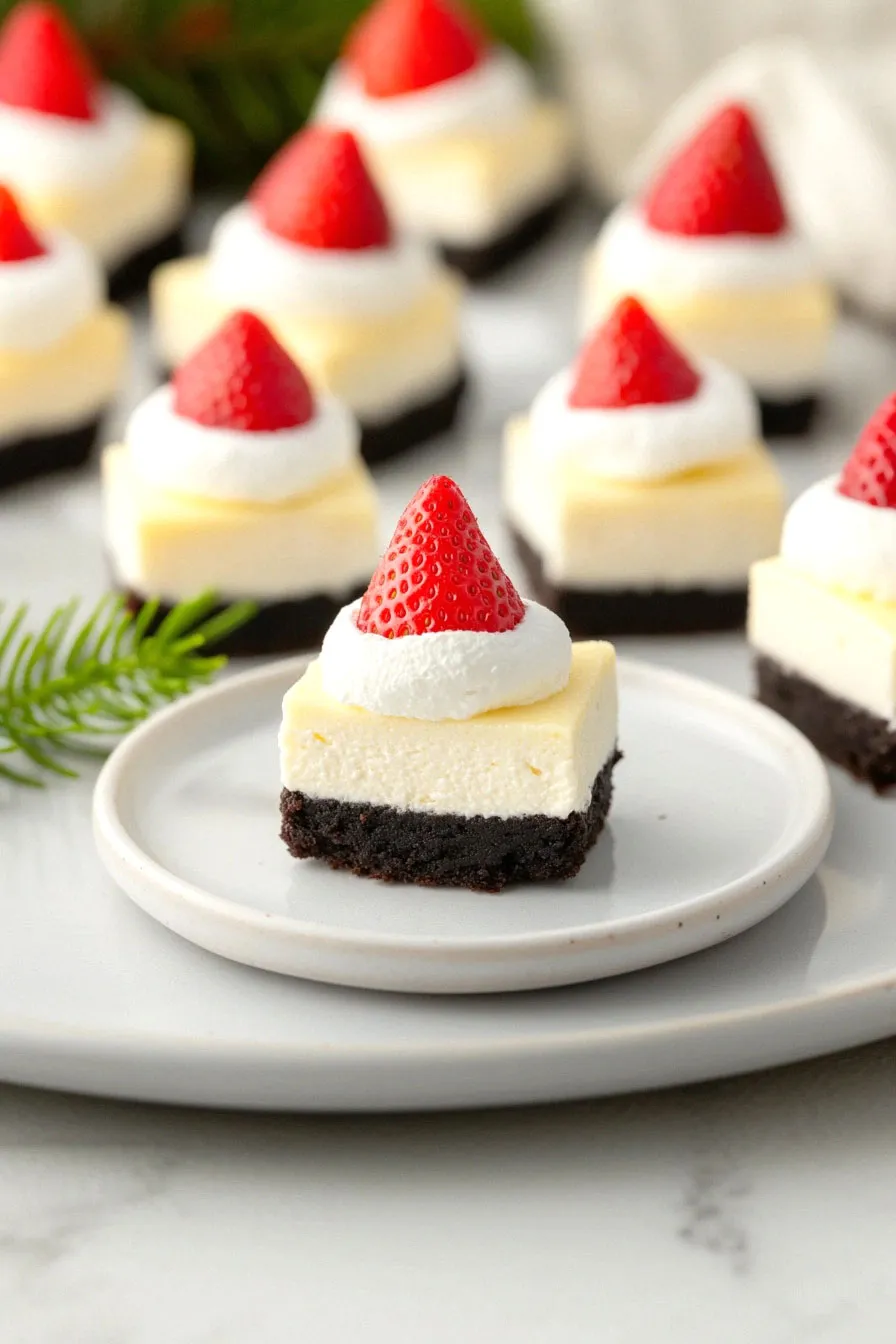
These cute little Christmas cheesecakes are perfect with a warm beverage to create that cozy holiday feeling! A cup of hot chocolate topped with whipped cream makes for an extra-festive pairing, while coffee or tea can help balance out the sweetness. Since these mini desserts are rich and creamy, I like to serve them with some fresh berries on the side – raspberries and blueberries work great alongside the strawberry topping. If you’re setting up a holiday dessert table, you might want to add some candy canes or chocolate-covered nuts nearby for guests to nibble on between bites of cheesecake.
Storage Instructions
Keep Fresh: These adorable mini cheesecakes will stay good in an airtight container in the fridge for up to 3 days. I recommend waiting to add the strawberry ‘hats’ until just before serving – this keeps the strawberries fresh and prevents them from making the cheesecakes wet.
Freeze: You can freeze the plain cheesecake bases (without the Santa hat decoration) for up to 2 months. Just wrap them individually in plastic wrap and place in a freezer-safe container. When you’re ready to serve, thaw them overnight in the fridge and add the fresh decorations.
Make Ahead: Want to get ahead for your holiday party? Make the cheesecake bases up to 2 days before. Keep them in the fridge, then decorate with the whipped cream and strawberries about an hour before serving. This makes holiday entertaining so much easier!
| Preparation Time | 30-40 minutes |
| Cooking Time | 40-55 minutes |
| Total Time | 200-360 minutes |
| Level of Difficulty | Medium |
Estimated Nutrition
Estimated nutrition for the whole recipe (without optional ingredients):
- Calories: 2500-2800
- Protein: 30-40 g
- Fat: 150-170 g
- Carbohydrates: 300-350 g
Ingredients
For the crust:
- 18 Oreo cookies (crushed into fine crumbs)
- 2 1/2 tbsp melted butter (I like Kerrygold unsalted butter for this)
For the cheesecake:
- 1 1/3 cups white chocolate morsels
- two 8 oz cream cheese (softened to room temperature)
- 1/3 cup heavy cream
- 2 large eggs
- 1/4 cup plus 2 tbsp granulated sugar
- 1/2 tsp vanilla extract (for best flavor and aroma)
For the topping:
- 1/2 cup heavy cream (makes it extra creamy and rich)
- 25 small fresh strawberries
- 2 tbsp confectioners’ sugar
Step 1: Prepare the Baking Dish
Preheat your oven to 325 degrees Fahrenheit.
Line an 8 by 8-inch baking dish with two large sheets of tinfoil, placing one sheet horizontally and the other vertically.
Ensure the sheets are long enough to provide an overhang over the edges of the pan.
Mold the foil snugly into the dish, then brush it with 1/2 tablespoon of melted butter to prevent sticking.
Step 2: Make the Oreo Crust
In a mixing bowl, use a fork to blend together crushed Oreos with 2 tablespoons of melted butter until the mixture is even and well-moistened.
Firmly press this mixture into the bottom of the prepared baking dish.
Using the bottom of a flat measuring cup or glass can help to press the crust evenly and cleanly.
Set the dish aside.
Step 3: Prepare the Cheesecake Filling
In a large mixing bowl, use an electric hand mixer on medium-low speed to blend together cream cheese and granulated sugar until the mixture is smooth, which should take about 30 seconds.
Add the eggs and vanilla extract, mixing until well combined.
Step 4: Melt White Chocolate and Combine
In a separate microwave-safe bowl, heat white chocolate chips with 1/3 cup of heavy cream at 50% power.
Use 30-second intervals, stirring after each, until the white chocolate is melted and smooth.
Pour this melted mixture into the cream cheese mixture and blend on low speed until combined.
Tap the bowl on the countertop around 30 times to release air bubbles.
Pour the mixture over the prepared Oreo crust in the baking dish.
Step 5: Bake and Chill the Cheesecake
Bake the cheesecake in the preheated oven for 40 minutes.
After baking, turn off the oven and allow the cheesecake to rest inside the warm oven without opening the door for 15 minutes.
Remove the cheesecake and let it cool at room temperature for 30 minutes.
Cover with plastic wrap and either freeze for 3 hours or refrigerate for 6 hours to set.
Step 6: Assemble and Serve
Once chilled and set, use the foil overhang to lift the cheesecake out of the pan.
Cut the cheesecake into squares slightly larger than the width of your strawberries, cleaning the knife with paper towels as needed.
In a mixing bowl, whip the remaining 1/2 cup of heavy cream on high speed with an electric mixer until soft peaks form.
Add powdered sugar and mix until stiff peaks form.
Top each cheesecake square with a strawberry, then pipe sweetened whipped cream around each strawberry and a small amount on top to resemble a “hat”.
Serve immediately or prepare the cheesecake a day ahead and assemble within an hour of serving.
Store leftovers in an airtight container in the refrigerator.
