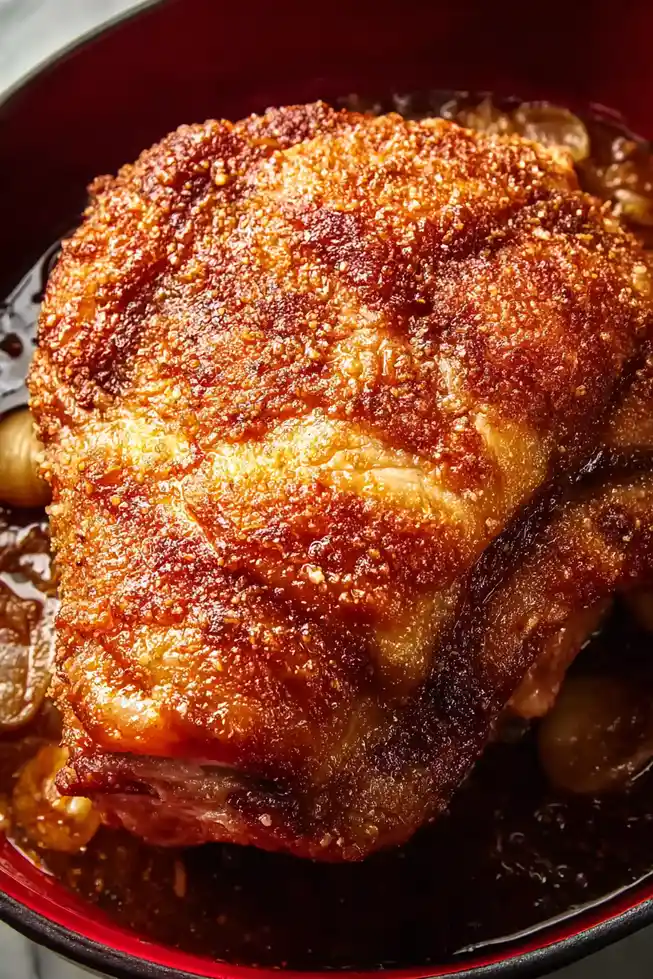
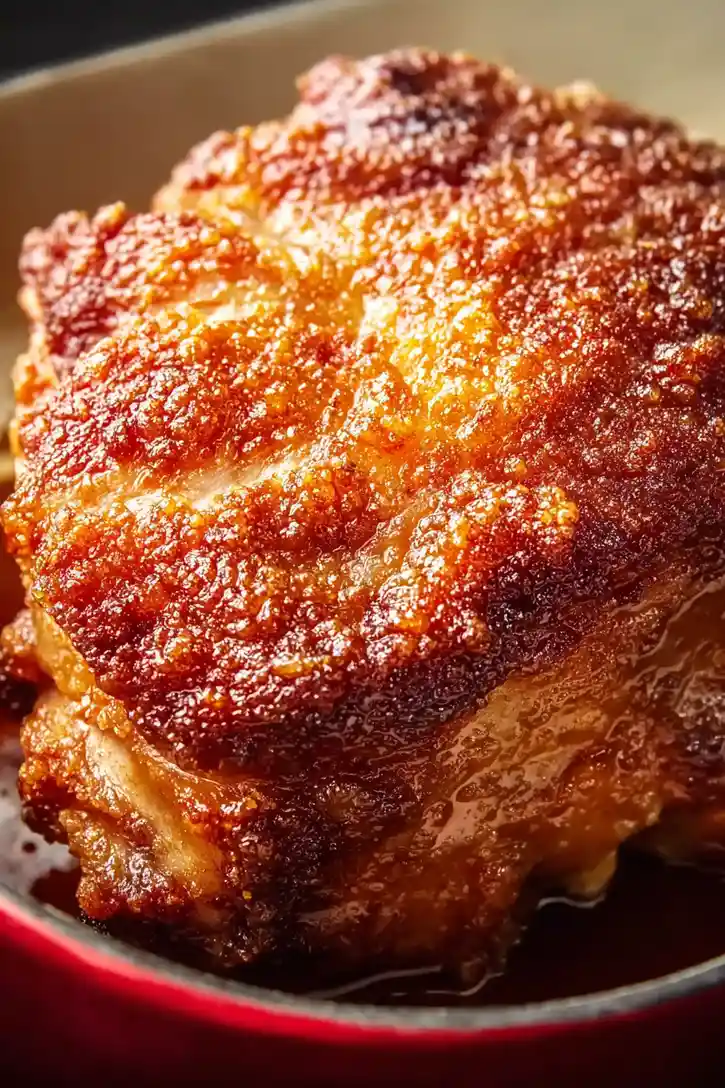
Here’s my go-to recipe for a juicy pork shoulder roast with perfectly crispy crackling that never fails to impress. The meat turns out tender and flavorful, while the outer layer becomes wonderfully crunchy – just the way crackling should be.
This pork roast has become our Sunday dinner tradition, and I always make extra because everyone fights over the crispy skin. Plus, the leftovers make the best sandwiches the next day – if there are any leftovers at all!
Why You’ll Love This Pork Roast
- Perfect crackling – The cooking method ensures you’ll get that satisfying, crispy crackling on top while keeping the meat underneath tender and juicy.
- Foolproof recipe – With clear instructions and basic ingredients, this recipe takes the guesswork out of making a restaurant-quality roast at home.
- Great for entertaining – This impressive centerpiece feeds a crowd and comes with its own delicious gravy made from the pan drippings.
- Make-ahead friendly – You can prep the pork the day before, and while it takes time to cook, most of it is hands-off time in the oven.
- Value for money – Pork shoulder is an economical cut that becomes incredibly tender when cooked this way, giving you a luxurious meal without the premium price tag.
What Kind of Pork Shoulder Should I Use?
For the best roast with crackling, look for a pork shoulder (sometimes called pork butt or Boston butt) that has a good layer of fat and skin left on top. You’ll want to choose a piece that’s pinkish-red in color with some marbling throughout the meat – this fat running through the meat helps keep it moist during the long cooking time. Fresh pork shoulder from your local butcher is ideal, but if you’re buying from the supermarket, check that the meat isn’t too wet or sitting in liquid in the package. Make sure to ask for the skin-on version, as the skin is essential for achieving that crispy crackling everyone loves. When you get it home, pat the skin dry with paper towels and let it sit uncovered in the fridge overnight – this helps dry out the skin, which is key for getting that perfect crack.
Options for Substitutions
Let’s talk about what you can swap in this roast recipe while still getting great results:
- Pork shoulder: The pork shoulder (also called pork butt) with skin is key for crackling – this isn’t one you can substitute if you want that crispy top. However, if you don’t care about crackling, you could use a skinless shoulder or boston butt.
- Kosher salt: While the recipe specifically calls for kosher or cooking salt, if you only have table salt, use about half the amount since it’s more concentrated.
- Fennel seeds: Not a fennel fan? Try rosemary, thyme, caraway seeds, or even a mix of dried Italian herbs. Each will give the roast its own special character.
- White wine: Don’t want to use wine? Apple cider, hard cider, or even chicken stock with a splash of apple cider vinegar will work great. Just make sure to use something with a bit of acidity to help tenderize the meat.
- Chicken broth: You can swap this with vegetable broth or even water mixed with a chicken bouillon cube. If using regular (not low-sodium) broth, just be careful with adding extra salt.
- All-purpose flour: For thickening the gravy, you can use cornstarch (mix 2 tablespoons with cold water) or instant gravy granules instead of flour.
Watch Out for These Mistakes While Roasting
The biggest mistake when making pork shoulder roast is not drying the skin thoroughly before cooking – pat it completely dry with paper towels and leave it uncovered in the fridge overnight to ensure perfectly crispy crackling. Getting the temperature right is crucial too: start with high heat (440°F/220°C) for the first 30 minutes to create the crackling, then lower it to 320°F/160°C for the remaining cooking time to avoid burning the outside while leaving the inside undercooked. Another common error is not letting the meat rest for at least 30 minutes after cooking – rushing to carve it will cause all those flavorful juices to run out, leaving you with dry meat. For the best results, check the internal temperature with a meat thermometer (it should reach 195°F/90°C for pull-apart tender meat) and resist the urge to baste the skin during cooking, as this will make the crackling chewy instead of crispy.
What to Serve With Pork Roast?
This juicy pork roast with its crispy crackling calls for some classic comfort food sides that’ll soak up all those tasty pan juices. Creamy mashed potatoes are my go-to choice – they’re perfect for catching every bit of gravy and complementing the rich meat. I also love adding some green veggies like roasted Brussels sprouts, steamed broccoli, or sautéed green beans to balance out the meal. For a bit of sweetness that pairs really well with pork, try serving some homemade applesauce or roasted root vegetables like carrots and parsnips alongside your roast. If you’re feeding a crowd, some warm dinner rolls are great for mopping up any extra gravy.
Storage Instructions
Keep Fresh: Let your pork roast cool down completely, then place it in an airtight container in the fridge. It’ll stay good for up to 4 days. Pro tip: store the gravy separately in its own container – this makes reheating much easier and helps keep the crackling crispy!
Freeze: This roast freezes really well for up to 3 months. Wrap the meat tightly in plastic wrap or foil, then pop it in a freezer bag. The crackling won’t stay crispy after freezing, but the meat will still be super tender. I like to freeze the gravy separately in a freezer-safe container.
Reheat: To bring back that delicious warmth, place the meat in a baking dish, add a splash of broth or water, cover with foil, and heat in a 325°F oven until warm through (about 20-30 minutes). For the crackling, pop it under the broiler for a few minutes to crisp up again. Heat the gravy separately on the stovetop, stirring occasionally.
| Preparation Time | 15-30 minutes |
| Cooking Time | 150-180 minutes |
| Total Time | 165-210 minutes |
| Level of Difficulty | Medium |
Estimated Nutrition
Estimated nutrition for the whole recipe (without optional ingredients):
- Calories: 4500-5000
- Protein: 350-400 g
- Fat: 300-350 g
- Carbohydrates: 150-200 g
Ingredients
For the pork:
- 5 tsp olive oil
- 6 lb boneless pork shoulder (skin on preferred for crackling)
- 1 1/4 tsp black pepper
- 3 tsp kosher salt (Diamond Crystal recommended for curing)
- 2 tsp fennel seeds (lightly crushed for more aroma)
For the roasting bed:
- 1 garlic bulb (halved horizontally)
- 2 onions (large, roughly chopped)
For the gravy:
- 2 cups dry white wine (like Sauvignon Blanc) or cider
- 1/4 cup all-purpose flour
- black pepper to taste
- salt to taste
- 2 cups low-sodium chicken broth
Step 1: Prepare and Season the Pork
Start by patting the pork skin dry with paper towels.
For optimal results, leave the pork uncovered in the fridge overnight to dry out.
If time doesn’t permit, just ensure it’s patted extra well.
Preheat your oven to 220°C/430°F (200°C fan).
Season the flesh of the pork by sprinkling it with 1 1/2 teaspoons of salt, all of the pepper, and all fennel seeds.
Add 1 tablespoon of olive oil and rub the mixture thoroughly into the flesh, ensuring it gets into all crevices and cracks.
Step 2: Salt the Skin and Prepare the Roasting Bed
Flip the pork so the skin side is facing up.
Drizzle 1 teaspoon of oil over the skin and rub it all over evenly with your fingers.
Sprinkle the remaining 1 1/2 teaspoons of salt over the skin, ensuring even coverage to achieve a bubbly crackling.
In a roasting pan, place halved garlic bulbs and onion halves as a bed, then position the pork skin side up on top of them.
Step 3: Begin the Roasting Process
Carefully pour wine into the roasting pan, ensuring the skin remains dry.
Transfer the pan to the preheated oven and immediately reduce the oven temperature to 160°C/320°F (140°C fan).
Slow roast the pork for 2 1/2 hours.
Check after 1 1/2 hours to ensure the pork is level and adjust if necessary by using balls of foil to support it.
Step 4: Final Roasting and Crispen the Skin
If the pan is drying out, add some water to prevent burning.
If there are areas on the skin without salt, lightly spray or brush with oil and sprinkle with salt.
Increase the oven temperature to 250°C/485°F (or as high as your oven will go).
Return the pork to the oven and roast for another 30 minutes, rotating the pan as needed, until the skin becomes crisp and bubbly all over.
Use foil to cover any areas that have finished crisping while allowing unfinished areas to continue.
Step 5: Rest and Prepare Gravy
Transfer the pork to a serving platter and tent loosely with foil to rest for 20 minutes.
Skim 3 tablespoons of fat from the roasting pan to a saucepan.
Strain remaining pan juices into a bowl, press out the juices, and discard onion and garlic.
Discard excess fat from the surface.
In the saucepan, heat the fat over medium heat, add flour, and cook for 1 minute to form a roux.
Gradually whisk in the stock and strained pan juices until there are no lumps.
Simmer until the gravy thickens.
Season with salt and pepper as desired.
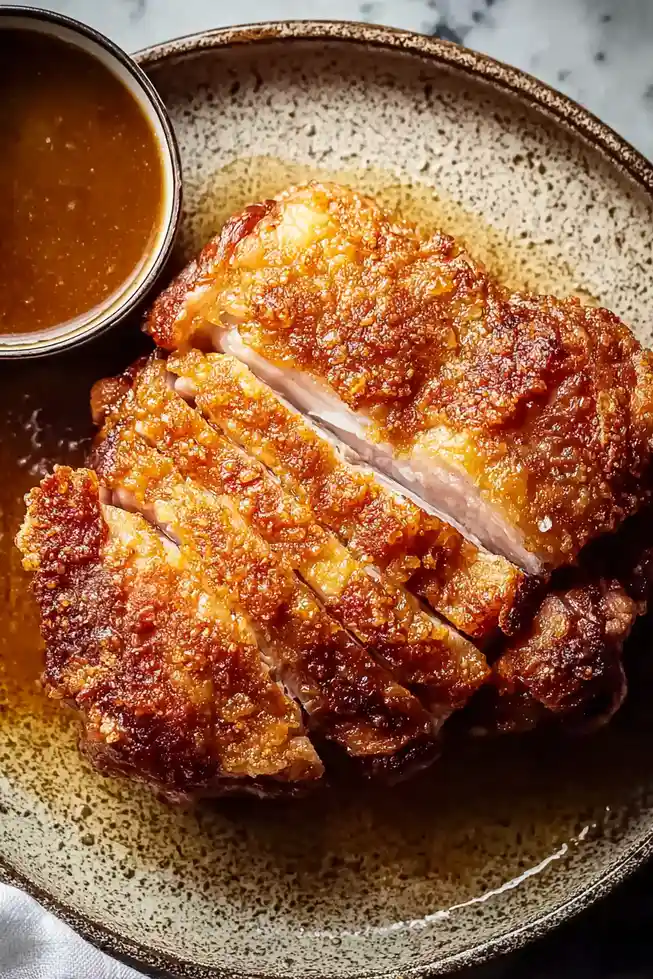
Step 6: Serve and Enjoy
Slice the rested pork with a serrated knife.
Serve the crispy pork with the homemade gravy on the side.
Remember, do not pour gravy over the crackling to maintain its texture.
Enjoy your deliciously roasted pork with your desired sides!
