There’s something about homemade bread that makes the whole house feel cozy. The smell alone gets everyone asking what’s baking. But let’s be honest – I don’t always have time to knead dough and wait for it to rise twice. That’s where quick breads come to the rescue.
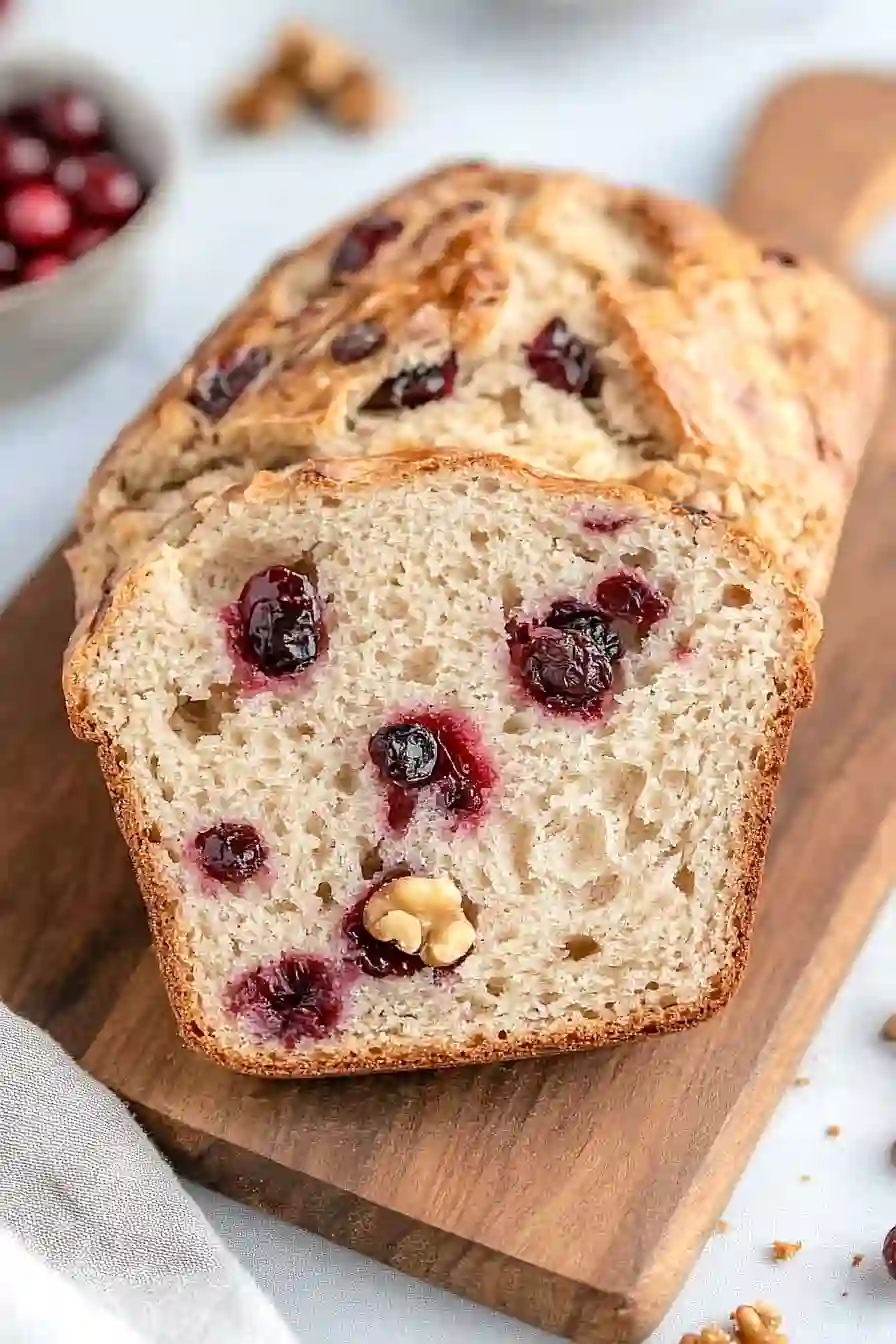
Cranberry walnut bread is my go-to when I want that fresh-baked feeling without all the work. It comes together in one bowl, and there’s no waiting around for yeast to do its thing. Just mix, pour, and bake. The tart cranberries and crunchy walnuts make it feel fancy enough for company, but easy enough for a Tuesday morning.
I like to make two loaves at once. One for us to enjoy right away, and one to wrap up and stick in the freezer. Trust me, future you will thank you for having homemade bread ready to go.

Why You’ll Love This Cranberry Walnut Bread
- No-knead method – This bread requires zero kneading, making it perfect for beginners or anyone who wants homemade bread without the arm workout.
- Minimal hands-on time – Despite the long rise time, you’ll only spend about 5 minutes actually working with the dough – the rest is just waiting while it does its magic.
- Simple pantry ingredients – You probably already have most of these basic ingredients at home, with just cranberries and walnuts to pick up at the store.
- Perfect sweet and nutty flavor – The tart cranberries and crunchy walnuts create a delicious contrast in every bite, while the honey adds just the right touch of sweetness.
- Impressive homemade bread – This rustic artisan-style loaf looks and tastes like it came from a fancy bakery, but it’s surprisingly easy to make at home.
What Kind of Flour Should I Use?
All-purpose flour is perfect for this cranberry walnut bread recipe and gives you that classic homemade bread texture we’re all after. You can use either bleached or unbleached all-purpose flour – both will work great, though unbleached tends to have a slightly nuttier flavor that pairs nicely with the walnuts. If you only have bread flour on hand, that’ll work too, but your bread might turn out a bit chewier than expected. For the best results, make sure to measure your flour properly by spooning it into your measuring cup and leveling it off, since too much flour can make your bread dense and heavy.

Options for Substitutions
This bread recipe is pretty forgiving when it comes to making swaps:
- All-purpose flour: You can substitute up to half the all-purpose flour with whole wheat flour for a nuttier flavor, but the bread will be denser. Bread flour also works great and will give you a chewier texture.
- Rapid-rise yeast: Regular active dry yeast works just fine – use the same amount. If using active dry yeast, you might want to proof it first in a bit of warm water with a pinch of sugar to make sure it’s active.
- Honey: Maple syrup, brown sugar, or even regular sugar can replace the honey. If using granulated sugar, use about 1 ½ tablespoons instead of 2 tablespoons honey.
- Dried cranberries: Feel free to swap these with other dried fruits like raisins, chopped dried apricots, or dried cherries. Fresh cranberries work too, but toss them in a bit of flour first to prevent sinking.
- Walnuts: Pecans, almonds, or hazelnuts make great substitutes. You can also leave the nuts out entirely if you prefer a nut-free version or have allergies.
Watch Out for These Mistakes While Baking
The biggest mistake when making no-knead bread is adding too much flour during the folding process, which can make your loaf dense and heavy – the dough should feel sticky and wet, so resist the urge to keep adding flour.
Another common error is not letting the dough rise long enough for the first fermentation, as this bread needs at least 12-18 hours at room temperature to develop proper flavor and texture.
To prevent your cranberries and walnuts from sinking to the bottom, fold them in gently during the final shaping stage rather than mixing them in at the beginning, and make sure your oven is fully preheated with the Dutch oven inside for at least 30 minutes before baking.
Finally, don’t skip the parchment paper when transferring the dough – it makes the whole process much easier and prevents sticking.
What to Serve With Cranberry Walnut Bread?
This cranberry walnut bread is perfect for breakfast or brunch with a generous spread of cream cheese or butter – the tangy cranberries and crunchy walnuts make every bite so satisfying. I love serving it alongside a cheese board with soft cheeses like brie or goat cheese, since the sweet and nutty flavors pair beautifully with creamy cheese. For a cozy afternoon snack, try toasting a slice and topping it with a drizzle of honey or your favorite jam. It also makes a great addition to holiday meals, served warm with soup or as part of a bread basket.
Storage Instructions
Keep Fresh: This cranberry walnut bread stays fresh for about 3-4 days when wrapped in a clean kitchen towel or stored in a bread box at room temperature. The crust might soften a bit, but that’s totally normal! If you want to crisp it back up, just pop it in a 350°F oven for 5-10 minutes.
Freeze: I love slicing this bread and freezing individual pieces wrapped in plastic wrap, then storing them all in a freezer bag. They’ll keep for up to 3 months this way, and you can just grab a slice or two whenever you want some without thawing the whole loaf.
Enjoy: Frozen slices thaw quickly at room temperature in about 15-20 minutes, or you can toast them straight from frozen. The cranberries and walnuts taste just as good after freezing, so don’t worry about losing any of that great texture and flavor!
| Preparation Time | 15-20 minutes |
| Cooking Time | 45 minutes |
| Total Time | 18 hours 1-5 minutes |
| Level of Difficulty | Medium |
Estimated Nutrition
Estimated nutrition for the whole recipe (without optional ingredients):
- Calories: 2100-2300
- Protein: 40-48 g
- Fat: 32-38 g
- Carbohydrates: 430-460 g
Ingredients
- 1/2 cup walnut pieces
- 2 tbsp honey
- 1 1/2 cups water
- 1 tsp instant yeast (fast-acting for quicker rise)
- 1 tsp kosher salt
- 3 cups all-purpose flour (I always use King Arthur all-purpose flour)
- 1 cup dried cranberries (sweetened is fine, or choose unsweetened for less sugar)
Step 1: Combine the Dry Ingredients
- 3 cups all-purpose flour
- 1 tsp kosher salt
- 1 tsp instant yeast
In a large mixing bowl, whisk together the all-purpose flour, kosher salt, and instant yeast until thoroughly combined.
This helps distribute the yeast and salt evenly for a consistent rise.
Step 2: Mix Wet Ingredients and Form Dough
- 1 1/2 cups water (room temperature)
- 2 tbsp honey
- 1 cup dried cranberries
- 1/2 cup walnut pieces
Add the room-temperature water and honey to the flour mixture.
Stir with a spatula or wooden spoon until all the flour is hydrated and a sticky dough forms.
Fold in the dried cranberries and walnut pieces, mixing until they’re evenly distributed throughout the dough.
Step 3: First Rise
Transfer the dough to a clean, greased bowl.
Cover the bowl tightly with plastic wrap and let the dough rise at room temperature for 18 hours.
The dough should double in size and look bubbly.
If you need a quicker rise, you can let it rest in a warm spot for about 6-8 hours, but longer fermentation develops better flavor—I always let mine go overnight if possible.
Step 4: Shape and Second Rest
After the first rise, turn the dough onto a floured piece of parchment paper.
With floured hands, gently shape the dough into a ball by lifting and folding the edges towards the center.
Spray the surface of the dough lightly with nonstick cooking spray and cover it loosely with plastic wrap.
Let it rest for 30 minutes, which helps it relax and makes scoring easier.
Step 5: Score the Dough
Using a sharp knife or bread lame, carefully score the top of the dough with an ‘X’ to allow the loaf to expand while baking.
This step not only improves the look of your bread, but also helps with oven spring.
Step 6: Preheat Dutch Oven and Bake
Place a Dutch oven (about 4 quarts) into a cold oven, then preheat both the oven and the pot to 450°F.
Once preheated, carefully transfer the dough with the parchment paper into the hot Dutch oven.
Cover with the lid and bake for 30 minutes.
After this initial bake, remove the lid and continue baking for another 15 minutes, or until the crust is deep golden brown.
For extra crunch, I sometimes remove the bread from the Dutch oven and let it bake directly on the oven rack for the last 5 minutes.
Step 7: Cool and Serve
Carefully remove the bread from the Dutch oven and let it cool on a wire rack for at least 30 minutes before slicing.
Allowing the bread to cool completely keeps the interior moist and prevents it from becoming gummy.
Slice and serve as desired.
