Finding a dessert that captures the essence of late summer can feel like a balancing act. Between managing work deadlines and getting the kids ready for back-to-school, who has time to spend hours in the kitchen baking elaborate treats? That’s where this nectarine crisp comes to the rescue – it’s the kind of dessert that lets the fruit shine without requiring professional baking skills or a long list of fancy ingredients. With just a few pantry staples and those perfectly ripe nectarines sitting on your counter, you can have a warm, comforting dessert that’s as easy to make as it is to share with family and friends.

Why You’ll Love This Nectarine Crisp
- Simple ingredients – You probably have most of these pantry staples on hand already – just grab some fresh nectarines and you’re ready to bake!
- Easy preparation – This dessert comes together with just basic mixing and layering – no fancy techniques or special equipment needed.
- Perfect summer dessert – When nectarines are in season and perfectly ripe, this crisp lets their natural sweetness shine while adding an irresistible buttery oat topping.
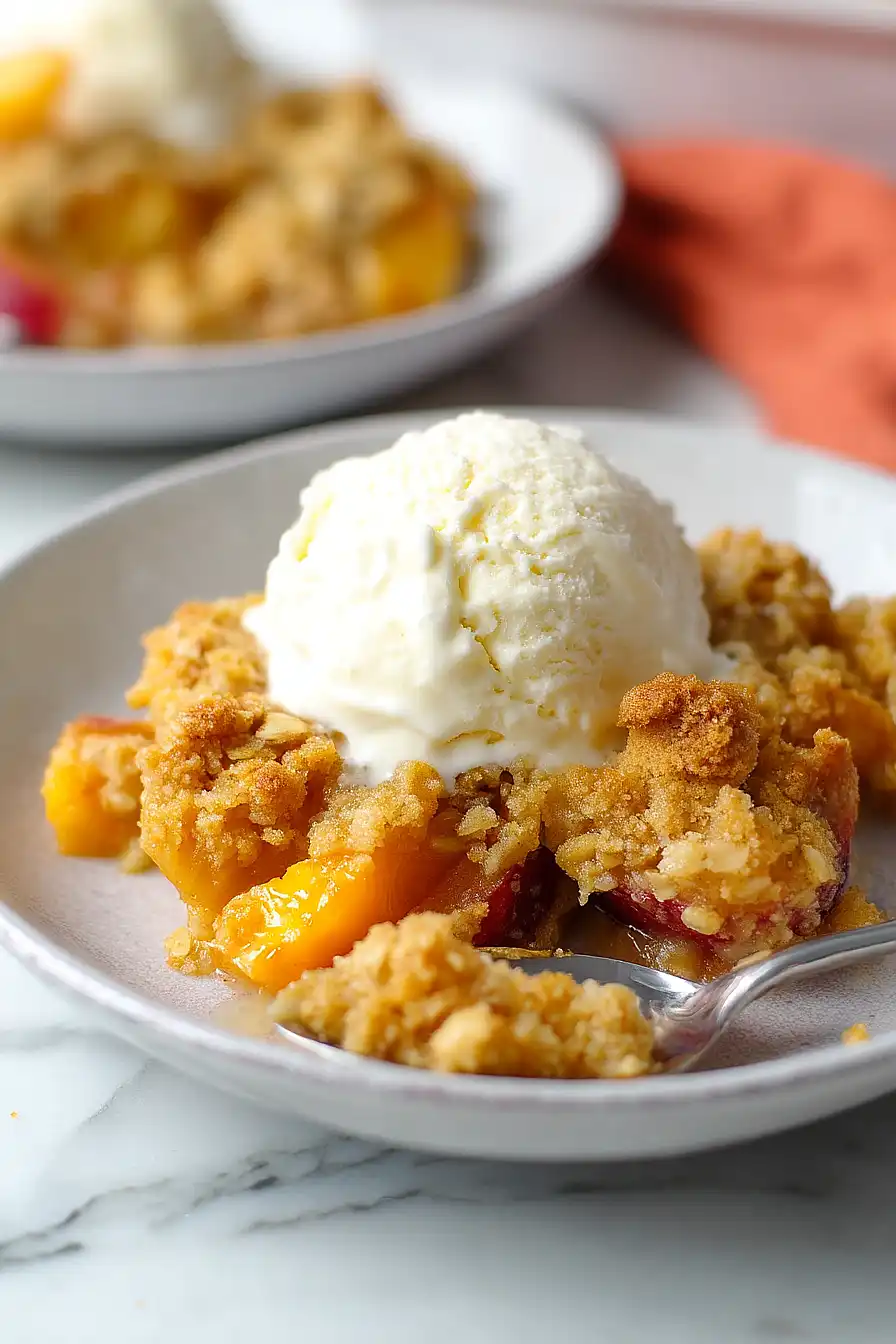
- Versatile serving options – Enjoy it warm with vanilla ice cream, at room temperature for breakfast, or cold straight from the fridge – it’s delicious any way you serve it.
What Kind of Nectarines Should I Use?
For a nectarine crisp, you’ll want to pick fruit that’s ripe but still firm enough to hold its shape when baked. When shopping, look for nectarines that give slightly when gently pressed and have a sweet, fruity smell at the stem end. Both yellow and white nectarines work great in this recipe – yellow ones tend to be more tart and tangy, while white nectarines offer a milder, sweeter flavor. Just make sure to avoid any fruit that’s too soft or has bruised spots, as these won’t hold up well during baking.
Options for Substitutions
This fruit crisp recipe is pretty adaptable and here are some easy swaps you can make:
- Nectarines: You can easily swap nectarines with peaches, plums, or even a mix of stone fruits. Apples or pears work great too – just make sure to slice them thinly since they take longer to soften.
- Old fashioned oats: Quick oats can work in a pinch, though the texture won’t be quite as nice. Don’t use instant oats as they’ll get too mushy. You could also replace oats with chopped nuts if you prefer.
- Cornstarch: All-purpose flour works as a thickener too – just use 3 tablespoons instead of 2. Tapioca starch is another good option, use the same amount as cornstarch.
- Brown sugar: White sugar plus a tablespoon of molasses works instead of brown sugar. You can also use coconut sugar for a slightly different flavor.
- Butter: For a dairy-free version, use coconut oil or a plant-based butter substitute. Just make sure it’s melted and cooled slightly before mixing.
- Lemon juice: Orange juice or lime juice will work too. You mainly need some citrus to prevent the fruit from browning and add a bit of tang.
Watch Out for These Mistakes While Baking
The biggest challenge when making a nectarine crisp is ending up with a soupy filling – to prevent this, make sure to thoroughly coat your fruit with cornstarch and let it sit for 5-10 minutes before adding to your baking dish. Another common mistake is creating a topping that’s too dense or floury – the key is to mix the dry ingredients first, then drizzle in the melted butter gradually while using your fingers to create those perfect crumbly clusters. To avoid a burnt or underdone topping, keep an eye on the color during the last 10 minutes of baking – it should be golden brown, not dark brown, and if it’s browning too quickly, simply cover with foil while the filling finishes cooking. For the best texture, let your crisp cool for at least 20 minutes after baking, as this allows the filling to thicken and the topping to become perfectly crunchy.
What to Serve With Nectarine Crisp?
This warm, fruity dessert practically begs for a scoop of vanilla ice cream on top – the way it melts into all those sweet nectarines and buttery crumble is just perfect! If you’re not in an ice cream mood, try a dollop of freshly whipped cream or even a spoonful of Greek yogurt for a tangy twist. I love serving this dessert right from the oven while it’s still warm, but it’s also really good at room temperature with your morning coffee (I won’t tell if you eat it for breakfast!). For an extra special touch, drizzle some caramel sauce over the top or add a sprinkle of toasted sliced almonds for some crunch.
Storage Instructions
Keep Fresh: Once your nectarine crisp has cooled down, cover it with plastic wrap or aluminum foil and pop it in the fridge. It’ll stay good for about 4-5 days, though the topping might lose some of its crunch over time. The flavors actually get even better after a day as everything melds together!
Freeze: This crisp freezes really well! Let it cool completely, then wrap it tightly in plastic wrap and aluminum foil. It can hang out in your freezer for up to 3 months. Just remember that the topping might not be quite as crispy when thawed.
Warm Up: When you’re ready to dig in, warm individual portions in the microwave for about 30-45 seconds. For the best texture, you can also pop it in a 350°F oven for about 15 minutes – this helps bring back some of that lovely crunch in the topping. A scoop of vanilla ice cream on top of the warm crisp is absolutely perfect!
| Preparation Time | 15-20 minutes |
| Cooking Time | 40-45 minutes |
| Total Time | 55-65 minutes |
| Level of Difficulty | Easy |
Estimated Nutrition
Estimated nutrition for the whole recipe (without optional ingredients):
- Calories: 1800-2000
- Protein: 15-20 g
- Fat: 80-90 g
- Carbohydrates: 300-320 g
Ingredients
For the fruit filling:
- 4 medium nectarines
- 2 tbsp cornstarch
- 1 tsp vanilla extract (I use Nielsen-Massey for best flavor)
- 2 tbsp lemon juice
- 2/3 cup granulated sugar
For the oat topping:
- 2/3 cup rolled oats (quick-cooking or old-fashioned work well)
- 1/2 tsp salt
- 2/3 cup all-purpose flour
- 2/3 cup brown sugar (packed well for accurate measure)
- 1/2 tsp ground cinnamon
- 1/2 cup unsalted butter (melted and cooled slightly)
Step 1: Preheat the Oven and Prepare Pan
Preheat your oven to 350˚F (175˚C).
Lightly spray a 9×9 inch square baking pan with cooking spray to ensure easy removal after baking, then set the pan aside.
Step 2: Make the Nectarine Filling
- 4 medium nectarines, pitted and sliced
- 2 tbsp freshly squeezed lemon juice
- 2/3 cup granulated sugar
- 2 tbsp cornstarch
- 1 tsp vanilla extract
In a large bowl, combine the sliced nectarines, freshly squeezed lemon juice, granulated sugar, cornstarch, and vanilla extract.
Mix well until the nectarines are evenly coated and the mixture is well combined.
Pour the filling into the prepared baking pan, spreading it out evenly.
Step 3: Prepare and Add the Topping
In a medium bowl, mix together all of the topping ingredients until fully combined.
(Note: The original recipe is missing the specific topping ingredients, but in most crisp or crumble recipes, you would typically use ingredients like flour, butter, oats, and brown sugar here.) Evenly spread the topping mixture over the nectarine filling.
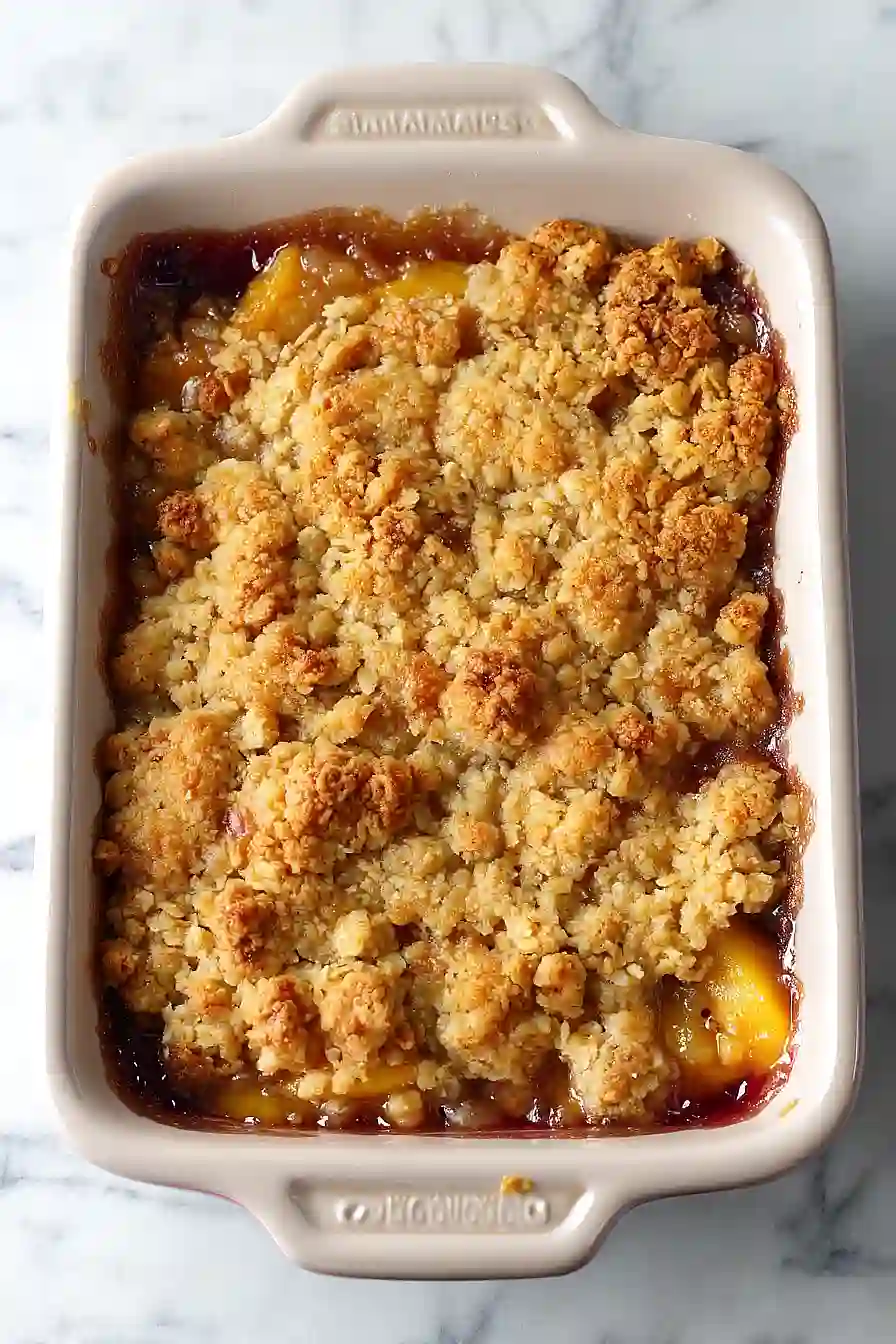
Step 4: Bake and Cool
Bake the assembled crisp in the preheated oven for 40-45 minutes, or until the top is golden brown and the filling is bubbling.
Remove the baking pan from the oven and allow the crisp to cool for at least 20 minutes before serving.
I like to serve this warm, sometimes with a scoop of vanilla ice cream for extra indulgence!
